Vascular Integration in 3D Bioprinting: Strategies for Connecting Engineered Tissues to the Host Circulatory System
This article provides a comprehensive analysis of the strategies and challenges in achieving functional integration between bioprinted tissues and the host vasculature—a critical hurdle in regenerative medicine.
Vascular Integration in 3D Bioprinting: Strategies for Connecting Engineered Tissues to the Host Circulatory System
Abstract
This article provides a comprehensive analysis of the strategies and challenges in achieving functional integration between bioprinted tissues and the host vasculature—a critical hurdle in regenerative medicine. It explores the foundational biology of vascular networks, details advanced bioprinting methodologies for creating hierarchical vasculature, and addresses key optimization challenges such as immune response and structural stability. Furthermore, it evaluates current validation techniques and comparative performance of different approaches, offering researchers and drug development professionals a roadmap for advancing tissue constructs from the laboratory to clinical applications.
The Biological Blueprint: Understanding Native Vasculature and Integration Fundamentals
The Critical Role of Vascularization in Tissue Survival and Function
Frequently Asked Questions (FAQs)
1. Why is vascularization critical for 3D-bioprinted tissues? Vascularization is essential for delivering oxygen and nutrients and removing waste products. In the absence of blood perfusion, simple diffusion can only support cells within 100–200 µm from a nutrient source. Constructs larger than a few hundred microns quickly develop necrotic cores if not vascularized, which limits the engineering of thick, functional tissues [1].
2. What are the primary bioprinting methods for creating vascular networks? Several advanced bioprinting modalities enable the fabrication of vascular structures:
- Sacrificial Writing: A fugitive material is printed as a vascular template and later dissolved, leaving behind perfusable channels [1].
- Coaxial Extrusion: Uses concentric nozzles to directly print tubular, vessel-like structures in a single step [1].
- Freeform Reversible Embedding of Suspended Hydrogels (FRESH): Prints bioink within a temporary gel support bath, allowing the creation of complex, branching vessels that are held in place until cured [1].
- Rotating Mandrel Method: A scaffold-free approach where bioink is deposited onto a rotating rod to create the tubular structure of a blood vessel [2].
3. Our bioprinted constructs have low cell viability. What are the common causes? Low cell viability can stem from multiple factors related to the bioprinting process and subsequent culture conditions [3] [4]:
- Shear Stress: During extrusion-based bioprinting, cells experience shear stress from high print pressure, small nozzle diameters, or high bioink viscosity, leading to cell damage [5] [4].
- Needle Clogging: Using a bioink with particle sizes larger than the needle gauge or inhomogeneous mixing can cause clogs, requiring higher, more damaging pressures to extrude [6].
- Structural Collapse: If the bioink has insufficient viscosity or crosslinking time, 3D structures may merge or collapse, compromising internal nutrient diffusion [6].
- Contamination: A non-sterile environment during bioink preparation or printing can lead to cell death [6].
4. How can we improve integration between bioprinted vasculature and the host's blood vessels? Promising strategies focus on encouraging host vessels to infiltrate and connect with the bioprinted network. Microfluidic perfusion of bioprinted channels immediately after printing provides endothelial cells with essential shear stress cues. This promotes the formation of a stable, mature endothelium with strong cell-cell junctions and anti-thrombogenic properties, which is critical for seamless integration and long-term patency upon implantation [1].
Troubleshooting Guides
Guide 1: Addressing Low Cell Viability in Bioprinted Constructs
| Problem Area | Specific Issue | Potential Solution | Reference |
|---|---|---|---|
| Bioprinting Process | High shear stress during extrusion | - Use a larger needle diameter or a tapered tip.- Optimize and reduce the print pressure.- Slow down the print speed.- Use bioinks with shear-thinning properties. | [5] [3] [6] |
| Needle clogging | - Ensure bioink homogeneity and avoid particle agglomeration.- Use a needle with a larger gauge.- For persistent clogs, dissolve residual polymer with an appropriate solvent. | [6] | |
| Bioink & Crosslinking | Lack of 3D structure; layers merge | - Increase bioink viscosity through formulation.- Optimize and increase crosslinking time for the bottom layer before printing the next. | [6] |
| Harsh crosslinking methods | - Explore alternative, gentler crosslinking mechanisms (e.g., ionic, enzymatic).- For photocrosslinking, optimize UV wavelength and exposure time. | [3] | |
| Post-Printing Culture | Necrotic core in thick constructs | - Incorporate perfusable vascular channels during the design phase.- Use dynamic culture systems (bioreactors) to provide nutrient flow. | [1] [7] |
Guide 2: Troubleshooting Vascular Network Fabrication
| Problem | Possible Reason | Solution Approach | |
|---|---|---|---|
| Printed vessels lack structural integrity | Bioink lacks sufficient mechanical strength or crosslinking is inadequate. | - Use hybrid bioinks combining natural and synthetic polymers for tunable strength.- Optimize crosslinker concentration and method (ionic, UV) for stronger gels. | [1] [6] |
| Failure to form patent (open), perfusable channels | Sacrificial ink is not fully removed or channels collapse. | - Ensure the sacrificial material is completely dissolved by the removal agent.- Use a support bath (e.g., FRESH technique) to print complex channels that resist collapse. | [1] |
| Poor endothelialization of channel walls | Endothelial cells are not properly seeded or are damaged by flow. | - Line channels with endothelial cells post-printing using low, gentle flow rates.- Use coaxial bioprinting to simultaneously create the vessel wall and an endothelial lining. | [1] [7] |
Experimental Protocols
Protocol 1: Creating a Functional 3D-Bioprinted Blood Vessel Using a Rotating Mandrel
This protocol is adapted from a recent study that successfully implanted a bioprinted aorta into a rat model [2].
1. Bioink Preparation:
- Cells: Use rat aortic fibroblasts (FCs) and smooth muscle cells (SMCs). Harvest cells at passage 10 or less upon reaching 80-90% confluence.
- Hydrogel: Use a commercial hydrogel kit such as HyStem-C, which contains hyaluronic acid, gelatin, and polyethylene glycol diacrylate (PEGDA).
- Formulation: Encapsulate the cells at a high density (e.g., 100 million cells/mL) in the crosslinked hydrogel mixture. One tested ratio is 70% SMCs and 30% FCs to mimic the vascular wall layers.
2. Bioprinting Process:
- Method: Employ a scaffold-free bioprinting approach using a rotating mandrel.
- Procedure: Load the prepared bioink into the bioprinter syringe. Extrude the bioink directly onto a rotating stainless-steel mandrel to form a tubular construct.
- Crosslinking: Allow the hydrogel to crosslink according to the manufacturer's specifications to achieve final mechanical integrity.
3. Maturation and Implantation:
- Maturation: Culture the printed vascular conduit in a bioreactor that provides physiological flow and pressure conditions to promote tissue maturation.
- Implantation: The bioprinted aortas were well-tolerated and well-incorporated into the native vasculature of rats, demonstrating physiological behavior.
Protocol 2: Incorporating Perfusable Vasculature using Sacrificial Writing
This method is widely used to create complex, branching vascular networks within bulk tissue constructs [1].
1. Material Selection:
- Sacrificial Ink: Select a fugitive material such as Pluronic F-127 or carbohydrate glass, which can be easily printed and later removed.
- Structural Bioink: Choose a biocompatible hydrogel like collagen, fibrin, or a GelMA blend that supports cell growth and can be crosslinked around the sacrificial template.
2. Printing Process:
- Co-printing: Use a bioprinter with multiple printheads. First, print the 3D network of the sacrificial ink.
- Embedding: Subsequently, encapsulate the entire sacrificial network within the cell-laden structural bioink and crosslink it.
3. Sacrificial Ink Removal:
- Dissolution: After crosslinking the structural hydrogel, cool the construct (for Pluronic F-127) or flush it with a specific solution (e.g., culture medium for carbohydrate glass) to liquefy and evacuate the sacrificial ink, leaving behind hollow, perfusable channels.
4. Endothelialization:
- Seeding: Introduce an endothelial cell suspension (e.g., HUVECs) into the channels and use a perfusion system to circulate the cells, allowing them to adhere and form a confluent endothelium.
The Scientist's Toolkit: Essential Research Reagents & Materials
| Item | Function / Application | Example in Context |
|---|---|---|
| Hyaluronic Acid-based Hydrogel (e.g., HyStem-C) | Provides a biocompatible, crosslinkable matrix that supports cell adhesion, motility, and proliferation. Used as a base for bioinks. | Served as the primary bioink material for creating implantable blood vessels in the rotating mandrel protocol [2]. |
| Polyethylene Glycol (PEG) / PEG Diacrylate (PEGDA) | A synthetic hydrogel offering tunable mechanical properties; PEGDA is photocrosslinkable for high printing fidelity. | Used in hybrid bioinks to provide mechanical strength and in sacrificial writing for structural support [1] [2]. |
| Pluronic F-127 | A thermoreversible polymer used as a sacrificial ink. It is solid at cell culture temperatures (37°C) and liquid when cooled, allowing for easy removal. | A common fugitive material printed to create the template for vascular channels, which is later cooled and evacuated [1]. |
| Gelatin Methacryloyl (GelMA) | A photocrosslinkable derivative of gelatin; combines the bioactivity of gelatin with the mechanical controllability of synthetic polymers. | Widely used as a structural bioink in extrusion-based and light-based bioprinting for vascularized tissues [8]. |
| Endothelial Cells (e.g., HUVECs) | Used to seed the lumen of fabricated channels to form a natural, non-thrombogenic endothelial lining, crucial for vascular function and integration. | Perfused through channels created by sacrificial writing or coaxial printing to form a functional endothelium [1]. |
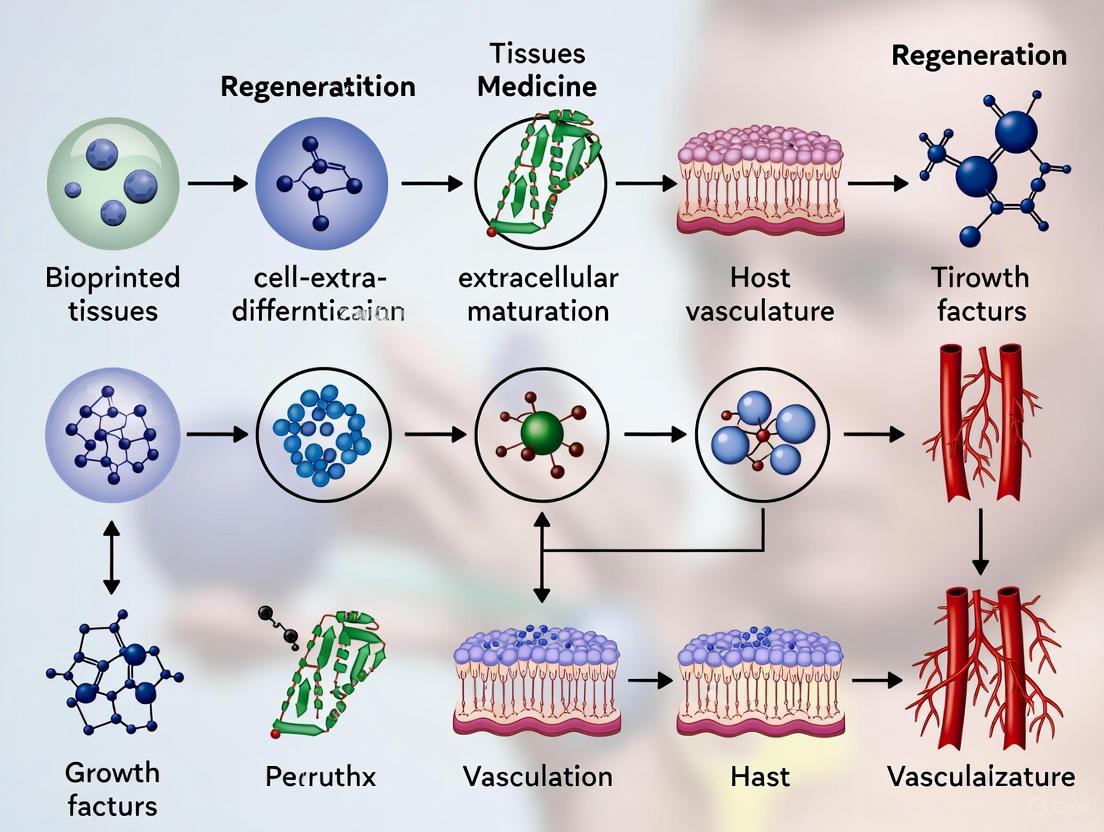
Signaling Pathways and Experimental Workflows
Diagram 1: Vascular Integration Pathway
Diagram 2: Bioprinted Vessel Experiment Workflow
Biological Processes of Vasculogenesis and Angiogenesis
This technical support center provides troubleshooting and methodological guidance for researchers working on the integration of bioprinted tissues with host vasculature. The successful clinical translation of engineered tissues depends on rapid and functional vascularization, a process governed by the fundamental biological mechanisms of vasculogenesis and angiogenesis. Vasculogenesis involves the de novo formation of blood vessels from endothelial progenitor cells (EPCs) or angioblasts, which assemble into a primitive capillary plexus [9] [10]. Angiogenesis, in contrast, describes the formation of new blood vessels from pre-existing ones through endothelial cell sprouting and remodeling [11] [10]. This guide addresses the specific challenges you might encounter when replicating these processes in bioprinted constructs.
Frequently Asked Questions (FAQs) and Troubleshooting
1. Our bioprinted vascular networks are regressing before they can connect with the host. What are the potential causes?
Vascular regression is often a failure of maturation and stabilization.
- Cause: Lack of pericyte or vascular smooth muscle cell (VSMC) recruitment [9]. Newly formed endothelial tubes are fragile and require the physical support and biochemical signaling provided by mural cells.
- Solution: Incorporate pericyte precursors or VSMCs into your bioink or co-culture system. Ensure your hydrogel supports the migration and adhesion of these cells. The secretion of factors like Platelet-Derived Growth Factor-BB (PDGF-BB) from endothelial cells is crucial for attracting mural cells [9].
2. Why are the vessels in our construct leaky and non-functional, even though they are perfusable?
The presence of a lumen does not equate to a functional barrier.
- Cause: Immature cell-cell junctions and incomplete basement membrane formation [9] [11]. Functional vessels require strong adherens junctions (dependent on VE-cadherin) and tight junctions to control permeability.
- Solution: Allow sufficient time for in vitro maturation post-printing. Apply physiological flow conditions, as shear stress is a key promoter of endothelial quiescence and barrier function [12]. Verify the expression of junctional proteins like VE-cadherin and ZO-1 in your models [9].
3. What is the "angiogenic switch" and why is it relevant to in vitro models?
The "angiogenic switch" is a critical concept for initiating angiogenesis in your constructs.
- Answer: It describes the shift in the local equilibrium from a predominance of anti-angiogenic factors to a predominance of pro-angiogenic factors [11]. This switch is often triggered by hypoxia within the tissue.
- Relevance: To induce angiogenesis in your bioprinted tissue, you must actively create conditions that flip this switch. This can be achieved by creating a hypoxic gradient or by directly supplementing with pro-angiogenic factors like VEGF [11] [10].
4. Our bioprinted capillaries lack the hierarchical structure of native vasculature. How can we better mimic nature?
Native vasculature is a multi-scale network from arteries down to capillaries.
- Cause: Many bioprinting approaches focus on a single scale, typically microvascular networks, and neglect the need for larger feeding and draining vessels [9].
- Solution: Employ a multi-strategy approach. Combine different bioprinting techniques to create hierarchical networks. For example, use extrusion bioprinting to create larger, perfusable channel designs, and leverage self-assembly or sacrificial printing to create the finer capillary networks [13] [12]. This ensures efficient perfusion from the macro- to the micro-scale.
Experimental Protocols for Key Assessments
Protocol 1: Establishing a 3D Bioprinted Co-culture Model for Angiogenesis
This protocol details a method to recapitulate branching angiogenesis using a fibroblast-endothelial cell co-culture system within a bioprinted construct [10].
- Bioink Formulation:
- 7.5% (w/v) Gelatin
- 0.5% (w/v) Alginate
- 2% (w/v) Fibrinogen
- Cell Culture:
- Endothelial Cells: Human Umbilical Vein Endothelial Cells (HUVECs).
- Support Cells: Human dermal fibroblasts.
- Culture both cell types in their respective standard media before bioink preparation.
- Bioprinting and Post-Processing:
- Mix fibroblasts and HUVECs into the bioink at a defined density (e.g., 1x10^6 cells/mL each).
- Bioprint the cell-laden construct using a microextrusion bioprinter.
- After printing, crosslink the construct by immersing it in a solution containing thrombin to initiate fibrin polymerization from fibrinogen, forming a stable gel.
- Culture and Maturation:
- Maintain the bioprinted tissue in a suitable endothelial cell growth medium.
- Culture for 7-14 days, with medium changes every 2-3 days.
- The fibroblasts and HUVECs will communicate bidirectionally, leading to the self-organization of endothelial cells into tubular, branching structures within the matrix [10].
- Validation:
- Use immunohistochemistry to stain for CD31/PECAM-1 (an endothelial cell marker) to visualize the tubular networks.
- Perform proteomic analysis (e.g., multiplex ELISA) on the culture supernatant to detect the presence of key angiogenic proteins like VEGF, FGF, and PDGF.
Protocol 2: Assessing Host Integration (Inosculation)
This protocol outlines steps to evaluate the connection between pre-formed vessels in a bioprinted construct and the host vasculature after implantation.
- Pre-vascularization:
- Generate a bioprinted tissue with a defined, perfusable vascular network using HUVECs as described in Protocol 1.
- Optionally, label the endothelial cells with a fluorescent cell tracker (e.g., CM-Dil) prior to implantation for tracking.
- Implantation:
- Implant the pre-vascularized construct into an appropriate animal model (e.g., mouse dorsal skinfold chamber or subcutaneous model).
- Analysis:
- Perfusion Assessment: At various time points post-implantation, intravenously inject a fluorescently labelled lectin (e.g., FITC-Lens culinaris agglutinin) or dextran. The presence of the tracer within the lumens of the bioprinted vessels confirms functional anastomosis with the host circulatory system [9].
- Histology: Explain the construct and process for histology. Staining for host-specific (e.g., if using human cells in a mouse model) and donor-specific endothelial markers can confirm the hybrid nature of the connected vessels.
Quantitative Data and Reagents
Table 1: Key Angiogenic Growth Factors and Their Functions
| Growth Factor | Primary Receptor | Core Function in Vascularization | Key Considerations for Experiments |
|---|---|---|---|
| VEGF-A [14] [10] | VEGFR2 | Potent mitogen and chemoattractant for endothelial cells. Critical for sprouting angiogenesis. | Multiple isoforms exist (e.g., VEGF121, VEGF165) with different heparin-binding affinities and diffusion properties [14]. |
| VEGF-C [14] | VEGFR3 | Primarily drives lymphangiogenesis. In its mature form, can also activate VEGFR2. | Requires proteolytic processing (e.g., by ADAMTS3) for full activation and high-affinity receptor binding [14]. |
| PDGF-BB [9] [10] | PDGFR-β | Critical for vessel maturation and stability. Chemoattractant for pericytes and vascular smooth muscle cells. | Ensures newly formed vessels are stabilized and do not regress. A key factor in co-culture systems [9]. |
| bFGF (FGF-2) [10] | FGFR | Promotes endothelial cell proliferation, migration, and differentiation. Synergizes with VEGF. | Involved in both vasculogenesis and angiogenesis. A broad-spectrum mitogen for many cell types [10]. |
The Scientist's Toolkit: Essential Research Reagents
| Item | Function/Application |
|---|---|
| HUVECs | The most common endothelial cell type used for in vitro vascular model generation [10]. |
| Gelatin-Based Bioink | Provides a natural, cell-adhesive microenvironment (due to RGD sequences) that supports cell migration and network formation [10]. |
| Fibrinogen | When polymerized to fibrin, forms a provisional matrix that facilitates robust endothelial cell sprouting and tubulogenesis [10]. |
| Recombinant VEGF-A | Used to induce and stimulate angiogenic sprouting in 3D cultures. A fundamental component of most angiogenic media [14] [10]. |
| Anti-CD31 Antibody | A primary antibody for immunohistochemistry or immunofluorescence to identify and visualize endothelial cells and vascular networks [10]. |
| Fluorescent Lectin (e.g., FITC-labeled) | Used for perfusion studies in vivo and in vitro to label the luminal surface of functional vessels [9]. |
Signaling Pathways and Experimental Workflows
VEGF-VEGFR2 Signaling Pathway
Workflow for Vascular Integration Study
FAQs: Core Concepts and Troubleshooting
Q1: What is the fundamental role of pericytes and smooth muscle cells (SMCs) in vascular stabilization?
A1: Pericytes (in microvessels) and SMCs (in larger vessels) are mural cells that are crucial for vessel maturation and stabilization. Their physical association with the nascent endothelial cell tube terminates a period of growth factor dependence and signals the cessation of vessel growth. This interaction leads to the production of basement membrane and confers mechanical stability, preventing vessel regression. The loss of these cells is associated with pathological instability, as seen in diabetic retinopathy. [15]
Q2: During an experiment, our bioprinted vascular constructs remain unstable and regress in culture. What are the potential causes?
A2: Vessel regression often points to a failure in mural cell recruitment or function. Key factors to troubleshoot include:
- Growth Factor Imbalance: Ensure your culture medium contains adequate Platelet-Derived Growth Factor-BB (PDGF-BB), which is secreted by endothelial cells to recruit mural cell precursors. Simultaneously, verify that Vascular Endothelial Growth Factor (VEGF) levels are not chronically high, as this can maintain vessels in an immature, unstable state. [15]
- Insufficient Cell-Cell Contact: The stabilization process requires direct contact between endothelial and mural cells, which activates Transforming Growth Factor-beta (TGF-β). This local activation inhibits endothelial proliferation and migration while promoting pericyte/SMC differentiation. Review your bioprinting protocol to ensure the spatial arrangement allows for this critical interaction. [15]
- Biomaterial Properties: The scaffold or bioink must support the deposition of a mature basement membrane. The presence of basement membrane components (e.g., collagen IV, laminin) provides a long-term signal for vessel stabilization. [15]
Q3: Our implanted bioprinted vessels fail to integrate with the host's circulatory system. How can we promote this integration?
A3: Successful integration requires the bioprinted vessel to be both perfusable and biologically active.
- Pre-vascularization: Bioprint constructs with layered bioinks containing endothelial cells and supporting cells to form a pre-made, immature network. A recent study successfully implanted a bioprinted myocardial patch by arranging layers of muscle bioink between layers of vascular bioink, which then connected with the host's blood supply. [16]
- Use of Progenitor Cells: Consider using vascular wall-resident multipotent stem cells (VW-MPSCs). These CD44+ cells, found in the arterial adventitia, can differentiate into pericytes and SMCs. When co-implanted with endothelial cells, they contribute to new vessel maturation and coverage in vivo. [17]
- Functional Endothelium: Ensure the lumen of your bioprinted vessel is lined with a functional endothelial layer that can form connections with the host endothelium. This is critical for guiding blood flow into the new construct. [18]
Q4: What are the key signaling pathways involved in the communication between endothelial cells and mural cells?
A4: The communication is mediated by several key pathways and tools:
- PDGF-BB / PDGFR-β: Endothelial cells secrete PDGF-BB, which binds to PDGFR-β on pericytes and SMC precursors, mediating their recruitment and migration. [15]
- TGF-β Activation: Direct contact between endothelial cells and mural cells leads to the local activation of latent TGF-β. Active TGF-β then inhibits endothelial cell growth and promotes mural cell differentiation. [15]
- Angiopoietins: Angiopoietin-1 (Ang-1) is associated with vessel stabilization, while Angiopoietin-2 (Ang-2) can destabilize vessels by antagonizing Ang-1. [15]
- Extracellular Vesicles (EVs): Recent research highlights EVs as a communication tool. For instance, EC-derived EVs containing miR-539 and SMC-derived EVs containing miR-582 can be transferred between cells to modulate each other's phenotypes and promote vessel coverage. [19]
The following diagram illustrates the key signaling pathways and cellular interactions during vascular maturation.
Q5: What are the critical parameters for bioprinting a stable, layered vascular construct?
A5: Successful bioprinting requires careful optimization of both biological and engineering parameters.
- Bioink Composition: Use a hybrid bioink that provides both printability and biological cues. A common approach uses a base of gelatin (for plasticity), fibrinogen (for structure), hyaluronic acid (for cell attachment), and a crosslinker like microbial transglutaminase (mTG) for stability. [16]
- Cell Source and Density: For the vascular wall, use a combination of SMCs and fibroblasts. One protocol uses a high cell density of 100 million cells/mL, with a ratio of 70% SMCs to 30% fibroblasts to mimic the tunica media and adventitia. [2]
- Scaffold-Free Technique: To avoid long culture times and potential foreign body responses, consider scaffold-free methods using a rotating mandrel to create the tubular structure, allowing deposited cells to secrete their own extracellular matrix. [2]
- Spatial Design: For complex tissues like a myocardial patch, alternate layers of vascular bioink (containing vascular microfragments or endothelial cells) and muscle bioink (containing cardiomyocytes) to create an integrated, perfusable network. [16]
Quantitative Data and Reagents
This table summarizes key microRNAs identified in extracellular vesicle-mediated communication between endothelial and smooth muscle cells. [19]
Table 1: Functional microRNAs in Endothelial-Smooth Muscle Cell Communication
| microRNA | Primary Secreting Cell | Key Functional Role in Vascular Maturation |
|---|---|---|
| miR-539 | Endothelial Cell (EC) | Modulates SMC phenotype; promotes vessel coverage and stabilization in vivo. |
| miR-582 | Smooth Muscle Cell (SMC) | Modulates EC phenotype; cooperates with miR-539 to trigger vessel coverage. |
This table outlines critical parameters for bioprinting a functional vascular conduit, based on a recent study. [2]
Table 2: Experimental Parameters for 3D-Bioprinting a Vascular Conduit
| Parameter | Specification | Purpose/Function |
|---|---|---|
| Cell Type | Rat venous SMCs, Rat aortic fibroblasts | Forms the tunica media and adventitia layers of the vessel wall. |
| Bioink Base | Hyaluronic acid, Gelatin, PEGDA | Provides structural support, hydration, and a crosslinkable matrix for cell adhesion. |
| Cell Density | 100 x 10^6 cells/mL | Ensures high cell density for tissue formation without prolonged culture. |
| Cell Ratio | 70% SMCs, 30% Fibroblasts | Mimics the cellular composition of the native vascular wall. |
| Fabrication Method | Rotating mandrel (scaffold-free) | Creates a tubular structure; allows cells to form their own ECM. |
| In Vivo Outcome | Well-incorporated, physiological behavior in rat model | Demonstrates functional integration with native vasculature. |
The Scientist's Toolkit: Key Research Reagent Solutions
Table 3: Essential Reagents for Vascular Maturation and Bioprinting Research
| Reagent / Material | Function / Application | Example Use Case |
|---|---|---|
| Hyaluronic Acid & Gelatin-based Bioink | Provides a biocompatible hydrogel matrix for cell encapsulation; offers tunable mechanical properties. | Used as a base bioink for printing vascular conduits and myocardial patches. [2] [16] |
| Recombinant PDGF-BB | Recruits pericytes and smooth muscle cell precursors to nascent endothelial tubes. | Added to culture media to promote mural cell coverage in in vitro vessel formation assays. [15] |
| Recombinant TGF-β1 | Stimulates differentiation of stem/progenitor cells into SMCs; promotes vessel stabilization. | Used to induce SMC marker expression in multipotent vascular stem cells in culture. [17] |
| CD44 MicroBeads | Isolates vascular wall-resident multipotent stem cells (VW-MPSCs) via magnetic sorting. | Used for the immunoselection of CD44+ VW-MPSCs from human arterial tissue. [17] |
| Gelatin Methacrylate (GelMA) | A photopolymerizable bioink; allows high-resolution printing of complex 3D structures. | Used in bioprinting protocols to create multi-layered, cell-laden constructs for tissue engineering. [20] [21] |
| Matrigel | Basement membrane extract used for in vitro angiogenesis and co-culture assays. | Used in spheroid-based in vitro assays and in vivo Matrigel plug assays to study vessel formation. [17] |
Detailed Experimental Protocols
Protocol 1: Isolating and Differentiating Vascular Wall-Resident Stem Cells
This protocol is adapted from methods used to isolate human CD44+ multipotent stem cells from the arterial adventitia. [17]
- Tissue Acquisition: Obtain human arterial samples (e.g., internal thoracic artery) following ethical and regulatory guidelines.
- Mechanical Dissociation: Mince the vessel tissue thoroughly under a dissection microscope to remove fatty tissue.
- Enzymatic Digestion: Incubate the minced tissue in OptiMEM I medium containing 0.2% collagenase type II and 5 U/mL elastase for 30-40 minutes at 37°C.
- Cell Suspension Preparation: Pass the digested cellular suspension through a 70 µm cell strainer and wash with PBS containing 5% FCS.
- CD44+ Cell Isolation: Use anti-CD44 antibody conjugated to magnetic microbeads with MACS technology to positively select for VW-MPSCs from the cell suspension.
- Culture and Expansion: Plate the isolated CD44+ cells on standard plastic culture plates in complete MSC growth medium. Remove non-adherent cells after 24 hours.
- SMC Differentiation: To induce differentiation into SMCs, stimulate the VW-MPSCs with TGF-β1 (e.g., 5-10 ng/mL) for several days. Monitor the up-regulation of SMC markers (e.g., αSMA, calponin) via immunostaining or flow cytometry.
Protocol 2: Bioprinting a Multi-Layered Tissue Construct with Embedded Vasculature
This protocol summarizes the workflow for designing and printing a complex, multi-cellular construct, integrating principles from several sources. [2] [16] [20]
3D Model Design:
- Use CAD software (e.g., TinkerCAD) to design the construct. For a vascularized patch, create a multi-layered object.
- Export each layer as a separate .STL file (e.g., "Bottom" and "Top").
Bioink Preparation:
- Muscle Bioink: Mix a base hydrogel (e.g., gelatin, fibrinogen, hyaluronic acid, mTG) with the primary functional cells (e.g., cardiomyocytes derived from iPSCs).
- Vascular Bioink: Use the same base hydrogel but load it with vascular cells. This can be endothelial cells (e.g., HUVECs) or microvascular fragments from adipose tissue.
Slicing and Printer Setup:
- Import the .STL files into a slicing software (e.g., PrusaSlicer).
- Set printing parameters in "Expert" mode. Configure layer height (e.g., 0.2 mm), set vertical shells and solid layers to 0, and set infill density (e.g., 50%) with a rectilinear pattern.
Bioprinting Process:
- Load the respective bioinks into separate printheads.
- Print the construct using a layer-by-layer approach. For a myocardial patch, a successful strategy is to print three layers of muscle bioink alternated with two layers of vascular bioink. [16]
- Perform crosslinking as needed (e.g., UV or enzymatic, depending on the bioink).
Maturation and Implantation:
- Culture the bioprinted construct in a dynamic bioreactor system if possible, to promote preconditioning.
- For in vivo testing, implant the construct into an animal model (e.g., rat). Histological analysis after explant can assess integration, host cell infiltration, and the formation of a perfused vascular network.
The following diagram outlines the key stages of the bioprinting and integration workflow.
Frequently Asked Questions (FAQs) & Troubleshooting Guides
FAQ 1: What defines a "functional" blood vessel in bioprinted tissue?
Answer: The definition of a "functional" blood vessel is inherently context-dependent and varies by target tissue. A vessel that suffices for nutrient delivery in a skin graft may be inadequate for cardiac tissue, which requires pulsatile flow and tight barrier regulation. Functionality is not a single endpoint but a spectrum of capabilities that must be evaluated over time. True functionality encompasses not just initial perfusability but also the vessel's ability to adapt, mature, and integrate within the host tissue environment [9].
Troubleshooting Guide: Vessels are perfusable but fail to sustain tissue long-term
- Problem: Bioprinted constructs are initially perfused but develop necrotic cores or regress over time.
- Potential Cause 1: Lack of Vessel Maturation. The vasculature may not have undergone necessary stabilization steps, such as pericyte recruitment and basement membrane formation.
- Solution: Co-print or co-culture with supporting cells like pericytes or vascular smooth muscle cells. Ensure your bioink or culture conditions include key maturation signals such as PDGF-BB to recruit mural cells [9].
- Potential Cause 2: Inadequate Barrier Function. Vessels may be leaky, failing to establish proper organ-specific barrier properties.
FAQ 2: Why do my bioprinted pre-vascular networks fail to anastomose with the host vasculature after implantation?
Answer: Successful inosculation requires more than just the physical presence of endothelial channels. Failure often results from a lack of angiogenic potential, biochemical incompatibility, or insufficient mechanical stability in the implanted network [23] [9].
Troubleshooting Guide: Lack of host-implant vascular connection
- Problem: After implantation, the bioprinted construct does not connect to the host's circulatory system.
- Potential Cause 1: Passive Endothelial Networks. The implanted endothelial cells are not in an activated state capable of sprouting toward or receiving sprouts from host vessels.
- Solution: Pre-condition the construct with pro-angiogenic factors (e.g., VEGF) in vitro before implantation. Consider using iPSC-derived endothelial cells with high angiogenic potential, such as those generated via ETV2 transcription factor activation [24].
- Potential Cause 2: Absence of Key Signaling Cues. The biochemical environment does not support the cross-talk between host and implant endothelial cells.
- Solution: Incorporate components into the bioink that promote angiogenic signaling. Studies show that sustained endothelial Akt signaling is critical for maintaining vascular stability and Jagged1/Notch signaling, which regulates smooth muscle cell coverage and functional integrity [22].
FAQ 3: How can I improve the structural hierarchy and stability of bioprinted vasculature?
Answer: Native vasculature is hierarchically organized, from capillaries to arteries. To replicate this, your biofabrication strategy must go beyond creating a single type of channel and incorporate methods to generate vessels of different diameters and wall compositions [9] [25].
Troubleshooting Guide: Uniform, immature capillary-like networks without hierarchy
- Problem: Bioprinting produces a network of vessels with similar, small diameters, lacking the larger arterioles/arteries needed for robust inflow and outflow.
- Potential Cause: Homogeneous Bioink and Printing Parameters. Using a single cell-laden bioink and identical printing parameters throughout the construct.
- Solution: Employ a multi-material bioprinting strategy. Use a supporting bioink to create larger, sacrificial channels that can be evacuated to create conduit vessels. Simultaneously, print a more permeable, angiogenic bioink in other regions to encourage the subsequent formation of microvascular networks [25]. Additionally, apply mechanical conditioning (e.g., cyclic strain) to promote the remodeling of certain channels into stronger, larger vessels [23].
The tables below consolidate key quantitative metrics for assessing vascular function and composition, essential for troubleshooting experimental outcomes.
Table 1: Functional Metrics for Vasculature Assessment
| Metric | Description | Target Tissues & Values | Assessment Method |
|---|---|---|---|
| Perfused Vascular Volume | Volume of the construct that is actively perfused. | Cardiac: >45% volume [22] | MicroCT, lectin perfusion assays [22] |
| Capillary-to-Arteriole Ratio | Balance between exchange and conduit vessels. | Healthy Heart: Low ratio (e.g., ~2:1); Dysfunctional: Can be >5.5:1 [22] | Immunofluorescence (CD31, SMA) [22] |
| Barrier Function | Measure of vessel leakiness, tissue-dependent. | Continuous Capillaries (e.g., muscle): Tight barriers; Fenestrated (e.g., kidney): Permeable [9] | Dextran leakage assays, TEER measurement [9] |
| Vessel Maturation Index | Degree of pericyte/vSMC coverage. | Stable Microvessels: >70% coverage [9] | Co-staining (CD31/NG2 or SMA) [9] |
Table 2: Structural Hierarchy of Native Vasculature for Design Goals
| Vessel Type | Lumen Diameter | Key Cellular Components | Primary Function |
|---|---|---|---|
| Capillaries | 5 - 10 μm [9] | Endothelial cells, pericytes [9] [25] | Nutrient/waste exchange |
| Arterioles | 5 - 100 μm [9] | Endothelial cells, 1+ layers of SMCs [9] | Blood flow regulation |
| Arteries | >100 μm [22] | Endothelial cells, multiple SMC/elastic layers [9] [25] | Conduit, pressure dampening |
Detailed Experimental Protocols
Protocol 1: Assessing Vessel Functionality via Perfusion and Patency
Objective: To quantitatively evaluate the volume and patency of perfused vasculature within an implanted bioprinted construct [22].
- Preparation of Tracer: Prepare a solution of fluorescently labeled lectin (e.g., FITC-Lectin) in a physiological buffer.
- Animal Perfusion: Under approved ethical guidelines, anesthetize the rodent host and surgically expose the aorta.
- Systemic Perfusion: Cannulate the aorta and perfuse the animal with the lectin solution at a physiological pressure to ensure capillary filling.
- Tissue Harvesting: Excise the implanted bioprinted construct and surrounding host tissue.
- Fixation and Imaging: Fix the tissue, section it, and image using confocal microscopy.
- Image Analysis:
- Use 3D reconstruction software to calculate the total volume of the lectin-positive (perfused) vasculature.
- Generate a vessel size distribution plot to identify the loss of larger, patent vessels, a key indicator of dysfunction [22].
Protocol 2: Generating Vascular Organoids via Transcription Factor Activation
Objective: To rapidly generate 3D vascular organoids (VOs) with co-differentiated endothelial and mural cells for high-throughput testing [24].
- Cell Line Preparation: Use engineered human iPSC lines with doxycycline (Dox)-inducible expression of the transcription factors ETV2 (for endothelial cells) and NKX3.1 (for mural cells).
- Mesoderm Induction: Differentiate iPSCs into mesoderm progenitor cells (MePCs) over 2 days using a medium containing a GSK-3β inhibitor.
- 3D Aggregation: Combine the two populations of MePCs (dox-ETV2 and dox-NKX3.1) in a defined ratio in an ultra-low attachment plate to form aggregates.
- Transcription Factor Activation: Add doxycycline to the culture medium for 48-72 hours to simultaneously induce ETV2 and NKX3.1 expression, driving co-differentiation.
- Organoid Maturation: After 5 days in total, harvest the formed VOs. For further maturation, the VOs can be embedded in an extracellular matrix (ECM) like Matrigel or a collagen-fibrin blend and cultured for an additional 1-2 weeks.
- Functional Validation: Confirm the formation of lumenized vessels with apical-basal polarity via immunostaining for CD31 and VE-Cadherin. Assess in vivo functionality by implanting VOs into models like hind limb ischemia and measuring perfusion recovery [24].
Key Signaling Pathways
The following diagram illustrates the key signaling pathway involved in maintaining vascular stability, a common point of failure in engineered vasculature.
The Scientist's Toolkit: Research Reagent Solutions
Table 3: Essential Reagents for Vascularized Construct Research
| Reagent / Material | Function / Application | Example Use Case |
|---|---|---|
| Hyaluronic Acid / Gelatin / PEGDA Hydrogel | Bioink component providing compression strength, hydration, and cell adhesion sites. | Used as a base bioink for scaffold-free printing of vascular conduits on a rotating mandrel [2]. |
| Doxycycline-inducible ETV2/NKX3.1 iPSCs | Enables controlled, simultaneous differentiation of endothelial and mural cell lineages. | Rapid generation of uniform vascular organoids (VOs) within 5 days for therapeutic testing [24]. |
| Recombinant PDGF-BB | Key cytokine for the recruitment and attachment of pericytes to nascent endothelial tubes. | Added to culture medium to promote microvessel maturation and stabilization [9]. |
| Recombinant Jagged1 Peptide | Activates Notch signaling in adjacent cells. | Used as a therapeutic treatment to rescue vascular smooth muscle cell coverage and stability in Akt-deficient models [22]. |
Frequently Asked Questions (FAQs) and Troubleshooting Guide
FAQ 1: What are the primary biological reasons for the failure of bioprinted constructs to integrate with the host vasculature?
Bioprinted constructs often fail to integrate due to a combination of factors related to the host's immune response and the biological immaturity of the engineered tissue.
- Foreign Body Response (FBR): The host's immune system recognizes the implant as foreign, triggering an inflammatory response. This can lead to the formation of a fibrotic capsule (glial scar in neural tissue), which isolates the construct, prevents vascular ingrowth, and causes a decline in the recording and stimulation capabilities of the interface [26].
- Inadequate Vascular Maturation: The presence of perfusable channels does not guarantee functional, long-term integration. Many bioprinted vasculatures regress, leak, or remain disorganized because they lack key maturation steps. These include the recruitment of pericytes or smooth muscle cells for stability and the development of strong endothelial cell-cell junctions to control barrier function [9].
- Mechanical Mismatch: A significant difference in stiffness between a rigid construct and soft host tissue (e.g., brain tissue at ~1–30 kPa) prevents seamless integration, causes micromotion damage, and exacerbates the FBR [26].
FAQ 2: Our bioprinted vascular networks form initial lumens but then regress. What are the potential causes and solutions?
Vessel regression is typically due to a lack of biological and mechanical stabilization signals.
- Cause: Absence of Mural Cell Recruitment. Nascent endothelial tubes require pericytes and vascular smooth muscle cells for stability and long-term survival. This recruitment is mediated by signals like Platelet-Derived Growth Factor-BB (PDGF-BB) [9].
- Solution: Use Bioinks with Stromal Cues. Incorporate PDGF-BB into your hydrogel bioink and use bioinks that contain stromal cell populations (like pericyte precursors or smooth muscle cells) alongside endothelial cells to promote direct physical stabilization [9].
- Cause: Lack of Hemodynamic Cues. Without physiological flow and the associated shear stress, endothelial cells do not receive the necessary signals to mature, align, and form a stable, quiescent layer [1] [9].
- Solution: Implement Dynamic Perfusion. Integrate your bioprinted construct with a microfluidic bioreactor system immediately after printing. This provides flow-induced shear stress, which guides endothelial cell alignment and promotes the formation of a stable, non-thrombogenic endothelium [1].
FAQ 3: We observe robust vascular integration in small animal models, but the constructs fail to scale up. What are the key hurdles?
Scaling up presents challenges in ensuring uniform viability and function throughout a larger tissue volume.
- Diffusion Limits: Simple diffusion can only support cells within 100–200 µm of a nutrient source. In larger, cell-dense constructs, the core quickly becomes necrotic without an internal, perfusable vascular network [1].
- Hierarchical Network Design: A successful scalable design must replicate the body's natural vascular hierarchy. This includes large, mechanically robust vessels for inflow/outflow that branch into smaller arterioles for flow control, which in turn feed into dense capillary networks for nutrient exchange [9]. Most bioprinting approaches struggle to create this full range of scales in a single construct.
- Insufficient Architectural Resolution: While extrusion bioprinting can create larger channels (>100 µm), it often lacks the resolution to create the true capillary-level networks (<20 µm) required for efficient oxygen exchange throughout a thick tissue [1] [27]. Combining bioprinting with self-assembling microvasculature may be a necessary strategy [1].
Troubleshooting Common Experimental Problems
| Problem | Possible Cause | Recommended Solution |
|---|---|---|
| Fibrotic encapsulation of the implant [26] | Mechanical mismatch; Strong foreign body response | Use softer, biomimetic materials (e.g., hydrogels) with an elastic modulus matching the host tissue; Functionalize surfaces with bioactive coatings (ECM proteins) to improve biocompatibility. |
| Leaky, unstable vasculature [9] | Lack of pericyte coverage; Immature endothelial junctions | Co-culture endothelial cells with pericyte precursors in the bioink; Apply sustained perfusion to mature junctions and enhance barrier function via VE-cadherin. |
| Necrotic core in thick constructs [1] | Lack of internal perfusion; Diffusion limits exceeded | Incorporate sacrificial bioinks (e.g., Pluronic F127) to create perfusable channels within the construct; Bioprint a hierarchical vascular tree prior to seeding parenchymal cells. |
| Poor host-graft anastomosis (inosculation) [9] | Lack of pro-angiogenic signals at the interface; Mismatched vessel diameters | Functionalize the construct's periphery with VEGF-loaded microparticles; Design the construct's peripheral vasculature to have channel sizes similar to the host's capillaries (~5-10 µm) to facilitate connection. |
| Low cell viability post-printing [28] | High shear stress during extrusion | Optimize bioink viscosity and printing parameters (pressure, speed); Use nozzles with larger diameters or bioinks with shear-thinning properties to reduce cell stress. |
Essential Experimental Protocols
Protocol 1: Assessing Functional Vascular Integration In Vivo
This protocol outlines a method for evaluating the success of vascular integration in an animal model, based on the deployment of a bioprinted blood vessel in rats [2].
1. Bioprinting the Vascular Conduit:
- Bioink Formulation: Prepare a hydrogel-based bioink. Example: Use the HyStem-C Kit containing hyaluronic acid, gelatin, and poly(ethylene glycol) diacrylate (PEGDA). Encapsulate relevant cells (e.g., smooth muscle cells and fibroblasts) at a high density (e.g., 100 million cells/mL) [2].
- Fabrication Technique: Utilize a scaffold-free bioprinting approach on a rotating mandrel to create a tubular structure mimicking the native vessel's layers [2].
2. Pre-Implantation Maturation:
- Conditioning: Culture the bioprinted vessel in a bioreactor system that provides pulsatile flow and cyclic stretching to promote extracellular matrix (ECM) production and mechanical strengthening [2].
3. Surgical Implantation:
- Anastomosis: Surgically implant the bioprinted conduit into the target location (e.g., replacing a segment of the aorta) using standard vascular anastomosis techniques to connect it to the host's circulatory system [2].
4. Post-Implantation Analysis:
- Patency and Function: Monitor the implant over time using Doppler ultrasound to assess blood flow and patency. Explain the graft at predetermined endpoints for histological analysis [2].
- Histological Evaluation:
- Staining: Use Masson's Trichrome stain to visualize collagen deposition and tissue remodeling.
- Immunofluorescence: Stain for CD31 (PECAM-1) to identify host-derived endothelial cells that have migrated to form the new intima, confirming endothelialization [2].
- Assessment: Look for evidence of graft incorporation into the native tissue, absence of a significant fibrotic capsule, and the presence of physiological behavior similar to a native vessel [2].
Protocol 2: Process Control for Reproducible Bioprinting
This protocol describes a method to minimize print defects and improve the reproducibility of fabricated tissues, a critical factor for successful integration [29].
1. Setup:
- Equipment: Integrate a modular, low-cost (<$500) digital microscope onto any standard 3D bioprinter to enable layer-by-layer imaging during the printing process [29].
2. Printing and Monitoring:
- Image Acquisition: As the printer deposits each layer of bioink, the digital microscope captures high-resolution images of the nascent tissue structure in real-time [29].
3. AI-Based Image Analysis:
- Defect Detection: Feed the acquired images into an AI-based image analysis pipeline. This software rapidly compares the printed structure to the intended digital design (e.g., the CAD file) [29].
- Identification: The system automatically identifies common print defects, such as over-deposition or under-deposition of bioink, which can compromise the structural integrity and intended function of the final construct [29].
4. Parameter Optimization:
- Iteration: Use the feedback from the analysis to identify the optimal printing parameters (pressure, speed, temperature) for a given bioink material. This ensures high-fidelity fabrication and enhances inter-tissue reproducibility, which is foundational for reliable experimental outcomes and integration studies [29].
Signaling Pathways in Vascular Integration and Stability
The following diagram illustrates the key cellular and molecular interactions that determine the success or failure of vascular integration at the host-construct interface.
Key Signaling Pathways in Vascular Integration
Research Reagent Solutions
The table below details key materials and their functions for engineering the host-construct interface, as cited in recent literature.
| Research Reagent | Function / Application | Example Use Case |
|---|---|---|
| FRESH Bioprinting (Collagen Bioink) [27] | Enables high-fidelity 3D printing of soft biological structures like microfluidic channels and vascular networks. | Creating fully biologic, collagen-based microphysiologic systems with perfusable channels down to ~100 µm diameter [27]. |
| Sacrificial Bioinks (e.g., Pluronic F127) [1] | Printed as a temporary scaffold to define the shape of hollow channels, then dissolved away post-printing. | Fabricating complex, branching vascular networks within a larger tissue construct. The dissolved fugitive material leaves behind open, perfusable lumens [1]. |
| Hydrogel Systems (Hyaluronic Acid, Gelatin, PEGDA) [2] | Provides a tunable, hydrated 3D microenvironment that supports cell encapsulation, adhesion, and proliferation. | Used as a bioink for bioprinting a functional rat aorta, providing compression strength and supporting cell motility [2]. |
| VEGF (Vascular Endothelial Growth Factor) [1] [9] | Key signaling protein that stimulates host angiogenic sprouting and guides endothelial tip cells. | Incorporated into hydrogel bioinks to create a chemical gradient that actively recruits host blood vessels toward the implant [9]. |
| PDGF-BB (Platelet-Derived Growth Factor-BB) [9] | Critical chemotactic signal secreted by endothelial cells to recruit pericytes and smooth muscle cells. | Added to bioinks to ensure the stabilization and maturation of nascent bioprinted vessels, preventing regression [9]. |
| Decellularized ECM (dECM) Bioinks [1] [30] | Provides a naturally derived, tissue-specific microenvironment rich in native biochemical cues. | Used to create bioinks that enhance tissue-specific cell function and maturation in bioprinted constructs [30]. |
Bioprinting Vascular Networks: From Bioinks to Functional Constructs
Troubleshooting Guides
Guide 1: Troubleshooting 3D Bioprinted Culture Viability
A sudden loss of cell viability is a common challenge in 3D bioprinting. This guide addresses the most frequent variables affecting viability, from general 3D culture conditions to specific bioprinting parameters [3].
General 3D Culture Variables
Before focusing on the printing process, ensure these foundational parameters are optimized.
Table 1: General 3D Culture Variables Affecting Viability
| Variable | Potential Issue | Recommended Action |
|---|---|---|
| Cell Culture Contamination | Low viability in 2D controls indicates issues with initial cell cultures. | Maintain a 2D control in all experiments. Follow standard cell culture contamination protocols. [3] |
| Material Contamination or Toxicity | New or contaminated bioink material affects cell health. | Use a pipetted thin film control to assess potential material-related issues. [3] |
| Cell Concentration | High density leads to hyperplasia; low density leads to low proliferation and death. | Run an encapsulation study to test varying cell concentrations for each new cell type or material. [3] |
| Crosslinking Process | Harsh chemicals or altered material properties from crosslinking harm cells. | Optimize crosslinking method and degree to minimize exposure and maintain desired material permeability. [3] |
| Sample Thickness | Thickness >0.2 mm can cause diffusion limitations, leading to central necrosis. | Adjust fabrication to create thinner films; use bioprinting to create structures with integrated microchannels for improved nutrient transport. [3] |
Bioprinted 3D Culture Variables
After optimizing general encapsulation, these printing-specific variables must be characterized.
Table 2: Bioprinting Process Variables Affecting Viability
| Variable | Potential Issue | Recommended Action |
|---|---|---|
| Needle Type | Shear stress from small or improperly shaped needles damages cells. | Test tapered tips and larger diameters. Conduct a 24-hour viability study comparing different needle types and pressures. [3] |
| Print Pressure | Increased pressure increases shear stress on encapsulated cells. | Test a variety of print pressures and create 3D printed thin-film controls to monitor effects on viability. [3] |
| Print Time | Prolonged print sessions can compromise cell viability depending on material, cell type, and temperature. | Track print session duration and determine the maximum print time for different bioink formulations. [3] |
Essential Experiment Controls
Implement these controls in all bioprinting studies to quickly pinpoint the source of viability issues [3].
- 2D Control: For each varying cell concentration, type, and ratio used in bioprinted samples.
- 3D Pipette Control: For each different material, material concentration, crosslinking process, and cell type/concentration.
- 3D Print Control: For each variable in the 3D pipette controls, plus each different pressure and needle type used.
Guide 2: Assessing Function of Bioprinted Vascular Tissue
A major challenge is that bioprinted vascular structures are often unsuitable for transplantation compared to natural blood vessels, and a complete assessment system is lacking. This guide provides a framework for evaluating bioprinted vasculature from multiple levels [31].
Cellular-Level Functional Assessment
Evaluate the basic cellular functions and phenotypes that are crucial for forming and maintaining stable vessels.
Table 3: Cellular-Level Assessment Parameters
| Assessment Category | Key Metrics & Markers | Technique |
|---|---|---|
| Endothelial Cell Phenotype & Connectivity | Expression of CD31 and Vascular Endothelial Cadherin (VE-cad). | Immunofluorescence. [32] |
| Vessel Maturity & Tight Junctions | Expression of Zonula Occludens-1 (ZO-1) and establishment of endothelial cell polarity. | Immunofluorescence. [32] |
| Thrombotic Response | von Willebrand factor immobilization and prostacyclin release upon contact with inflammatory mediators. | ELISA, Immunoassay. [32] |
| Signaling Function | Transient increase in intracellular Ca²⁺ and production of Nitrous Oxide (NO) in response to stimuli like ATP. | Calcium imaging, NO detection assays. [32] |
| Inflammatory Response | Upregulation of adhesion molecules (ICAM-1, MCAM) and increased adhesion of leukocytes/platelets with cytokine exposure. | Flow cytometry, adhesion assays. [32] |
Tissue-Level Functional Assessment
At this level, the focus shifts to the architecture and permeability of the formed vascular network.
Table 4: Tissue-Level Assessment Parameters
| Assessment Category | Key Metrics | Technique |
|---|---|---|
| Network Morphology | Number, average diameter, length, and degree of branching of engineered microvessels. | Microscopy image analysis (e.g., of CD31-stained samples). [32] |
| Network Permeability | Ability to control molecular transport; modulated by factors like aqueous two-phase emulsion in the bioresin. | Permeability assays, tracer diffusion studies. [33] |
| Perfusion Capability | The ability to sustain flow through the printed channels without leakage or blockage. | Perfusion assays with colored dyes or fluorescent beads. [32] |
Organ-Level Functional Application
Bioprinted vascular models can be used to simulate pathological processes and conduct drug screening at the organ level, as in vessel-on-a-chip devices [31].
Frequently Asked Questions (FAQs)
Q1: What is the primary vascularization challenge in bioprinting larger tissues? The primary challenge is the lack of an efficient and extensive network of microvessels to deliver oxygen and nutrients and remove waste. Most living cells must be within 100-200 μm of a capillary to survive, making vascularization essential for engineering functional tissues of substantial size [32] [25].
Q2: What are the two main biological mechanisms for blood vessel formation that in vitro strategies aim to mimic? In vitro strategies primarily aim to mimic vasculogenesis (the de novo formation of blood vessels from endothelial progenitor cells) and angiogenesis (the sprouting of new vessels from existing ones) [32].
Q3: What are the two overarching strategies for incorporating vasculature into bioprinted constructs? The two main strategies are:
- Angiogenic Induction: Using the controlled release of angiogenic factors (e.g., VEGF, BFGF) to induce the growth of blood vessels within the printed tissue [25].
- Direct Printing: The direct printing of vascular scaffolds or channels, which can be seeded with endothelial cells to create a pre-formed vascular network [32] [25].
Q4: How can I improve the resolution and complexity of printed microchannels in hydrogel constructs? Lithographic biofabrication techniques, such as Digital Light Processing (DLP), offer superior resolution compared to conventional extrusion methods. Using specialized bioresins, this method can create high-resolution hydrogel constructs with embedded, convoluted networks of vessel-mimetic channels, including complex out-of-plane branches that are difficult to achieve with extrusion [33].
Q5: Are there rapid printing methods for creating sophisticated vascular structures? Yes, Volumetric Additive Manufacturing (VAM) is an emerging technology that enables rapid photopolymerization of entire 3D constructs in seconds to minutes, rather than layer-by-layer. This method has been used with pristine silk-based bioinks to create sophisticated, perfusable shapes and channel networks quickly [34].
The Scientist's Toolkit: Research Reagent Solutions
Table 6: Key Reagents for Vascularized Bioprinting Experiments
| Reagent | Function & Rationale |
|---|---|
| Gelatin-Based Bioresins | A versatile biomaterial for creating hydrogels. Ichthyic-origin gelatin can offer thermal stability at room temperature, which is ideal for lithographic printing. Can be modified with norbornene or methacryloyl groups for photochemical crosslinking. [33] |
| Silk Fibroin (SF) Bioink | A natural protein biomaterial known for its biocompatibility, tunable mechanical properties, and controllable degradability. Can be volumetrically printed in its pristine, unmodified form to create constructs with mechanical performance ranging from a few hundred Pa to hundreds of MPa. [34] |
| Silk Sericin (SS) Bioink | A silk protein often discarded as waste, but possesses valuable properties like hydrophilicity, anti-oxidation, and anti-inflammation. Can be used in its pure form for volumetric printing to create constructs with unique shape-memory properties. [34] |
| Photoinitiator System: Ru/SPS | A cytocompatible, visible-light photoinitiator system based on Tris-bipyridyl-ruthenium (II) hexahydrate (Ru) and Sodium Persulfate (SPS). Essential for crosslinking pristine silk and other bioresins under visible light in VAM and DLP printing. [34] |
| Vascular Endothelial Growth Factor (VEGF) | A key pro-angiogenic growth factor used to induce the formation and sprouting of blood microvessels within engineered constructs. [32] |
| Endothelial Cells (ECs) | Primary cells used to seed printed vascular channels or incorporated into bioinks to form the inner lining of microvessels, facilitating the formation of perfusable, biologically active networks. Human Umbilical Vein Endothelial Cells (HUVECs) are a common model. [32] |
| New Coccine | A cytocompatible photoabsorber used in lithographic printing to achieve high-resolution printing by confining the crosslinking reaction to precise locations, improving print fidelity. [33] |
Experimental Workflow: Volumetric Bioprinting of Silk-Based Vascular Constructs
The following protocol details the methodology for rapid fabrication of complex channel-laden constructs using Volumetric Additive Manufacturing (VAM), based on recent research with pristine silk bioinks [34].
Detailed Protocol:
Bioink Preparation:
- Silk Fibroin (SF) Solution: Prepare aqueous silk fibroin solution from Bombyx mori silkworm cocoons using standard lithium bromide dissolution and dialysis methods. Concentrations between 2.5% to 10% (w/v) are typically optimal for VAM, offering a good balance of printability and shape fidelity [34].
- Silk Sericin (SS) Solution: Extract silk sericin from silkworm cocoons. A concentration of 2.5% (w/v) has been identified as a key working concentration for VAM, enabling shorter crosslinking times and better shape fidelity compared to higher concentrations [34].
Photoinitiator Addition:
- To the silk bioink, add the visible-light photoinitiator system. The typical recommended concentrations are:
- Mix the bioink thoroughly but gently to avoid introducing air bubbles.
Volumetric Printing Process:
- Transfer the bioink to a transparent cylindrical vial.
- Place the vial in the VAM printer, which will rotate it continuously.
- The printer projects computed light patterns (wavelength ~525 nm) onto the rotating vial. The light patterns are calculated using a Radon transform of the target 3D model (e.g., a channel-in-cube or a brain-like structure) [34].
- The entire object is solidified via photopolymerization in a single, rapid step (typically 60-180 seconds), without the need for layer-by-layer deposition [34].
Post-Fabrication Processing:
- After printing, carefully extract the construct from the vial.
- Rinse thoroughly with sterile water or PBS to remove uncrosslinked material and photoinitiator residues.
- For SF constructs, post-processing can include ethanol treatments or mechanical loading to tune the mechanical properties and induce beta-sheet formation for stability in aqueous environments [34].
- For SS constructs, the unique reversible expansion and shrinkage (shape-memory) properties can be explored through hydration/dehydration cycles [34].
Construct Characterization:
- Viability: Culture with human mesenchymal stromal cells or other relevant cell types to assess cytocompatibility over extended periods (e.g., 1 month) [34].
- Functionality: Perform perfusion assays to validate the functionality of the embedded channels. Characterize the mechanical properties via rheometry or uniaxial compression/tensile testing [34].
Extrusion-Based Bioprinting for Macroscale Vascular Conduits
Frequently Asked Questions (FAQs) & Troubleshooting
This section addresses common technical challenges encountered during the extrusion-based bioprinting of macroscale vascular conduits, providing targeted solutions to ensure print fidelity, cell viability, and structural integrity.
FAQ 1: How do I prevent needle tip collisions with the print bed?
- Problem: The extruder needle crashes into the print bed when moving to the start position.
- Solution: This is typically a G-code calibration issue. Ensure the center point coordinates of your print area are accurately set. For specific printers, use commands like
G1 Z5 F200(for Trivima printers) to adjust the Z-axis height before extruder head movement, moving the bed down or head up by 5mm to avoid collision [6].
FAQ 2: What causes air bubbles in the bioink, and how can I remove them?
- Problem: Air bubbles in the bioink lead to inhomogeneity, voids, and uneven printing [6].
- Solution:
FAQ 3: My scaffold lacks structural integrity and layers merge or collapse.
- Problem: Printed layers fail to stack into a 3D structure, resulting in a collapsed 2D-like appearance.
- Solution:
- Bioink Viscosity: Perform rheological tests to ensure your bioink has sufficient thixotropic (shear-thinning) properties for extrusion and rapid structural recovery post-deposition [6].
- Crosslinking Optimization: Optimize the crosslinking method and time to ensure the bottom layer stabilizes quickly enough to support subsequent layers. This is critical for layer stacking [6].
FAQ 4: Why does my needle keep clogging during printing?
- Problem: Intermittent or complete cessation of bioink extrusion.
- Solution:
- Ensure Homogeneity: Confirm the bioink is homogeneous without phase separation [6].
- Adjust Pressure: Gradually increase extrusion pressure. If working with cells, limit pressure to a maximum of 2 bar to preserve viability. If clogging persists, change to a larger needle gauge [6].
- Particle Size Check: If using nanoparticles, ensure their size is smaller than the needle gauge diameter to prevent physical clogging. Pre-characterize particle size and ensure they do not agglomerate in the bioink [6].
FAQ 5: How can I maintain cell viability and prevent contamination during long-term incubation?
- Problem: Printed constructs show contamination or low cell viability after incubation.
- Solution:
- Sterile Environment: Maintain a sterile environment using biosafety cabinets. Use printers with inbuilt Germicidal UV and HEPA filters if available. Sterilize the print bed with 70% ethanol before printing [6].
- Material Sterilization: Ensure all biomaterials and media are sterilized (via autoclave, UV, or gamma irradiation) before being mixed with cells to prepare bioink [6].
Key Experimental Protocols for Vascular Conduit Bioprinting
This section outlines a detailed methodology for fabricating a scaffold-free, cell-laden macroscale vascular conduit, adapted from a recent study [2]. The protocol emphasizes the creation of a functional vessel without synthetic scaffolds, leveraging a rotating mandrel for structural support.
Protocol: Scaffold-Free Bioprinting of a Vascular Conduit Using a Rotating Mandrel
Objective: To fabricate a tri-layered, cellular vascular conduit suitable for in vivo implantation and integration studies.
Materials and Reagents:
- Cells: Rat aortic smooth muscle cells (SMCs) and rat fibroblasts (FCs). Use cells at passage 10 or less [2].
- Bioink Kit: HyStem-C Kit (or equivalent), containing Hyaluronic Acid, Gelatin, and Polyethylene Glycol Diacrylate (PEGDA) [2].
- Bioprinter: An extrusion-based bioprinter (e.g., Organovo) capable of precise temperature and pressure control.
- Hardware: A sterile, rotating stainless-steel mandrel (diameter tailored to the desired vessel size).
- Cell Culture Media: Standard media appropriate for the chosen SMCs and FCs.
Step-by-Step Procedure:
Bioink Preparation: a. Culture and expand rat SMCs and FCs separately until 80-90% confluence is achieved [2]. b. Harvest the cells and create two distinct bioink mixtures according to the hydrogel kit instructions: * Mixture 1 (Tunica Media Mimic): 70% SMCs and 30% FCs, encapsulated at a final cell density of 100 x 10^6 cells/mL in the crosslinked hydrogel [2]. * Mixture 2 (Tunica Adventitia Mimic): 100% FCs, encapsulated at the same high cell density [2]. c. Keep the bioinks on ice or in cooled printer cartridges to prevent premature crosslinking.
Mandrel and Printer Setup: a. Sterilize the stainless-steel mandrel and mount it onto the rotating axis within the bioprinter's sterile environment. b. Calibrate the printer's extruder path to align with the rotating mandrel, ensuring a consistent stand-off distance between the nozzle and the mandrel surface. c. Set the printing temperature to maintain the bioink's viscosity for optimal extrusion, typically between 4-10°C.
Bioprinting Process: a. Load the SMC/FC bioink (Mixture 1) into the printer cartridge. b. Initiate mandrel rotation and extrude the bioink in a continuous, helical pattern along the length of the rotating mandrel to form the inner layer of the conduit. c. After completing the first layer, switch to the FC bioink (Mixture 2). d. Extrude the second layer directly over the first, creating an outer fibroblast-rich layer. This two-layer structure mimics the tunica media and adventitia of a native blood vessel [2]. e. Key printing parameters to optimize include: * Extrusion Pressure: Adjust to achieve a consistent filament without straining cells. * Print Speed: Synchronize with mandrel rotation speed for uniform deposition. * Nozzle Gauge: Select based on the desired wall thickness and to minimize cell shear stress.
Post-Printing Crosslinking & Maturation: a. Following deposition, the PEGDA-based hydrogel is crosslinked, typically via exposure to UV light or a chemical initiator as per the kit's protocol, to solidify the structure [2]. b. Transfer the mandrel with the printed conduit to a bioreactor or culture vessel. c. Culture the construct under dynamic flow conditions if possible, using specific culture media to promote tissue maturation and ECM production over several days [2].
Pre-Implantation Processing: a. After the maturation period, carefully remove the solidified vascular conduit from the mandrel. b. The conduit is now ready for in vivo implantation studies. The inner lumen is not pre-seeded with endothelial cells in this protocol, relying on in vivo self-endothelialization by host progenitor cells after implantation [2].
Key Parameters for Successful Conduit Fabrication
Table 1: Critical Parameters for Scaffold-Free Vascular Conduit Bioprinting [2]
| Parameter | Specification | Function/Rationale |
|---|---|---|
| Cell Density | 100 x 10^6 cells/mL | Provides high cell-cell interaction for scaffold-free integrity and ECM production. |
| Cell Ratio (Inner Layer) | 70% SMC / 30% FC | Recapitulates the cellular composition of the native tunica media. |
| Bioink Composition | Hyaluronic Acid, Gelatin, PEGDA | Provides a temporary, cell-supportive hydrogel matrix with tunable mechanical properties. |
| Structural Support | Rotating Steel Mandrel | Acts as a scaffold-free template for the tubular conduit shape during printing. |
| Endothelialization | Not pre-seeded | Relies on host-mediated endothelialization post-implantation for intima formation. |
Visualization of Workflows and Signaling
Vascular Conduit Bioprinting and Host Integration Workflow
This diagram outlines the complete experimental journey from bioink preparation to the assessment of host integration, highlighting key steps and checkpoints.
Title: Vascular Conduit Bioprinting and Integration Workflow
Key Signaling Pathways in Host Graft Integration
Successful integration of bioprinted vascular conduits relies on critical biological signaling pathways that drive host cell recruitment and vessel remodeling. This diagram maps the primary pathways involved.
Title: Key Signaling for Host Vascular Integration
The Scientist's Toolkit: Essential Research Reagents
This table catalogs the core materials and reagents essential for the experimental bioprinting of macroscale vascular conduits, as derived from the featured protocol and related literature.
Table 2: Essential Research Reagents for Vascular Conduit Bioprinting [35] [1] [2]
| Reagent/Material | Function in the Protocol | Example & Notes |
|---|---|---|
| Smooth Muscle Cells (SMCs) | Primary cellular component for the tunica media layer; provides contractile function and ECM production. | Rat aortic SMCs [2]. Critical for mechanical strength and vasoactivity. |
| Fibroblasts (FCs) | Primary cellular component for the tunica adventitia; provides structural support and secretes collagen. | Rat aortic fibroblasts [2]. |
| Hyaluronic Acid (HA) | A core component of the bioink hydrogel; provides hydration, compression strength, and supports cell motility. | Part of HyStem-C Kit [2]. Mimics the native extracellular matrix. |
| Gelatin | A core component of the bioink hydrogel; provides cell adhesion motifs (e.g., RGD sequences) for cell attachment and proliferation. | Part of HyStem-C Kit [2]. Often derived from denatured collagen. |
| PEGDA (Polyethylene Glycol Diacrylate) | A synthetic polymer used as a crosslinker in the bioink; provides tunable mechanical properties and stabilizes the printed structure. | Part of HyStem-C Kit [2]. Crosslinks via UV light or chemical initiators. |
| Vascular Endothelial Growth Factor (VEGF) | A key growth factor used in many vascularization strategies to promote endothelial cell migration, proliferation, and vessel formation. | Often added to bioink or culture media [35] [25]. Critical for guiding host vasculature integration. |
| Basic Fibroblast Growth Factor (bFGF) | A growth factor that stimulates the proliferation of various cell types, including endothelial cells and SMCs, supporting vessel maturation. | Used as an additive in culture [35]. |
| Decellularized ECM (dECM) | A natural biomaterial derived from decellularized tissues; used as a bioink component to provide a tissue-specific microenvironment. | Can be derived from various tissues to enhance biological function [1] [30]. |
Scaffold-free bioprinting represents a paradigm shift in tissue engineering, moving away from exogenous biomaterial scaffolds toward systems that rely on cellular self-assembly to create functional tissues. Within cardiovascular medicine and the broader challenge of integrating bioprinted tissues with host vasculature, these approaches offer significant advantages, including high cell density, minimized foreign body response, and the capacity for cells to produce and organize their own native extracellular matrix (ECM) [36]. The absence of artificial scaffolds eliminates concerns about scaffold degradation rates, potential inflammatory responses, and interference with direct cell-cell communication, which are crucial for forming functional vascular networks [2] [37]. This technical support center focuses on two prominent scaffold-free techniques—the Kenzan Method and Rotating Mandrel Techniques—providing researchers with detailed protocols, troubleshooting guides, and resources to advance their work in vascularized tissue engineering.
Core Principles and Methodologies
The Kenzan Method
The Kenzan method is a robotic bioprinting technology that utilizes a microneedle array to hold and position cellular spheroids as building blocks for tissue construction without the use of hydrogel-based bioinks or scaffolds [38] [39].
- Fundamental Principle: Pre-formed, self-assembled cell spheroids are impaled onto a fine array of stainless-steel microneedles (the "Kenzan," Japanese for "sword array") by a robotic arm. The system positions the spheroids in a predefined 3D pattern, and through subsequent fusion processes, the spheroids coalesce into a single, cohesive tissue construct [38] [39]. The microneedles are removed after the tissue has fused sufficiently to become self-supporting.
- Key Experimental Protocol: The following workflow is adapted from established practices for creating tubular structures like vascular grafts or cardiac patches [39] [40]:
- Spheroid Preparation: Cells (e.g., fibroblasts, smooth muscle cells, or cardiomyocytes) are aggregated into spheroids of a highly uniform diameter, typically in the range of 100-500 µm, using techniques such as hanging drop or gyratory shaking.
- Robotic Assembly: The spheroids are transferred to a bioprinter (e.g., the Regenova system by Cyfuse Biomedical). Using computer-aided design (CAD) models, the robotic arm sequentially picks up individual spheroids and impales them onto the microneedles of the Kenzan array to form the desired tubular or patch geometry.
- Maturation and Fusion: The assembled construct is transferred to a bioreactor, which provides culture medium and, for contractile tissues like cardiac patches, may provide electrical or mechanical stimulation. Over several days, the spheroids fuse into a continuous tissue, secreting their own ECM.
- Kenzan Removal: Once the construct has gained sufficient mechanical integrity from ECM deposition and tissue remodeling, the entire Kenzan array is carefully removed, leaving a scaffold-free tissue.
Rotating Mandrel Techniques
Rotating mandrel techniques are a distinct scaffold-free approach that uses a cylindrical collector to directly deposit cells or cell-laden bioinks to form tubular tissue structures, mimicking the anatomy of blood vessels.
- Fundamental Principle: A rotating mandrel (typically made of stainless steel or glass) serves as a temporary mold or collector. A bioink—which can be a high-density cell paste or a cell-laden hydrogel designed for minimal long-term scaffolding—is extruded onto the rotating mandrel, forming a concentric tubular layer [2]. The resulting structure is then matured in a bioreactor.
- Key Experimental Protocol: The following protocol is derived from recent work fabricating and implanting functional blood vessels in animal models [2]:
- Bioink Preparation: Cells such as rat fibroblasts (FCs) and smooth muscle cells (SMCs) are harvested and mixed to create a bioink. A representative formulation uses a high cell density (e.g., 100 million cells per mL) suspended in a hydrogel precursor like a HyStem-C kit containing hyaluronic acid, gelatin, and PEGDA. This hydrogel provides initial structural support but is designed to be remodeled and replaced by native ECM, aligning with scaffold-free principles [2].
- Tubular Fabrication: The bioink is loaded into a bioprinter (e.g., an Organovo system) equipped with a syringe extruder. The bioink is extruded directly onto a rotating mandrel of the desired vessel diameter. Multiple layers can be deposited to create a multi-layered vessel wall structure (e.g., an SMC/FC layer mimicking the tunica media and an FC layer mimicking the tunica adventitia) [2].
- Cross-linking and Maturation: The deposited tube is cross-linked, often via photo-crosslinking for PEG-based hydrogels. The construct, still on the mandrel, is transferred to a bioreactor for further culture, allowing for tissue compaction and ECM production.
- Mandrel Removal and Implantation: After maturation, the vascular conduit is carefully slid off the mandrel. Studies have shown these constructs can be surgically implanted (e.g., into rat aortae), where they become incorporated into the native vasculature and demonstrate physiological function [2].
The Scientist's Toolkit: Essential Research Reagents and Materials
Table 1: Key Reagents and Materials for Scaffold-Free Bioprinting
| Item | Function/Description | Example Use Case |
|---|---|---|
| Cell Types | ||
| Fibroblasts (FCs) | Secrete core structural ECM proteins like collagen; form the adventitial layer of vessels [2]. | Used in both Kenzan and mandrel methods to provide structural integrity. |
| Smooth Muscle Cells (SMCs) | Provide contractile function and form the medial layer of vessels; crucial for vascular tone [2]. | A key component in bioinks for vascular grafts. |
| Endothelial Cells (ECs) | Form the confluent, anti-thrombogenic lumen lining (intima) of blood vessels [32] [41]. | Often seeded post-printing or expected to populate via host remodeling [2]. |
| Bioink Components | ||
| HyStem-C Kit (Hyaluronic Acid, Gelatin, PEGDA) | A hydrogel kit that provides temporary, biocompatible support for cells; allows cell motility and ECM deposition before biodegradation [2]. | Used as a carrier for high-density cells in rotating mandrel bioprinting [2]. |
| Hardware & Equipment | ||
| Regenova Bioprinter | A commercial bioprinter implementing the Kenzan method for scaffold-free tissue assembly [36] [38]. | Used for automated assembly of cell spheroids into complex 3D structures. |
| Rotating Mandrel Collector | A cylindrical collector that rotates to facilitate the deposition of bioinks into tubular forms [2]. | Central to the fabrication of tubular vascular grafts. |
| Perfusion Bioreactor | Provides nutrient flow and mechanical stimulation (e.g., pulsatile flow) to maturing tissue constructs [2] [42]. | Essential for post-printing maturation of thick tissues and vascular grafts. |
Troubleshooting Guide and Frequently Asked Questions (FAQs)
Troubleshooting Common Experimental Issues
Table 2: Troubleshooting Guide for Scaffold-Free Bioprinting
| Problem | Potential Causes | Recommended Solutions |
|---|---|---|
| Poor Spheroid Fusion (Kenzan) | • Spheroids too large/small.• Incorrect cell type or viability.• Inadequate ECM production. | • Standardize spheroid size (100-500 µm) [37].• Optimize cell seeding density and confirm high viability (>90%).• Use co-cultures (e.g., include fibroblasts) to boost collagen secretion [38]. |
| Low Mechanical Integrity | • Insufficient maturation time.• Lack of mechanical conditioning. | • Extend bioreactor culture time (weeks).• Apply cyclic strain or pulsatile flow in the bioreactor to stimulate ECM alignment and strengthening [2] [42]. |
| Bioink Detachment from Mandrel | • Unsuitable surface tension or hydrophobicity of the mandrel.• Bioink rheology is not optimized. | • Treat mandrel with plasma or coat with a thin adhesive layer (e.g., gelatin).• Adjust bioink viscosity and cross-linking kinetics for immediate gelation upon deposition [2] [41]. |
| Incomplete Endothelialization | • Failure to seed sufficient ECs.• Lack of pro-angiogenic signals. | • Seed ECs onto the lumen post-fabrication and culture under flow.• Incorporate angiogenic factors (e.g., VEGF) into the bioink or culture medium to attract host ECs in vivo [32] [42]. |
| Cell Death in Construct Core | • Limited nutrient diffusion in thick, avascular constructs. | • Design constructs with perfusable channels.• Use a perfusion bioreactor to maintain cell viability throughout the construct during maturation [32] [42]. |
Frequently Asked Questions (FAQs)
Q1: Can the Kenzan method truly be considered "scaffold-free" given the temporary use of microneedles? Yes, it is classified as scaffold-free because the microneedles are a temporary manufacturing aid, not a biodegradable biomaterial scaffold intended to be incorporated into the final tissue. The functional tissue is formed by the fused cell spheroids and their self-produced ECM after the needles are removed [38] [39].
Q2: What are the key considerations for choosing between the Kenzan and rotating mandrel methods for vascular graft fabrication? The choice involves a trade-off between geometric complexity and fabrication speed.
- Kenzan Method: Excels at creating complex 3D architectures and hierarchical branching structures, but the process of placing individual spheroids can be time-consuming [36] [37].
- Rotating Mandrel: Is typically faster and more straightforward for creating straight or simple curved tubular grafts, making it highly suitable for producing larger segments of vessels for implantation [2].
Q3: How can I assess the functionality of my scaffold-free vascular construct in vitro before moving to in vivo studies? A multi-level assessment is recommended:
- Cellular Level: Assess viability (live/dead staining), phenotype (immunofluorescence for markers like CD31/VE-cadherin for ECs, α-SMA for SMCs), and ECM production (collagen/elastin staining) [32] [31].
- Tissue Level: Measure burst pressure and suture retention strength to evaluate mechanical integrity [2] [31]. For contractile vessels, assess response to vasoactive agents.
- Organ Level: Use a perfusion system to demonstrate patency and non-thrombogenicity under flow. "Vessel-on-a-chip" models can be used for drug testing and disease modeling [31].
Q4: Our bioprinted vessel has good mechanical strength but is not integrating well with the host vasculature after implantation. What could be the issue? Successful integration requires both structural and biological compatibility. Ensure your construct has:
- Porosity/Permeability: To allow host cell infiltration and neovascularization from the surrounding tissue.
- Pro-Angiogenic Signaling: Incorporate cytokines like VEGF or SDF-1α to actively recruit host endothelial cells and promote anastomosis (connection) between the implant and host vessels [42].
- Surface Compatibility: A confluent endothelium in the lumen is critical to prevent thrombosis and facilitate seamless integration with the host's circulatory system [32] [31].
Frequently Asked Questions (FAQs)
Q1: What is the GRACE ERA platform and how does it accelerate vascular integration research? The GRACE ERA (Editor for Research Acceleration) is an open-source tool that functions as a complete Integrated Development Environment (IDE) for research. It allows researchers to deconstruct complex ideas, like vascular integration protocols, into reusable components, orchestrate them into automated workflows, and collaborate with AI models in a structured, verifiable way. This accelerates research by providing a "factory-maker" architecture to structure, automate, and scale experimental design and data analysis [43].
Q2: My bioprinted vascular scaffolds lack structural integrity. What are the primary factors to investigate? The structural integrity of bioprinted scaffolds is predominantly governed by the crosslinking method. You should assess:
- Crosslinking Method: The choice of crosslinking significantly influences the mechanical properties and cellular behavior of the construct [6].
- Bioink Viscosity: Insufficient bioink viscosity can cause layers to merge or collapse instead of stacking into a 3D structure. Perform rheological tests to understand the bioink's thixotropic nature before printing [6].
- Printing Speed: For self-crosslinkable polymers, printing at ultra-low speeds gives the struts adequate time to crosslink, enhancing integrity [6].
Q3: How can I prevent needle clogging during the bioprinting process? Needle clogging can be addressed through several methods:
- Ensure bioink homogeneity without any phase separation.
- Gradually increase pressure to extrude the clogged material (limit to 2 bar when working with cells to maintain viability).
- Change the needle gauge if extrusion does not occur or clogging persists.
- When using nanoparticles, confirm the particle size is smaller than the needle gauge diameter to prevent clogging and characterize particle size using SEM to prevent agglomeration [6].
Q4: What is the difference between "Editor" and "Build" modes in a GRACE ERA AI Chain? The mode dictates the order in which the AI processes instructions and content, which is a crucial strategic choice:
- Editor Mode (New Prompt First): The AI receives instructions from your Template before it sees the input from the previous step. This is best for analytical tasks like summarizing data, reformatting, or extracting information. Analogy: Handing an editor a style guide before giving them a manuscript (
Instructions -> Content) [43]. - Build Mode (Content First): The AI receives the input from the previous step before it sees your Template's instructions. This is ideal for creative synthesis, such as generating a novel theory from research notes or designing new code from a spec. Analogy: Giving an architect all the raw survey data before asking them to design a building (
Content -> Instructions) [43].
Q5: What are "Sticky Parts" in a GRACE ERA Chain? A "Sticky Part" is a piece of content (like a specific instruction or persona) whose content is included in every subsequent AI step in a chain, not just the one where its template is initially used. For example, a "personamasterresearcher" part can ensure every AI in a multi-step chain adopts the same expert persona, maintaining consistency [43].
Troubleshooting Guides
Guide: Troubleshooting Bioprinted Vascular Layer Stacking and Integrity
Problem: During multi-layer bioprinting, layers merge or collapse on the bottom layer, resulting in a 2D-like structure instead of a 3D construct.
Investigation and Solutions:
- Cause: Insufficient Bioink Viscosity/Crosslinking
- Action: Perform rheological tests to understand the thixotropic nature of your bioink before printing.
- Action: Optimize the crosslinking time to ensure the bottom layer maintains sufficient structural integrity to support subsequent layers. For ionic crosslinking, characterize the optimal crosslinker concentration. For photocrosslinking, ensure the appropriate wavelength and exposure time [6].
- Cause: Poor G-code Optimization (z-height)
- Action: If the needle embeds itself in the previous layer, the z-height is likely too low. Optimize the z-height in your G-code based on the defined height of each layer [6].
- Action: If the material is printing in the air without adhering to the bed, the z-height may be too high. Re-calibrate the gap between the needle and the print surface [44].
Guide: Addressing Cell Viability and Contamination in Long-Term Cultures
Problem: Cells in the bioprinted construct are losing viability or becoming contaminated during incubation.
Investigation and Solutions:
- Cause: Non-sterile Environment or Materials
- Action: Sterilize the print area using 70% ethanol before printing. If your printer has built-in features (like Germicidal UV and HEPA filters), switch on the UV for 30 minutes before printing, then turn it off and switch on the HEPA filter for the duration of the operation [6].
- Action: Ensure all media and biomaterials are sterilized (via autoclave, UV, or gamma irradiation) before being mixed with cells. Always handle bioink preparation in a biosafety cabinet under hygienic conditions [6].
Guide: Resolving GRACE ERA Chain Execution Issues
Problem: A GRACE ERA Chain does not produce the expected output or fails to execute properly.
Investigation and Solutions:
- Cause: Incorrect AI Step Mode Selection
- Action: Verify the mode (Editor vs. Build) for each AI Step. Use Editor Mode for tasks requiring analysis of given content (e.g., summarizing fetched data). Use Build Mode for tasks requiring creative synthesis from given content (e.g., generating a hypothesis from notes) [43].
- Cause: Unclear Instruction Flow
- Action: Use the Preview function to see the exact, final prompt that will be sent to the AI. This is indispensable for debugging complex templates and ensuring parts are combined as intended [43].
- Action: Check for dependencies in the "Manage" view. If you try to delete a Part that is used in a Template, you will be warned about this dependency, preventing workflow breaks [43].
Research Reagent Solutions for Vascularized Bioprinting
Table: Essential Materials for Bioprinting Functional Vascular Tissues
| Material/Reagent | Function in Vascular Bioprinting | Example Formulations |
|---|---|---|
| Gelatin Methacryloyl (GelMA) | A widely used photopolymerizable hydrogel that provides a tunable mechanical environment conducive to cell adhesion, proliferation, and formation of vascular structures [45]. | Often combined with Hyaluronic Acid (HA) or Fibrin to enhance printability and biological function. Used with HUVECs and SMCs for small and large caliber vessels [45]. |
| Polyethylene Glycol Diacrylate (PEGDA) | A synthetic bioink component offering high modularity and mechanical strength; often used in photocrosslinking systems to provide structural support [2]. | Used in a hydrogel kit with hyaluronic acid and gelatin to create vascular conduits, providing compression strength while allowing cell motility [2]. |
| Decellularized ECM (dECM) | Biomaterial derived from native tissues, providing a complex, biologically active microenvironment that can enhance cell differentiation and vascular maturation [45]. | Examples include bone-derived dECM (BdECM) and pancreatic ECM (pECM), used with stem cells and HUVECs to promote vascularized tissue formation [45]. |
| Hyaluronic Acid (HA) | A natural polymer that contributes to hydration, lubrication, and cell motility within the bioink, mimicking aspects of the native extracellular matrix [2]. | Part of the HyStem-C Kit, used in conjunction with gelatin and PEGDA to create a supportive environment for SMCs and fibroblasts in vascular conduits [2]. |
| Fibrin/Fibrinogen | A natural polymer involved in blood clotting; provides excellent cellular binding sites and promotes angiogenesis and endothelial cell network formation [45]. | Used in various composites, such as with GelMA or PEG, to create interpenetrating polymer networks that support vascular tissue development [45]. |
Experimental Protocol: Implantation and Assessment of 3D-Bioprinted Blood Vessels
This protocol is adapted from a study detailing the development and deployment of a functional 3D-bioprinted blood vessel in a rat model, focusing on assessing integration with the host vasculature [2].
1. Bioink Preparation
- Cell Culture: Expand rat aortic fibroblasts (FCs) and rat venous smooth muscle cells (SMCs) in culture. Harvest cells at passage 10 or less upon reaching 80-90% confluence.
- Hydrogel Preparation: Use a commercial hydrogel kit (e.g., HyStem-C containing hyaluronic acid, gelatin, and PEGDA). Follow the manufacturer's instructions to prepare the components.
- Bioink Formulation: Encapsulate the harvested cells at a high density (e.g., 100 × 10⁶ cells/mL) in the crosslinked hydrogel mixture. A representative ratio is 70% SMCs and 30% FCs to mimic the vascular wall structure [2].
2. Scaffold-Free Bioprinting Using a Rotating Mandrel
- Mandrel Setup: Secure a sterile, cylindrical mandrel (e.g., glass or stainless steel) of the desired vessel diameter into the bioprinter.
- Printing Process: Utilize a bioprinter (e.g., Organovo) to deposit the bioink in a layered, continuous fashion onto the rotating mandrel. This method creates a tubular construct without an artificial scaffold, relying on the high cell density and secreted ECM for structure.
- Post-Printing Culture: Transfer the bioprinted vessel construct into a bioreactor or culture medium to allow for initial maturation under controlled conditions.
3. In Vivo Implantation and Functional Assessment
- Surgical Implantation: Anastomose the 3D-bioprinted vascular conduit into the target location in the animal model (e.g., rat aorta). Ensure surgical techniques minimize ischemia time.
- Assessment of Host Integration:
- Patency and Physiological Behavior: Monitor the implanted graft over time using Doppler ultrasound or similar imaging to ensure blood flow (patency) and assess if it shows the physiological behavior of a native vessel, such as pulsatility.
- Histological Analysis: Upon explanation, perform histological staining (e.g., H&E, Masson's Trichrome) to evaluate:
- Tissue Incorporation: Examine how well the graft is incorporated into the native surrounding tissue.
- Self-Endothelialization: Check the lumen for the presence of an endothelial cell layer (tunica intima), which may form from host progenitor cells circulating in the blood [2].
- Matrix Remodeling: Assess the structure and composition of the extracellular matrix within the graft.
Workflow and Pathway Visualizations
GRACE ERA Workflow for Vascular Research
Vascular Integration Assessment Pathway
Frequently Asked Questions (FAQs)
Q1: What are the primary causes of failure for bioprinted cardiac patches after implantation? The primary causes of failure are poor vascular integration and inadequate electromechanical coupling with the host tissue. Without rapid formation of a functional vascular network, the patch core becomes necrotic due to hypoxia and insufficient nutrient delivery [46] [47]. Furthermore, if the patch does not establish proper electromechanical coupling with the native myocardium, it cannot contract synchronously with the host heart, leading to arrhythmias and functional failure [47].
Q2: Why is achieving high cell density in bioprinted liver tissues so challenging? Achieving high cell density is technically challenging due to bioink viscosity limitations. As cell density increases, it significantly alters the bioink's rheological properties. For instance, in hyaluronic acid-based bioinks, cell densities exceeding 2.5 × 10^8 cells/mL can prevent proper cross-linking, leading to a dramatic loss of structural integrity [48]. High-viscosity bioinks required for high cell densities also risk nozzle clogging during extrusion printing and expose cells to damaging shear stresses [49].
Q3: What are the critical mechanical properties a bioprinted aorta must possess? A bioprinted vascular graft must mimic native vessels to function effectively. The key mechanical properties are outlined in the table below [48]:
Table 1: Critical Mechanical Properties for Bioprinted Aortas
| Property | Native Blood Vessel | Target for Artificial Vessel |
|---|---|---|
| Burst Pressure | 3775 mmHg | >1000 mmHg |
| Tensile Strength | 0.2–6.0 MPa | >1 MPa |
| Suture Retention | Yes | Essential |
| Compliance | 10-20%/100 mmHg | Matches native tissue |
Q4: Which bioprinting technique is best for creating fine vascular networks? Laser-assisted bioprinting is particularly suited for creating fine, high-resolution capillary networks. It is a nozzle-free technique that can handle a wide range of bioink viscosities and can print at high cell concentrations (up to 1×10^8 cells/mL) while maintaining high cell viability and precision [49]. However, it is slower and more expensive than other methods, making it less ideal for printing large tissue volumes [49].
Troubleshooting Guides
Issue 1: Poor Vascularization in Implanted Cardiac Patches
Problem: Central necrosis observed in the implanted cardiac patch due to insufficient blood supply.
Solutions:
- Pre-vascularization: Bioprint a capillary network directly within the patch using a co-culture of endothelial cells and cardiac cells. The use of sacrificial bioinks (e.g., Pluronic F127) can create perfusable channels [35] [48].
- Incorporate Angiogenic Factors: Blend Vascular Endothelial Growth Factor (VEGF) or basic Fibroblast Growth Factor (bFGF) into the bioink. A slow, sustained release profile has been shown to promote greater and more stable vessel formation than rapid release [35].
- Cell Selection: Utilize induced pluripotent stem cells (iPSCs) or mesenchymal stem cells (MSCs) that can differentiate into vascular cell types and secrete pro-angiogenic signals to recruit host blood vessels [35].
Issue 2: Low Cell Viability and Function in Bioprinted Liver Tissues
Problem: Hepatocytes show poor survival and minimal metabolic function (e.g., albumin production, detoxification) post-printing.
Solutions:
- Optimize Bioink Composition: Use a decellularized liver extracellular matrix (dECM)-based bioink. This material provides liver-specific biochemical cues that enhance hepatocyte function and maturation [50] [49].
- Implement Perfusion Bioreactors: After printing, culture the liver construct in a perfusion bioreactor that provides continuous medium flow. This mimics blood flow, improving oxygen and nutrient delivery while removing waste products, which is critical for maintaining the function of high-metabolism hepatocytes [49].
- Create Zonated Architectures: Design the tissue structure to replicate the natural lobule or acinus organization of the liver, which is essential for establishing the metabolic zonation that drives full liver function [50] [49].
Issue 3: Structural Failure of Bioprinted Aortic Grafts
Problem: The bioprinted vessel lacks mechanical strength, leading to aneurysm, rupture, or suture pull-out under physiological pressure.
Solutions:
- Reinforce with Synthetic Polymers: Create a composite bioink by blending natural polymers (e.g., collagen, gelatin) with synthetic polymers like poly(L-lactide-co-caprolactone) to enhance tensile strength and burst pressure [2] [48].
- Mimic Native Vessel Structure: Bioprint a tri-layered structure using a rotating mandrel as a support. Seed the construct with fibroblasts to form an adventitia-like outer layer and smooth muscle cells to form a media-like middle layer, replicating the mechanical integrity of a native artery [2].
- Optimize Cross-linking: Employ a dual cross-linking strategy (e.g., ionic followed by UV light) to strengthen the hydrogel network, improving its resistance to deformation and rupture [48].
The Scientist's Toolkit: Essential Research Reagents & Materials
Table 2: Key Reagents for Vascularized Bioprinting Research
| Reagent/Material | Function | Example Applications |
|---|---|---|
| Gelatin Methacryloyl (GelMA) | A photopolymerizable hydrogel offering good cell adhesion and tunable mechanical properties. | A versatile base bioink for cardiac patches, liver models, and vascular structures [48] [49]. |
| Hyaluronic Acid (HA) | A natural polymer that promotes cell motility and proliferation; often modified for cross-linking. | Used in bioink formulations for its biocompatibility and role in tissue development [2] [48]. |
| Decellularized ECM (dECM) | Tissue-specific hydrogel that provides native biochemical cues for enhanced cell function. | Critical for creating biologically active liver and cardiac bioinks [50] [48]. |
| Vascular Endothelial Growth Factor (VEGF) | A key signaling protein that stimulates the growth of new blood vessels (angiogenesis). | Incorporated into bioinks or culture medium to promote vascularization in patches and tissues [35]. |
| Pluronic F-127 | A sacrificial material that can be printed as a temporary structure and later dissolved. | Used to create hollow, perfusable channels within bioprinted tissues to mimic vasculature [48]. |
| Induced Pluripotent Stem Cells (iPSCs) | A patient-specific cell source that can be differentiated into any cell type, including cardiomyocytes and hepatocytes. | The foundation for creating patient-specific cardiac patches and liver tissues, avoiding immune rejection [35] [51]. |
Experimental Protocol: Implantation and Analysis of a Bioprinted Aorta
This protocol summarizes the key methodology from a recent study that successfully implanted a 3D-bioprinted aorta in a rat model [2].
1. Bioink Preparation:
- Cell Source: Isolate and culture rat aortic smooth muscle cells (SMCs) and rat fibroblasts (FCs). Use cells at passage 10 or less.
- Hydrogel System: Use a commercial hydrogel kit like HyStem-C, containing thiolated hyaluronic acid, thiolated gelatin, and polyethylene glycol diacrylate (PEGDA).
- Formulation: Prepare two bioinks. Encapsulate SMCs at 70% and FCs at 30% in the first bioink for the "media" layer. Use 100% FCs in the second bioink for the "adventitia" layer. The total cell density should be 100 × 10^6 cells/mL.
2. Bioprinting Process:
- Technique: Use a scaffold-free, extrusion-based bioprinting system.
- Mandrel Support: Utilize a rotating cylindrical mandrel to build the tubular structure.
- Printing Sequence:
- First, print the SMC/FC blend bioink directly onto the rotating mandrel to form the inner layer.
- Second, print the FC-only bioink over the first layer to form the outer layer.
- Cross-linking: Allow the PEGDA in the bioink to cross-link to stabilize the structure.
3. Implantation Surgery:
- Animal Model: Anesthetize a rat and perform a midline laparotomy.
- Graft Placement: Resect a segment of the native abdominal aorta and replace it with the bioprinted graft of matching diameter using microsurgical anastomosis techniques.
- Monitoring: Allow the animal to recover and monitor for post-operative complications.
4. Post-Implantation Analysis:
- Patency and Integration: After a pre-determined period (e.g., 3-6 months), explant the graft. Assess integration with host tissue and check for aneurysm formation or stenosis.
- Histology: Perform staining (e.g., H&E, Masson's Trichrome) to examine tissue remodeling, collagen deposition, and the presence of an endothelial cell layer (tunica intima) on the luminal surface.
- Functionality: Evaluate the graft's mechanical performance and physiological behavior compared to a native vessel.
Visualization of Key Concepts
Diagram 1: Host Integration of a Bioprinted Cardiac Patch
This diagram illustrates the multi-stage process of integrating a pre-vascularized cardiac patch with the host's circulatory system.
Diagram 2: Workflow for Bioprinting a Functional Aorta
This flowchart outlines the key steps in the scaffold-free bioprinting and validation of a vascular graft.
Overcoming Integration Barriers: Immune Response, Perfusion, and Long-Term Stability
Troubleshooting Guide: FAQs on Bioprinted Tissue Integration
This technical support center provides targeted guidance for researchers confronting the primary obstacles in integrating bioprinted tissues with host vasculature. The following FAQs address specific, experimentally observed issues and their solutions.
Thrombosis (Blood Clotting)
FAQ 1: Our bioprinted vascular constructs consistently show signs of thrombosis under flow. How can we improve the anti-thrombogenic properties of the lumen?
Thrombosis occurs when the inner lining of the bioprinted vessel fails to prevent platelet adhesion and clot formation.
- Root Cause: A confluent and functional endothelial cell (EC) layer is the primary barrier against thrombosis. Thrombosis often indicates poor EC adhesion, low cell viability post-printing, or the absence of a stable, quiescent endothelium that expresses anti-thrombogenic factors [52].
- Solution:
- Ensure a Confluent Endothelium: Prioritize the formation of a continuous endothelial monolayer on the lumen of your construct. Using endothelial progenitor cells, such as endothelial colony-forming cells (ECFCs), can offer higher angiogenic potential compared to mature ECs [53].
- Apply Physiological Shear Stress: Culture your vascular constructs in a perfusion bioreactor that gradually introduces and maintains physiological flow rates. Shear stress is a critical cue that promotes endothelial cell alignment, strengthens cell-cell junctions, and induces a quiescent, anti-thrombogenic phenotype [1] [25].
- Functionalize Your Bioink: Incorporate specific peptides (e.g., RGD) into your bioink formulation to enhance endothelial cell adhesion and spreading, thereby supporting monolayer formation [9] [1].
Table 1: Key Experimental Assessments for Thrombosis
| Assessment Method | What It Measures | Desired Outcome |
|---|---|---|
| Immunohistochemistry (IHC) for CD31/PECAM-1 | Visualizes endothelial cell coverage and junction continuity [53]. | A continuous, unbroken lining of ECs. |
| Platelet Adhesion Assay | Quantifies the number of platelets that adhere to the lumen under flow [52]. | Minimal to no platelet adhesion. |
| qPCR / ELISA for Thrombomodulin & NO Synthase | Measures expression of key anti-thrombogenic proteins produced by healthy ECs [52]. | Upregulation of anti-thrombogenic genes. |
Experimental Protocol: Perfusion Bioreactor Conditioning
- Objective: Mature a bioprinted vascular conduit and reduce thrombogenicity.
- Materials: Bioreactor system, culture medium, bioprinted vessel.
- Steps:
- After endothelialization, mount the construct in the bioreactor.
- Initiate a low-flow, low-shear stress perfusion (e.g., 1-3 dyn/cm²) for 24-48 hours.
- Gradually increase the shear stress to physiological levels (10-15 dyn/cm² for arteries) over several days.
- Culture under sustained flow for a minimum of 7-14 days to allow for endothelial maturation [1] [25].
- Validation: Perform IHC for CD31 and VE-cadherin to confirm a confluent endothelial layer with mature junctions.
FAQ 2: The bioink material itself seems to be triggering a clotting response. How can we improve the hemocompatibility of our biomaterials?
- Root Cause: The surface chemistry or mechanical properties of the base polymer may be activating the coagulation cascade or platelets [53] [52].
- Solution:
- Conduct Hemocompatibility Testing: Follow standardized ISO protocols for hemocompatibility early in your bioink development. This includes tests for hemolysis (red blood cell rupture), platelet activation, and coagulation kinetics [53].
- Select Innert or Bioactive Polymers: Use naturally passive polymers like polyethylene glycol (PEG) or incorporate bioactive molecules like heparin, a natural anticoagulant, into the bioink to locally inhibit clot formation [2] [1].
Immune Rejection and Poor Host Integration
FAQ 3: Our implanted bioprinted graft is not connecting to the host's blood vessels (inosculation). How can we promote this integration?
Failure to inoculate with the host vasculature leads to graft ischemia and death.
- Root Cause: The bioprinted construct lacks the necessary biological signals to attract host blood vessels and facilitate connection. This can be due to insufficient pro-angiogenic cues or a dense, non-permissive ECM [9] [25].
- Solution:
- Pre-form a Microvascular Network: Bioprint a pre-designed, hierarchically branched network within your tissue. This includes not just a central channel, but also smaller, capillary-like vessels that can more easily connect to the host's microvasculature [9] [1].
- Use Pro-Angiogenic Bioinks: Formulate bioinks with decellularized extracellular matrix (dECM) from your target tissue, as it contains a native complex of pro-angiogenic factors [53] [1]. Alternatively, dope your bioink with sustained-release VEGF to actively recruit host endothelial cells [25].
- Include Supporting Stromal Cells: Co-print fibroblasts or mesenchymal stromal cells. These cells secrete essential growth factors like PDGF-BB, which recruit stabilizing pericytes and support the maturation and stability of new vessels, making them more likely to connect with host circulation [9] [2].
Table 2: Key Reagents for Promoting Vascular Integration
| Research Reagent | Function | Example Application |
|---|---|---|
| Endothelial Colony-Forming Cells (ECFCs) | Highly proliferative endothelial progenitors with strong vessel-forming capability [53]. | Seeding lumen or dispersing in bioink for microvessel formation. |
| Decellularized ECM (dECM) Bioink | Provides a native, tissue-specific microenvironment rich in pro-angiogenic cues [53] [1]. | Used as the primary hydrogel base for the bioprinted tissue. |
| Vascular Endothelial Growth Factor (VEGF) | Key signaling protein that stimulates host EC migration and sprouting (angiogenesis) [9] [25]. | Incorporated into bioinks via microparticles for sustained release. |
| Platelet-Derived Growth Factor-BB (PDGF-BB) | Critical signal for recruiting pericytes and vascular smooth muscle cells to stabilize new vessels [9]. | Released from co-printed stromal cells or from the bioink. |
Experimental Protocol: Assessing Host Integration in vivo
- Objective: Quantify the extent of host vasculature perfusion into the implanted bioprinted construct.
- Materials: Animal model (e.g., rat), bioprinted construct, fluorescent dextran or lectin.
- Steps:
- Implant the bioprinted tissue into the animal model.
- After a set period (e.g., 2-4 weeks), inject a fluorescent dye (e.g., FITC-dextran) intravenously. The dye will only perfuse vessels with a functional connection to the host's circulation.
- Harvest the implant and analyze it using confocal microscopy or histology.
- Quantify the percentage of the implant area that is perfused by the fluorescent tracer and count the number of host-derived (e.g., lectin-positive) vessels within the graft [2].
Fibrosis (Scar Tissue Formation)
FAQ 4: Our implants are being walled off by a thick, fibrous capsule, preventing integration. How can we mitigate the foreign body response and fibrosis?
Fibrosis is a common immune-mediated response to biomaterials that isolates the implant and blocks vascular integration.
- Root Cause: The implant is recognized as a foreign body, triggering a chronic inflammatory response that leads to the activation of host fibroblasts and excessive deposition of collagen, forming a fibrous capsule [9] [2].
- Solution:
- Modulate the Immune Response: Design biomaterials that promote a pro-regenerative (M2) macrophage phenotype over a pro-inflammatory (M1) phenotype. This can be achieved by incorporating anti-inflammatory cytokines (e.g., IL-4) or using specific ECM components known to modulate immunity [9].
- Enhance Biointegration: Create constructs with a porous or degradable matrix that allows host immune and stromal cells to infiltrate freely, rather than isolating the implant. Fast and seamless vascularization is key to preventing hypoxia-driven inflammation and fibrosis [2] [1].
- Use Scaffold-Free or Autologous Cells: Scaffold-free methods that rely on cell self-assembly and secreted ECM minimize the foreign body response triggered by synthetic polymers [2]. When possible, using patient-specific (autologous) cells eliminates adaptive immune rejection, a major driver of inflammation and subsequent fibrosis.
Experimental Protocol: In Vivo Assessment of Fibrosis
- Objective: Evaluate the extent of the fibrotic response to an implanted bioprinted construct.
- Materials: Explanted graft, standard histology reagents.
- Steps:
- Fix, section, and stain the explanted graft with Masson's Trichrome stain or Picrosirius Red stain.
- Masson's Trichrome will stain collagen fibers blue, clearly delineating the dense, acellular collagen capsule from the native tissue and the graft.
- Quantify the thickness of the fibrous capsule at multiple points around the implant and measure the total collagen area as a percentage of the total implant area using image analysis software [2].
Strategies for Pre-vascularization and Inosculation with Host Vasculature
Core Concepts FAQ
Q1: What is pre-vascularization and why is it critical for tissue-engineered constructs? Pre-vascularization involves creating a microvascular network within a tissue-engineered construct before it is implanted into a host. This is crucial because cells located more than 200 micrometers from a blood supply cannot receive sufficient oxygen and nutrients via diffusion alone, leading to cell death and the formation of a necrotic core in larger constructs [54] [55]. A pre-formed network acts as a ready-made conduit that can rapidly connect to the host's circulatory system, significantly improving cell survival and integration post-implantation [54] [56].
Q2: What is inosculation and how does it relate to pre-vascularization? Inosculation is the process where the pre-formed vasculature within an engineered construct surgically connects with the host's existing blood vessels. It is the crucial in vivo event that links your pre-vascularization strategy to a functional blood supply. Successful inosculation leads to immediate perfusion of the graft with host blood [56] [55]. Studies have shown that pre-vascularized constructs can inosculate with the host vasculature within a remarkably short timeframe, such as 4 days post-implantation in rodent models [56].
Q3: What are the primary strategic categories for vascularizing engineered tissues? Current strategies can be broadly classified into three main categories [55]:
- Cell-Based Approaches: Co-culturing vessel-forming cells (like endothelial cells and pericytes) with your target tissue cells to encourage the self-assembly of a capillary network within the construct.
- Scaffold-Based Approaches: Designing the biomaterial scaffold itself to promote vascular ingrowth. This includes techniques like 3D bioprinting of vascular channels, using sacrificial materials to create perfusable lumen, and fabricating scaffolds with specific micro-architectures.
- Angiogenic Factor-Based Approaches: Incorporating growth factors (e.g., VEGF, bFGF) into the construct in a controlled manner to actively recruit host blood vessels and induce angiogenesis.
Troubleshooting Common Experimental Issues
Q1: Our pre-vascularized constructs fail to perfuse adequately after implantation. What could be the cause? Inadequate perfusion is often linked to poor inosculation. Consider the following factors:
- Maturity of Pre-formed Vessels: Ensure the endothelial networks in your construct are sufficiently mature and stable. Co-culture with pericytes or mesenchymal stem cells (MSCs) can enhance vessel maturation by expressing stabilizing factors like angiopoietin-1 (ANG-1) [57] [55].
- Host Implantation Site: The implant site must have an adequate vascular bed for connection. Using an omentum or a highly vascularized muscle bed can enhance inosculation compared to a subcutaneous site [57].
- Inflammatory Response: An excessive host inflammatory response can hinder integration. Using autologous cells or immuno-compatible materials can mitigate this.
Q2: We observe cell death in the core of our bioprinted tissues. How can diffusion limits be overcome during in vitro culture? Cell death beyond the diffusion limit is a classic challenge. Implement these solutions:
- Incorporating Perfusable Channels: Use sacrificial bioprinting (e.g., printing a gelatin or carbohydrate glass filament that can be melted away) to create patent channels within your hydrogel. These channels can then be perfused with culture media in a bioreactor, simulating blood flow and nourishing the inner regions [58] [25].
- Using Hyper-Porous Materials: Employ granular hydrogels or other hyper-porous biomaterials that allow for enhanced nutrient diffusion and cell migration throughout the construct immediately after printing [58].
- Bioreactor Culture: Maintain constructs in perfusion bioreactors that force culture media through the internal architecture, providing convective transport in addition to diffusion [57] [32].
Q3: What are the relative merits of using Stromal Vascular Fraction (SVF) versus Microvascular Fragments (MVF) for pre-vascularization? The choice between SVF (a single-cell suspension) and MVF (intact vessel segments) is critical. A comparative study revealed key performance differences, summarized in the table below [59].
Table 1: Comparison of SVF vs. MVF for Scaffold Pre-vascularization
| Parameter | Stromal Vascular Fraction (SVF) | Microvascular Fragments (MVF) |
|---|---|---|
| Viability Post-Isolation | 82% ± 1% | 95% ± 1% |
| Cellular Composition | Mixture of endothelial cells, pericytes, adipocytes, stem cells | Comparable mixture, but as intact vessel segments |
| Initial Distribution in Scaffold | Cells penetrate deeply, uniform distribution | Fragments trapped on surface, less uniform |
| Functional Microvessel Density (FMD) in Center (Day 14) | Lower | 3.4-fold higher |
| Key Advantage | Simpler isolation, good cell penetration | Higher viability, faster and superior vascularization |
Detailed Experimental Protocols
Protocol 1: Creating a Pre-vascularized Construct via Cell Sheet Engineering This protocol avoids scaffolds and uses temperature-responsive surfaces to create dense, vascularized tissues [55].
- Cell Culture: Co-culture your target cells (e.g., cardiomyocytes) with Human Umbilical Vein Endothelial Cells (HUVECs) or Endothelial Colony-Forming Cells (ECFCs) and supporting cells like fibroblasts or MSCs on a temperature-responsive culture dish (e.g., coated with poly(N-isopropylacrylamide).
- Cell Sheet Harvest: Once a confluent, communicating monolayer is formed, lower the temperature to below 32°C. The hydrated polymer surface will release the intact cell sheet, preserving cell-cell junctions and deposited extracellular matrix.
- Stacking: Multiple cell sheets can be stacked layer-by-layer to create a thicker, 3D tissue construct. The endothelial cells within the sheets will spontaneously form interconnected network structures.
- Maturation in Bioreactor: Transfer the stacked construct to a bioreactor and culture with added FGF-2 for several days to enhance the formation and maturity of the tubular vascular structures before implantation [57] [55].
Protocol 2: Bioprinting a Vascularized Tissue Construct Using a Sacrificial Bioink This protocol outlines the creation of perfusable channels within a 3D-bioprinted hydrogel [58].
- Bioink Preparation: Prepare two bioinks. (A) A cell-laden hydrogel (e.g., GelMA, collagen, fibrin). (B) A sacrificial bioink (e.g., Pluronic F127, gelatin, carbohydrate-based glass).
- Printing Setup: Use a bioprinter with at least two printheads. Load the cell-laden bioink into one and the sacrificial bioink into the other.
- Co-printing: Print the desired tissue geometry. The cell-laden bioink forms the tissue parenchyma, while the sacrificial bioink is printed in a branching, vascular-like pattern embedded within it.
- Crosslinking: Crosslink the entire structure (e.g., via UV light for GelMA, or temperature for collagen/fibrin).
- Sacrifice: Lower the temperature to liquefy Pluronic/gelatin, or flush with warm, sterile cell culture media to dissolve the sacrificial material. This leaves behind patent, perfusable channels.
- Endothelialization: Seed the lumen of the channels with endothelial cells to create a blood-contacting surface.
Research Reagent Solutions
Table 2: Essential Reagents for Pre-vascularization and Inosculation Studies
| Reagent / Material | Function in Experiment | Example Application |
|---|---|---|
| HUVECs / ECFCs | Forms the inner lining of blood vessels (endothelium) and is capable of forming capillary-like tubes. | Core cellular component for in vitro vasculogenesis in co-culture systems [57] [55]. |
| Mesenchymal Stem Cells (MSCs) | Provides perivascular support; secretes angiogenic factors (VEGF, HGF); stabilizes nascent vessels. | Co-cultured with endothelial cells to enhance vessel maturity and stability [57] [55]. |
| VEGF & bFGF | Key angiogenic growth factors that stimulate endothelial cell migration, proliferation, and sprouting. | Added to culture media or loaded into scaffolds to induce angiogenesis [57] [32] [55]. |
| Fibrin / Collagen Gel | Natural hydrogel that serves as a 3D ECM-mimetic scaffold for cell encapsulation and vessel morphogenesis. | Common matrix for 3D in vitro co-culture models of vasculogenesis [57] [55]. |
| Sacrificial Bioink (e.g., Gelatin, Pluronic) | Temporary material printed to define channel geometry; removed post-printing to create perfusable lumens. | Used in bioprinting to create complex, embedded vascular networks within tissues [58]. |
| Decellularized ECM Scaffolds | Provides a natural, biomechanically and biochemically relevant 3D architecture that preserves native vascular outlines. | Can be repopulated (recellularized) with patient-specific cells to create vascularized organoids [32]. |
Signaling and Workflow Visualization
Diagram 1: Strategic Workflow for Pre-vascularization. This diagram outlines the major strategic pathways (Cell-, Scaffold-, and Factor-Based) for creating pre-vascularized tissues, highlighting the key in vitro processes and the primary signaling molecules that drive vascular network formation and maturation.
Diagram 2: Inosculation Process with Host. This diagram illustrates the multi-step biological process following implantation, where the pre-vascularized graft and host vasculature communicate via biochemical signals to facilitate endothelial migration, physical connection (inosculation), and eventual perfusion.
The successful integration of bioprinted tissues with the host vasculature represents a pivotal challenge in regenerative medicine. For engineered tissues to survive and function beyond a diffusion-limited scale, they must rapidly connect with the host's circulatory system to receive oxygen and nutrients and remove metabolic waste [32]. This process, known as perfusion, is critically dependent on the formation of a robust, functional vascular network within the bioprinted construct. A multidisciplinary approach combining advanced bioprinting techniques with strategic biomolecular signaling is essential to overcome this biological hurdle [32].
The incorporation of growth factors and other biomolecular cues directly into the bioprinting process provides a powerful strategy for guiding the formation and maturation of these essential vascular networks. This technical support document addresses common experimental challenges and provides detailed protocols for enhancing the perfusion and integration of bioprinted tissues through the strategic use of biological signaling molecules.
Troubleshooting Guide: Common Challenges in Vascularization
Frequently Asked Questions (FAQs)
Q1: Why are the microvessels in my bioprinted construct not connecting to form a perfusable network?
A: This issue often arises from an insufficient concentration or improper spatial distribution of angiogenic growth factors. To promote the formation of interconnected networks, ensure a sustained, biologically relevant concentration of VEGF (typically 10-50 ng/mL) and consider co-administering other factors like BFGF to stimulate endothelial cell sprouting and tube formation [32]. Utilizing a bioink that allows for controlled release of these factors can significantly improve network connectivity.
Q2: My bioprinted vascular channels are collapsing during maturation. How can I improve structural stability?
A: Channel collapse indicates inadequate mechanical support or delayed maturation of the vessel wall. Incorporate smooth muscle cells or pericytes into your bioink formulation using a coordinated patterning strategy [60]. These supporting cells provide structural integrity and secrete essential extracellular matrix components. Furthermore, optimize your crosslinking method and duration to ensure the surrounding hydrogel provides sufficient temporary mechanical support until the biological matrix matures [6].
Q3: How can I assess whether my engineered vasculature is functional and not just structural?
A: Functionality assessment requires a multi-parameter approach. Common techniques include:
- Immunofluorescence Staining: Analyze the expression of maturity markers like CD31 (for endothelial cells) and α-SMA (for smooth muscle cells) [32] [31].
- Permeability Assays: Assess the barrier function of the endothelium.
- Perfusion Testing: Directly test the ability of the network to conduct flow using tracer particles or colored media [31]. The presence of a patent lumen and the ability to respond to physiological stimuli (e.g., vasoactive agents) are key indicators of functionality.
Troubleshooting Table: Bioprinting and Vascularization
| Problem | Possible Cause | Solution |
|---|---|---|
| Needle Clogging [6] | Bioink inhomogeneity, particle agglomeration, high cell density. | Centrifuge bioink at low RPM; ensure particle size < needle gauge; limit pressure to 2 bar for cell-laden inks. |
| Poor Layer Stacking [6] | Insufficient bioink viscosity; inadequate crosslinking time. | Perform rheological tests; optimize crosslinking time (ionic, thermal, UV) for faster gelation. |
| Lack of Structural Integrity [6] [44] | Ineffective or incomplete crosslinking. | Characterize optimal crosslinker concentration (ionic), bed temperature (thermal), or wavelength (photocrosslinking). |
| Uneven Extrusion [44] | Air bubbles in bioink; unstable pressure; partial nozzle clog. | Triturate bioink gently along tube walls; centrifuge to remove bubbles; ensure stable air pressure supply. |
| Low Cell Viability Post-Printing [6] | Shear stress during extrusion; contamination; improper bioink environment. | Use sterile techniques (UV/ethanol); optimize pressure and speed to reduce shear; include cell-adhesive motifs (e.g., RGD) in bioink [61]. |
Experimental Protocols: Key Methodologies for Enhanced Perfusion
Protocol 1: Sacrificial Bioprinting of Perfusable Channels
This protocol details the creation of hollow, perfusable vascular channels within a cell-laden hydrogel using a sacrificial ink [62] [60].
Workflow Overview:
Detailed Methodology:
Design and Bioink Preparation:
- Design a branched channel network using CAD software, mimicking native vasculature architecture.
- Prepare the sacrificial bioink (e.g., Pluronic F127, carbohydrate glass, or gelatin) that is liquefiable by temperature or dissolution [62] [60].
- Prepare the cell-laden hydrogel bioink (e.g., GelMA, collagen, fibrin) containing tissue-specific cells and pro-angiogenic factors like VEGF (e.g., 25 ng/mL) [32].
Bioprinting Process:
- Using a microextrusion bioprinter, first print the sacrificial ink network onto a cooled print bed (if thermosensitive).
- Subsequently, encapsulate the entire sacrificial network by printing or casting the cell-laden hydrogel around it.
- Crosslink the hydrogel matrix using the appropriate method (e.g., UV light for GelMA, temperature for collagen).
Channel Formation and Endothelialization:
- Liquefy and remove the sacrificial material (e.g., by cooling for Pluronic, applying vacuum for carbohydrate glass, or warming for gelatin) [62]. This leaves behind hollow, interconnected channels.
- Immediately perfuse the channels with a suspension of endothelial cells (e.g., HUVECs at 5-10 million cells/mL) [62] [32]. Allow cells to adhere to the channel walls under static conditions for several hours before initiating perfusion culture.
Protocol 2: Coordinated Patterning of Vascular Precursors
This protocol uses multi-material bioprinting to spatially organize vascular cells and growth factors directly within the construct to promote de novo vascular network formation via vasculogenesis and angiogenesis [60].
Workflow Overview:
Detailed Methodology:
Multi-Bioink Formulation:
- Bioink A (Parenchymal Tissue Bioink): A hydrogel (e.g., alginate-gelatin blend, dECM) containing the primary tissue cells (e.g., cardiomyocytes, hepatocytes) and pro-angiogenic factors. Incorporate VEGF (50 ng/mL) and BFGF (30 ng/mL) to guide angiogenesis [32].
- Bioink B (Vascular Precursor Bioink): A hydrogel with similar mechanical properties but laden with endothelial cells (e.g., HUVECs or iPSC-ECs) and mesenchymal stem cells (MSCs) or pericytes at a ratio between 5:1 and 2:1 (EC:MSC) to support vessel stability [60] [63].
Bioprinting Process:
- Using a multi-printhead bioprinter, program the deposition pattern to place Bioink B (vascular) in a strategic, interconnecting pattern within the bulk of Bioink A (tissue) [60].
- Printing parameters (pressure, speed) must be optimized for each bioink to ensure smooth extrusion and accurate placement.
Post-Printing Maturation:
- Culture the bioprinted construct in a perfusion bioreactor that provides continuous nutrient supply and physiological mechanical cues (e.g., shear stress).
- Culture media should be supplemented with additional angiogenic factors to support network formation and maturation over 1-3 weeks.
The Scientist's Toolkit: Research Reagent Solutions
Table 2: Essential Reagents for Engineering Perfusable Vasculature.
| Reagent / Material | Function / Rationale | Example Usage |
|---|---|---|
| Vascular Endothelial Growth Factor (VEGF) [32] | Primary driver of endothelial cell migration, proliferation, and tube formation; crucial for angiogenesis. | Added to bioink (10-50 ng/mL) or culture medium to induce sprouting and network formation. |
| Basic Fibroblast Growth Factor (BFGF/FGF-2) [32] | Promotes proliferation of endothelial cells and smooth muscle cells/fibroblasts; supports vessel stability. | Used in conjunction with VEGF (e.g., 20-50 ng/mL) in bioink or media for robust vasculogenesis. |
| Endothelial Cells (HUVECs, iPSC-ECs) [32] [63] | Form the inner lining (endothelium) of all blood vessels; essential for creating biological vasculature. | Seeded into sacrificial channels or printed directly with bioink at high densities (5-20 million cells/mL). |
| Mesenchymal Stem Cells (MSCs) / Pericytes [60] [63] | Supportive cells that stabilize nascent vessels, deposit ECM, and prevent vascular regression. | Co-printed with endothelial cells in a coordinated patterning strategy at an EC: MSC ratio of 2:1 to 5:1. |
| Sphingosine-1-Phosphate (S1P) [32] | Lipid signaling molecule that enhances endothelial barrier integrity and promotes vessel maturation. | Supplemented in culture media (0.1-1 µM) to improve the stability and function of engineered microvessels. |
| Gelatin Methacryloyl (GelMA) [60] [61] | A versatile, photocrosslinkable hydrogel derived from ECM; presents cell-adhesive motifs (RGD). | Used as a primary bioink component for both sacrificial (if modified) and cell-laden hydrogels. |
| Decellularized Extracellular Matrix (dECM) [30] | Provides a tissue-specific biochemical microenvironment that enhances cell viability and function. | Formulated as a bioink to create a highly biomimetic niche for vascular and tissue-specific cells. |
The strategic integration of growth factors like VEGF and BFGF with advanced bioprinting techniques such as sacrificial printing and coordinated patterning provides a powerful, multi-faceted approach to overcome the critical challenge of perfusion in engineered tissues. By addressing common technical issues through systematic troubleshooting and implementing robust experimental protocols, researchers can significantly improve the vascularization and functional integration of bioprinted constructs. The continued refinement of these strategies, supported by the reagents and methods detailed in this guide, is essential for advancing the clinical translation of bioprinted tissues for regenerative medicine and drug development.
Frequently Asked Questions (FAQs)
Q1: Our bioprinted vascular construct has low mechanical strength and collapses during handling. How can we improve its structural integrity without compromising biocompatibility? The conflict between soft, cell-friendly materials and the need for structural strength is a common challenge. You can address this by using a hybrid bioink strategy [1] [64]. Consider blending a natural polymer (e.g., alginate or collagen) with a synthetic polymer (e.g., PCL or PEG). The natural polymer provides excellent biocompatibility and cell interaction, while the synthetic polymer offers tunable mechanical strength and degradation kinetics [1]. Additionally, reinforcing your bioink with nanomaterials like cellulose nanocrystals (CNC) can enhance its mechanical properties without significantly affecting its biocompatibility [65].
Q2: How can we enhance the degradation rate of a synthetic polymer to better match the rate of new tissue formation? Synthetic polymers like PCL are known for their prolonged degradation, which can hinder tissue remodeling. You can optimize this by copolymerizing them with faster-degrading polymers (like PLGA) or by modifying their molecular weight [1]. A lower molecular weight generally leads to a faster degradation rate. Furthermore, incorporating natural polymers such as gelatin or silk fibroin into your bioink can create a composite material with more tailored degradation profiles that better match tissue growth [65] [66].
Q3: What are the key considerations for selecting a bioink to build a perfusable vascular network that can integrate with host tissue? The key is to select a bioink that supports both printability and biological function. The material must have sufficient rheological properties to hold complex, hollow structures like tubes, but also be permissive for endothelial cell function and angiogenesis [1] [31]. Alginate-based bioinks are widely used due to their excellent tunability and rapid crosslinking [64]. For better biological outcomes, use alginate composites, such as alginate-gelatin or alginate-dECM (decellularized extracellular matrix), which improve cell adhesion and tissue remodeling [64]. The ultimate goal is a material that degrades in a controlled manner, allowing the patient's own cells to replace the printed construct with functional tissue [31].
Q4: We are experiencing poor cell viability after the bioprinting process. How can we optimize our bioink for better cell survival? Poor cell viability is often linked to shear stress during extrusion and a lack of supportive cues post-printing. To mitigate this:
- Optimize bioink viscosity: A lower viscosity bioink can reduce shear stress on cells. This can be achieved by using alginate-based bioinks or incorporating shear-thinning hydrogels like gellan gum or chitosan [65] [1].
- Incorporate protective components: Adding matrix components like gelatin or hyaluronic acid can provide a more native environment for cells [66].
- Use advanced printing techniques: Consider Freeform Reversible Embedding of Suspended Hydrogels (FRESH). This technique involves printing your bioink into a soft support bath, which protects the delicate structure and embedded cells from collapsing and mechanical stress, significantly improving viability [1].
Q5: How can we assess the functional success of our bioprinted vascular tissue in vitro? A comprehensive assessment should span multiple levels [31]:
- Cellular Level: Evaluate endothelial cell viability, proliferation, and the formation of cell-cell junctions (e.g., CD31 staining).
- Tissue Level: Assess barrier function through permeability assays (e.g., dextran diffusion) and the ability to withstand physiological flow pressures without leaking.
- Organ Level: Create vessel-on-a-chip models to simulate blood flow and study interactions with other cell types (e.g., pericytes), providing a platform for drug screening and disease modeling [31].
Troubleshooting Guides
Problem: Poor Print Fidelity and Structural Collapse
Issue: The bioprinted vascular structure lacks resolution, sags, or collapses before crosslinking.
| Possible Cause | Solution | Experimental Protocol to Test |
|---|---|---|
| Bioink viscosity is too low. | Increase polymer concentration or add rheological modifiers (e.g., nanocellulose, clay nanoparticles) [65]. | Perform rheological testing to measure storage (G') and loss (G") moduli. A higher G' indicates a more solid-like behavior suitable for printing. |
| Insufficient or slow crosslinking. | Optimize crosslinking parameters (e.g., CaCl₂ concentration for alginate, UV intensity for methacrylated gels) [64]. | Print a standard structure (e.g., a filament or a simple tube) and visually assess the time to full gelation and shape fidelity. |
| Lack of temporary support. | Use a support bath technique like FRESH for printing complex, overhanging structures like vascular branches [1]. | Compare the print fidelity of a complex vascular tree design printed in air versus printed within a FRESH support bath. |
Problem: Inadequate Vascularization and Host Integration
Issue: The implanted construct fails to develop a functional blood vessel network and does not connect with the host's circulatory system.
| Possible Cause | Solution | Experimental Protocol to Test |
|---|---|---|
| Bioink lacks pro-angiogenic signals. | Incorporate vascular endothelial growth factor (VEGF) or other angiogenic factors into the bioink via microparticles for sustained release [64]. | Use an in vitro endothelial cell tube formation assay on top of or within the modified bioink. |
| Construct is too dense for cell infiltration. | Optimize bioink porosity and degradation rate to enable host cell migration and vessel ingrowth [1]. | Implant the construct subcutaneously in an animal model and histologically analyze (e.g., H&E, CD31 staining) for host cell infiltration and vessel formation over time. |
| Absence of perivascular cells. | Co-culture endothelial cells with pericytes or mesenchymal stem cells in the bioink to promote vessel maturation and stability [31]. | Co-culture cells in the bioink and assess the formation of stable, CD31-positive tubular structures that are covered by pericyte markers (e.g., α-SMA). |
Key Data for Material Selection
Table 1: Comparison of Common Biomaterials for Bioprinting
| Material Class | Example Materials | Biocompatibility & Degradation | Mechanical Properties | Key Considerations for Vascular Integration |
|---|---|---|---|---|
| Natural Polymers | Alginate, Chitosan, Collagen, Silk [65] | High biocompatibility; Degradation via hydrolysis or enzymatic activity; rate can be tuned via crosslinking [65] [64]. | Generally soft and weak; Often require blending or heavy crosslinking for structural support [65]. | Excellent cellular interaction; Alginate is bioinert but can be modified with RGD peptides to enhance cell adhesion [64]. |
| Synthetic Polymers | PCL, PEG, PLGA [1] | Biocompatible; Degradation rate is highly tunable (days to years) via molecular weight and copolymer ratios [1]. | Strong and tunable mechanical properties; Can be tailored to match native tissue stiffness [1]. | Lack natural cell-binding sites; Often need to be functionalized with bioactive peptides or combined with natural polymers [1]. |
| Composite/Hybrid | Alginate-Gelatin, PEG-dECM, Silk-Methacrylate [65] [1] | Good biocompatibility; Degradation profile can be engineered by component ratios [65] [64]. | Can achieve a balance between printability, strength, and elasticity [65] [1]. | Ideal for mimicking ECM; Combines the printability and strength of synthetic materials with the bioactivity of natural materials [1]. |
Table 2: Advanced Bioprinting Techniques for Vascularized Tissues
| Bioprinting Technique | Resolution | Cell Viability | Suitability for Vasculature | Key Limitation |
|---|---|---|---|---|
| Extrusion-Based | 100 - 500 μm [1] | Medium to High (can be optimized with bioink) [1] | High; suitable for large, perfusable channels; can use sacrificial inks [1] [30]. | Shear stress can damage cells [1]. |
| Digital Light Processing (DLP) | 10 - 100 μm [67] | High (due to fast, gentle crosslinking) [67] | Excellent for high-resolution, complex 3D vascular networks [67]. | Limited to photo-crosslinkable materials; potential cytotoxicity from photoinitiators [67]. |
| Melt Electrowriting (MEW) | ~5 - 50 μm [1] | Low (high temperature process) | Creates highly organized, micro-diameter fibrous scaffolds that can guide tissue growth and vascularization [1]. | Not for cell-laden printing; typically used to create reinforcing scaffolds. |
Essential Experimental Protocols
Protocol 1: Assessing Bioink Printability and Shape Fidelity
Objective: To quantitatively evaluate the ability of a bioink to be printed accurately and maintain its shape.
- Bioink Preparation: Prepare your bioink formulation and load it into the printing cartridge. For crosslinking bioinks, prepare the crosslinking solution (e.g., CaCl₂ for alginate).
- Print a Standard Test Structure: Using a CAD model, print a multi-layered grid structure (e.g., 20mm x 20mm, 5 layers) and a hollow tube with a defined diameter (e.g., 2 mm).
- Image Acquisition: Immediately after printing, capture high-resolution images of the printed structures from a top-down and side view.
- Quantitative Analysis:
- Filament Width Uniformity: Measure the diameter of the printed filament at multiple points and calculate the coefficient of variation.
- Pore Size Fidelity: Measure the pore sizes in the grid and compare them to the designed dimensions.
- Angle Accuracy: For the tube, measure the branching angles and compare them to the design.
- Shape Fidelity Score: Calculate a score (e.g., S = (Ad / Ap) where Ad is the area of the designed structure and Ap is the area of the printed structure from the image). A score closer to 1 indicates higher fidelity [30].
Protocol 2: Evaluating In Vitro Vascular Network Formation
Objective: To test the capability of a bioink and cell combination to form endothelial networks.
- Bioink and Cell Seeding: Mix human umbilical vein endothelial cells (HUVECs) with your bioink at a density of 5-10 million cells/mL. Print or cast the cell-laden bioink into a desired mold.
- Culture Conditions: Culture the constructs in endothelial cell growth medium (EGM-2). Change the medium every 2-3 days.
- Staining and Imaging: After 7-14 days in culture, fix the constructs and perform immunofluorescence staining for endothelial markers (e.g., CD31/PECAM-1 for cell-cell junctions).
- Confocal Microscopy and Analysis: Image the stained constructs using a confocal microscope. Use image analysis software (e.g., ImageJ) to quantify:
- Total Tube Length: The combined length of all CD31-positive structures.
- Branching Points: The number of intersections in the tubular network.
- Mesh Area: The area enclosed by the tubular structures [31].
Research Reagent Solutions
Table 3: Essential Materials for Bioprinting Vascularized Tissues
| Item | Function | Example & Notes |
|---|---|---|
| Alginate | Base bioink material; provides rapid ionic crosslinking and tunable mechanical properties [64]. | High M/G ratio alginates form stiffer gels; often modified with RGD peptides [64]. |
| Gelatin Methacryloyl (GelMA) | Photocrosslinkable bioink component; provides excellent cell adhesion sites and biodegradability [1]. | Degree of functionalization controls crosslinking density and mechanical properties. |
| Polyethylene Glycol Diacrylate (PEGDA) | Synthetic, photocrosslinkable bioink; provides a bioinert, tunable hydrogel platform [1]. | Must be functionalized with adhesive peptides (e.g., RGD) to support cell adhesion. |
| Decellularized ECM (dECM) | Bioink derived from native tissues; provides a complex, tissue-specific biochemical microenvironment [1]. | Ideal for mimicking the native cardiac or vascular niche; often blended with other polymers for printability. |
| LAP Photoinitiator | Initiates crosslinking in light-based 3D printing (e.g., DLP); known for low cytotoxicity and high efficiency [67]. | Preferred over older initiators like Irgacure 2959 for better cell compatibility. |
| Pluronic F-127 | Sacrificial ink; used to print temporary channels that are later liquefied and removed to create perfusable lumens [1]. | Melts at low temperatures (4-15°C), allowing for gentle removal. |
Workflow and Strategy Visualization
Bioink Optimization Strategy
Vascular Network Bioprinting Workflow
Troubleshooting Guides
Contamination Control
Q: My bioreactor culture shows signs of contamination. What are the immediate steps I should take?
A: Contamination can compromise tissue maturation, particularly the delicate process of vascular network formation. Immediate action is required.
- Detection: Look for early signs like unexpected changes in culture turbidity, medium color (e.g., a shift from pink to yellow in phenol red-based media), off-smells, or poor cell growth [68].
- Source Identification: Common sources include the inoculum, faulty sterilization, or compromised seals. Check that the autoclave reached the correct temperature and that all vessel O-rings are not flattened, torn, or damaged. Replace O-rings every 10-20 sterilization cycles [68].
- Resolution: If a spore-forming organism is suspected, completely disassemble the vessel and tubing. Autoclave with pauses between cycles to allow spores to germinate before sterilizing again [68].
Q: How can I prevent contamination during the inoculation process?
A: Aseptic technique is critical.
- Avoid the "aseptic pour" into an open port. Instead, use secure, closed-system transfer methods [68].
- Pre-assemble as much equipment as possible (e.g., connect tubing and media bottles) before sterilization to minimize connections made post-autoclaving [68].
Parameter Fluctuations
Q: How do I troubleshoot pH and temperature fluctuations in my bioreactor?
A: Stable parameters are vital for consistent cell metabolism and vascular maturation.
- Sensor Calibration: Regularly calibrate pH and temperature sensors to ensure accuracy [69].
- Preventive Maintenance: Implement regular cleaning protocols to prevent sensor fouling and have backup sensors ready to minimize downtime [69].
- System Checks: For temperature control issues, investigate components beyond the core system, such as those maintained by Facilities or Engineering teams [70].
Process-Related Issues
Q: Excessive foam is disrupting my process. How can I manage it?
A: Foam can impede oxygen transfer and mixing.
- Adjust Process Parameters: Lower agitation speeds if possible, as high speeds can contribute to foam formation [69].
- Use Antifoam Agents: Carefully introduce chemical antifoam agents [69].
- Mechanical Solutions: Install mechanical foam breakers for a non-chemical intervention [69].
Q: What should I check if I suspect inefficient mixing or aeration?
A: Uneven nutrient and oxygen distribution can create poor microenvironments for tissue maturation.
- Inspect Hardware: Check for damage to the impeller, which is crucial for mixing [69].
- Verify Airflow: Confirm that air supply systems are functioning and that airflow rates are set correctly [69].
Frequently Asked Questions (FAQs)
Q: Why is vascularization so critical for bioprinted tissue maturation in a bioreactor? A: Tissues rely on vascular networks for oxygen, nutrient delivery, waste removal, and immune cell trafficking. Without functional vasculature, bioprinted grafts suffer from core necrosis, poor survival, and failed integration with host tissues after implantation [9] [31].
Q: What defines a "functional" vasculature in this context? A: Function is tissue-specific. A functional vasculature must not only be perfusable but also mature, stabilize, and integrate with the host. This involves lumen formation, recruitment of pericytes and smooth muscle cells for stability, and the development of appropriate barrier functions—all of which are dynamic, time-dependent processes [9].
Q: How do bioreactor parameters influence vascular maturation? A: Bioreactors provide the controlled mechanical and biochemical environment necessary for vascular development. Parameters like flow-induced shear stress are critical for guiding endothelial cell behavior and vessel remodeling. Furthermore, stable temperature and pH are essential for consistent cellular metabolism and signaling during this process [9] [69].
Q: My culture is not contaminated, but vascular network formation is poor. What could be wrong? A: The issue may lie with the bioink or hydrogel microenvironment. The scaffold must provide the right biochemical cues (e.g., RGD peptides, growth factors like VEGF) and have tunable mechanical properties (stiffness, degradation kinetics) to support endothelial cell migration, adhesion, and tubulogenesis [9].
Data Presentation
Key Bioreactor Parameters for Vascular Tissue Maturation
The following parameters must be carefully controlled and monitored to support the biological processes required for vascularized tissue maturation.
Table 1: Critical Bioreactor Parameters and Their Impact on Vascularization
| Parameter | Optimal Range / Value | Impact on Vascular Maturation | Biological Rationale |
|---|---|---|---|
| Temperature | 37°C (for human cells) | High | Essential for consistent cellular metabolism and enzymatic activity driving vascular morphogenesis. |
| pH | 7.2 - 7.4 | High | Deviations can disrupt cell health, protein function, and critical cell-cell signaling for vessel stability [69]. |
| Dissolved Oxygen (DO) | Tissue-specific (e.g., 20-60% air saturation) | High | Oxygen is a key morphogen; gradients can drive angiogenic sprouting, but low levels can cause cell death [9]. |
| Flow-induced Shear Stress | 5 - 25 dyn/cm² (arterial models) | Critical | Mechanical forces from fluid flow guide endothelial cell alignment, promote lumen formation, and strengthen vessel walls [9]. |
Research Reagent Solutions for Vascularization
Table 2: Essential Materials for Engineering Vascularized Tissues
| Reagent / Material | Function in Vascularization |
|---|---|
| VEGF (Vascular Endothelial Growth Factor) | Key signaling molecule that stimulates endothelial cell proliferation, migration, and new vessel sprouting (angiogenesis) [9]. |
| PDGF-BB (Platelet-Derived Growth Factor-BB) | Critical for recruiting mural cells (pericytes and smooth muscle cells) to nascent endothelial tubes, which stabilizes and matures the vessels [9]. |
| RGD-Peptide Modified Hydrogel | Provides integrin-binding sites within the scaffold, enabling endothelial cell adhesion, migration, and tubulogenesis [9]. |
| Protease-Degradable Crosslinker | Allows cells to locally remodel and degrade the surrounding matrix, creating space for vascular network invasion and expansion [9]. |
Experimental Protocols
Protocol: Assessing Vascular Network Integration and Function
This protocol outlines a methodology to evaluate the success of vascular network formation in a bioreactor and its potential for host integration, aligning with thesis research goals.
1. Hydrogel Scaffold Preparation:
- Prepare a bioink consisting of a natural matrix (e.g., gelatin methacrylate) or a synthetic polymer hydrogel with tunable stiffness.
- Incorporate key biological cues: 1-10 µg/mL VEGF to promote angiogenesis and 5-20 µg/mL PDGF-BB to support pericyte recruitment [9].
- Mix the bioink with human umbilical vein endothelial cells and pericyte precursors at a ratio between 2:1 and 5:1 (HUVECs:Pericytes) to form a co-culture.
2. Bioprinting and Bioreactor Culture:
- Utilize a extrusion-based bioprinting technology to fabricate the construct with embedded perfusable channels.
- Transfer the construct to a bioreactor system capable of providing medium perfusion to mimic blood flow and apply cyclic mechanical strain.
- Culture for 14-28 days, maintaining critical parameters as defined in Table 1.
3. Functional Assessment and Analysis:
- Perfusion Assay: At defined endpoints, perfuse the vascular channels with a fluorescent dextran solution. Use confocal microscopy to quantify the perfusion efficiency and assess vessel permeability [9] [31].
- Immunofluorescence Staining: Fix constructs and stain for key markers:
- Endothelial Cells: CD31/PECAM-1 (cell-cell junctions), VE-cadherin (adherens junctions).
- Mural Cells: α-smooth muscle actin, NG2.
- Vessel Maturation: Co-localization of endothelial and mural cell markers indicates stable, maturing vessels [9].
- Gene Expression Analysis: Perform qPCR on retrieved constructs to analyze the upregulation of maturation genes (e.g., those encoding VE-cadherin, smooth muscle actin) [31].
Visualization
Diagram: Vascular Maturation Workflow
Diagram: Bioreactor Parameter Interplay
Assessing Success: Functional Metrics, Preclinical Models, and Clinical Translation
➤ Troubleshooting Guides and FAQs for Researchers
Frequently Asked Questions (FAQs)
Q1: Our bioprinted vessels consistently leak during initial perfusion tests. What could be the cause and how can we resolve this? Leaks often stem from incomplete fusion between bioink layers or inadequate maturation of cell-cell junctions.
- Solution: Ensure that your bioink has sufficient viscoelastic properties to hold its shape post-printing. For cellular vessels, implement a pre-perfusion maturation period in static culture to allow endothelial cells to form stable adherens junctions and tight junctions before introducing flow [45]. Using a support bath during printing, such as the FRESH method, can also improve layer fusion and structural integrity [1].
Q2: The endothelial barrier in our model shows high permeability, failing to mimic a tight blood-retinal or blood-brain barrier. How can we improve barrier integrity? A robust barrier requires more than just endothelial cells; it needs the correct biochemical cues and mechanical conditioning.
- Solution: Coat your scaffold with basement membrane proteins (e.g., Collagen IV, Laminin) to provide the correct adhesive substrate [71]. Incorporate supporting cells like pericytes and astrocytes, either in co-culture or via conditioned media, as they secrete factors that enhance tight junction formation (e.g., upregulating ZO-1, claudin-5) [71]. Gradually introduce physiological shear stress through perfusion, which is a critical signal for endothelial cells to form a tight barrier [72] [71].
Q3: How can we assess if our bioprinted vessel is truly integrating and remodeling like a native vessel after implantation? Remodeling is a complex process best assessed through a combination of in vitro and in vivo methods.
- In Vitro Assessment: Culture your vessel in a degradable bioink (e.g., certain GelMA formulations) and monitor for cell-driven matrix remodeling and compaction over time. You can also assess the contractile capability of smooth muscle cells in response to vasoactive agents [45] [2].
- In Vivo Validation: The gold standard is implantation. As demonstrated in a rat model, successful integration is indicated by anastomosis with host vasculature, sustained patency (non-clotting), and the absence of a severe immune response. Further evidence includes host cell infiltration and the deposition of native extracellular matrix proteins like collagen and elastin [2].
Q4: How do we maintain sterility during the extended bioprinting and culture process required for mature vascular constructs? Sterility is a major challenge, especially for large constructs.
- Solution: Beyond working in a biosafety cabinet, consider using a confined bioreactor system. Devices like the FUGU (Flexible Unique Generator Unit) are designed as sealed, gas-permeable chambers where the entire process—from bioprinting to long-term culture—can occur without exposure to the external environment. This system protects the construct from contamination while allowing for gas exchange and medium perfusion [73].
Troubleshooting Common Experimental Issues
| Problem | Potential Cause | Solution |
|---|---|---|
| Vessel Collapse During Printing | Bioink lacks mechanical strength; insufficient crosslinking. | Increase bioink polymer concentration; optimize crosslinking parameters (e.g., UV intensity, time); use a support bath [1] [74]. |
| Low Cell Viability Post-Printing | High shear stress during extrusion; overly aggressive crosslinking. | Use a larger nozzle diameter (balancing print resolution); optimize bioink rheology with additives like nanoclay; use milder crosslinking mechanisms (e.g., visible light, ionic) [1] [75]. |
| Poor Perfusion Flow | Narrow or collapsed lumen; clogging from dead cells. | Verify print path and nozzle calibration for open lumens; include a post-printing wash step; use a sacrificial ink (e.g., Pluronic F127) to define the lumen clearly [1] [76]. |
| Lack of Physiological Function | Absence of key vascular cell types; static culture conditions. | Co-culture endothelial cells (ECs) and smooth muscle cells (SMCs) in a stratified geometry; use a perfusion bioreactor to apply physiological shear stress and cyclic strain [72] [45] [2]. |
➤ Experimental Protocols for Key Assessments
Protocol: Perfusion Experiment for Vessel Patency
This protocol is adapted from a method used to verify the patency of bioprinted hollow vessels [76].
- Objective: To visually confirm that a bioprinted vessel can be perfused without leakage.
- Materials:
- Bioprinted vascular construct
- PBS
- Plastic tubing (e.g., with 1 mm inner diameter)
- Syringe (1 mL)
- Red food dye
- PDMS block
- Biocompatible super glue (e.g., Loctite Ultra Gel)
- Method:
- Carefully retrieve the bioprinted vessel using tweezers and wash with PBS.
- Prepare a platform in a Petri dish. Place the vessel in the center, supported on a small slice of PDMS.
- Connect plastic tubing to both the inlet and outlet of the vessel. Secure the connections onto the tubing and PDMS support using super glue at the edges. Allow the glue to cure completely.
- Fill a 1 mL syringe with PBS mixed with red food dye.
- Connect the syringe to the inlet tube and initiate a slow, manual flow. Observe the vessel for one minute of continuous flow.
- Expected Outcome: A successful experiment will show the dye flowing continuously through the vessel lumen without any visible leakage, confirming patency [76].
Protocol: Establishing a 3D Perfusable Atherosclerotic Vessel-on-a-Chip (3D-PAVoC)
This protocol summarizes the creation of a disease model for drug screening, as detailed in the search results [72].
- Objective: To fabricate a perfusable, inflammatory stimulus-responsive vascular model for studying atherosclerosis and drug effects.
- Materials:
- Microfluidic chip device
- GelMA hydrogel
- Human Endothelial Cells (ECs) and Smooth Muscle Cells (SMCs)
- Perfusion pump system
- Inflammatory cytokines: TNF-α and IL-1β
- Oxidized Low-Density Lipoprotein (ox-LDL)
- Model drug (e.g., Rapamycin)
- Method:
- Fabricate a 3D vascular construct inside the microfluidic chip by co-culturing ECs and SMCs within a GelMA hydrogel matrix to form a multilayer structure.
- Connect the chip to a perfusion system to circulate culture medium, applying physiological shear stress to the endothelium.
- Induce a pathological state by supplementing the perfusion medium with a combination of inflammatory cytokines (TNF-α and IL-1β) and ox-LDL to mimic the atherosclerotic microenvironment.
- Administer the drug candidate via the perfusion system and monitor its effects on hallmarks of atherosclerosis, such as endothelial dysfunction, lipid accumulation, and expression of inflammatory markers. Transcriptomic analysis (e.g., RNA-seq) can be used for mechanistic studies [72].
The workflow for this protocol is summarized in the following diagram:
➤ The Scientist's Toolkit: Research Reagent Solutions
The table below lists key materials and their functions for fabricating and testing perfusable vascular constructs, based on the cited research.
| Research Reagent | Function / Application |
|---|---|
| Gelatin Methacryloyl (GelMA) | A widely used photopolymerizable bioink derived from gelatin. It provides a biocompatible, tunable 3D environment that supports cell adhesion, proliferation, and the formation of vascular networks [72] [1] [45]. |
| Hyaluronic Acid (HA) / Gelatin / PEGDA Hydrogel Kit (e.g., HyStem-C) | A hydrogel system offering a balance of compression strength, hydration, and cell adhesion motifs. Used as a bioink for scaffold-free bioprinting of implantable vascular conduits [2]. |
| Polyethylene Glycol Diacrylate (PEGDA) | A synthetic, photopolymerizable hydrogel. Valued for its tunable mechanical properties and inert nature, it is often used in vascular models to form the bulk matrix or as a component in hybrid bioinks [1] [45]. |
| Tumor Necrosis Factor-alpha (TNF-α) & Interleukin-1beta (IL-1β) | Pro-inflammatory cytokines used in combination to induce endothelial inflammation and dysfunction in atherosclerosis models, mimicking a key disease driver [72]. |
| Oxidized Low-Density Lipoprotein (ox-LDL) | A key pathological stimulus used in vitro to model hyperlipidemia, leading to lipid accumulation and foam cell formation in the vessel wall, a hallmark of atherosclerosis [72]. |
| Decellularized Extracellular Matrix (dECM) | Biomaterial derived from native tissues (e.g., bone, pancreas). dECM bioinks provide tissue-specific biochemical cues that can enhance the maturation and function of bioprinted vascular cells [45]. |
➤ Quantitative Benchmarking of Vascular Function
To effectively benchmark your bioprinted vessels against native physiology and other models, the following quantitative metrics should be established. The table below summarizes key parameters based on the provided research.
| Functional Trait | Key Metrics & Assays | Target (Native Physiology) | Notes & Considerations |
|---|---|---|---|
| Perfusability | Visual Patency Test [76]; Flow Rate vs. Pressure; Reynolds Number (to confirm laminar flow) [72] | Continuous flow without leakage; Laminar flow regime (Low Reynolds number) | The viscosity of the perfusate (culture medium vs. blood) will affect shear stress calculations [72]. |
| Barrier Integrity | TEER (Transendothelial Electrical Resistance) [71]; Paracellular Permeability Assay (e.g., FITC-dextran leakage) [72] [45] | iBRB: 1500-2000 Ω·cm² [71] | TEER is a sensitive, non-invasive gold standard. Permeability assays provide a direct functional readout. |
| Remodeling Capacity | Matrix Degradation/Compaction; Gene Expression (qPCR for MMPs, collagen, elastin); In Vivo Anastomosis & Patency [2] | Successful integration with host vasculature; Physiological contractile response | Requires degradable bioinks and/or long-term culture. In vivo validation is ultimately essential for implantation studies [2]. |
| Mechanical Properties | Tensile/Burst Pressure Testing; Dynamic Mechanical Analysis [45] [2] | Matches target native vessel (e.g., artery vs. vein) | Critical for withstanding physiological pressures, especially for graft applications. |
The logical relationships between these core functions and their assessments are illustrated below:
For researchers and scientists focused on the integration of bioprinted tissues with host vasculature, in vivo validation represents a pivotal, final step in translating laboratory constructs into clinically applicable solutions. The successful anastomosis, or surgical connection, of bioprinted vascular conduits with a living host's circulatory system is the ultimate test of their functionality and patency. These long-term survival studies in animal models are indispensable for assessing the structural stability, biocompatibility, and functional performance of engineered tissues under physiological conditions, providing critical pre-clinical data that cannot be replicated by in vitro systems alone. This guide addresses the common challenges encountered during these complex experiments and provides evidence-based troubleshooting methodologies to enhance the success and reliability of your research.
Key Challenges & FAQs in Long-Term In Vivo Studies
FAQ 1: What are the primary causes of bioprinted vessel failure in long-term animal implants?
The failure of bioprinted vascular grafts in long-term studies often stems from a combination of factors related to material properties, biological integration, and surgical technique. Key issues include:
- Thrombosis and Occlusion: The formation of blood clots within the graft lumen is a major cause of early failure. This is often due to incomplete or delayed endothelialization of the luminal surface, where the lack of a confluent endothelial cell layer exposes thrombogenic materials to blood flow [2]. The choice of bioink can significantly influence this process.
- Insufficient Mechanical Integrity: Bioprinted vessels must withstand physiological pressures and pulsatile flow. Failure often occurs due to a mismatch in mechanical properties between the graft and the native vessel, leading to aneurysm (bulging), rupture, or compression. The crosslinking strategy and composition of the bioink are critical determinants of mechanical strength [6] [2].
- Inadequate Host Integration: Successful long-term survival requires the graft to integrate with the host's surrounding tissues and vasculature. This includes not only anastomosis but also cellular infiltration, neovascularization from the host into the graft wall, and appropriate extracellular matrix (ECM) remodeling. A lack of this integration can lead to graft encapsulation by fibrotic tissue, isolation, and eventual failure [2].
- Inflammatory and Foreign Body Response: The host's immune response to the biomaterials and cells in the bioink can lead to chronic inflammation, which compromises the graft's structure and function, stimulating hyperplastic tissue growth that can occlude the lumen [2].
FAQ 2: How can I assess the functional integration of a bioprinted vessel with the host vasculature?
A multi-modal assessment strategy is required to fully evaluate functional integration, moving from gross observation to cellular-level analysis.
- Patency and Blood Flow: Use Doppler ultrasound to non-invasively monitor blood flow velocity and vessel patency over the study's duration. This provides direct evidence of functional integration [2].
- Physiological Behavior: Monitor the implanted vessel for its ability to maintain its structure and demonstrate physiological responses, such as those driven by pulsatile flow, indicating it is a functional part of the circulatory system [2].
- Histological and Immunohistochemical Analysis: Post-explant, analyze the graft for key indicators of integration:
- Endothelialization: Stain for CD31 (Platelet Endothelial Cell Adhesion Molecule) to identify a confluent endothelial layer on the lumen [2].
- Cellular Infiltration and Organization: Stain for smooth muscle actin (SMA) to identify functional smooth muscle cells and assess the layered structure of the vessel wall. Look for host cell migration into the graft material [2].
- Tissue Remodeling: Use stains for collagen (e.g., Masson's Trichrome) and elastin to evaluate ECM deposition and organization, comparing it to native tissue.
- Inflammatory Response: Stain for immune cell markers (e.g., CD45 for leukocytes) to assess the level and chronicity of the host immune response.
FAQ 3: What are the best practices for designing a long-term survival study in rodent models?
A robust study design is paramount for generating reliable and interpretable data.
- Animal Model Selection: Rat models, particularly for aorta implantation, are well-established for initial in vivo validation of bioprinted vascular grafts due to their manageable size, cost-effectiveness, and well-characterized physiology [2].
- Appropriate Controls: Always include a control group. This could be animals implanted with a current clinical standard (e.g., an autograft or a synthetic graft like ePTFE) for a direct comparison of efficacy and performance [2].
- Time-Points for Analysis: Plan multiple, strategic endpoints. An early endpoint (e.g., 1-2 weeks) can assess acute inflammation and initial integration, while later endpoints (e.g., 3-6 months or longer) are crucial for evaluating long-term stability, chronic immune response, and calcification potential.
- Advanced Imaging: Utilize high-resolution imaging modalities throughout the study. Micro-CT angiography and magnetic resonance angiography (MRA) are excellent for non-invasively visualizing the 3D structure of the implanted vessel and its connection to the host vasculature, allowing for longitudinal monitoring of the same animal [77].
Troubleshooting Common Experimental Problems
The table below outlines specific issues, their potential causes, and actionable solutions based on recent research.
| Problem Observed | Potential Cause | Recommended Solution |
|---|---|---|
| Low Cell Viability in Pre-implant Constructs [6] [3] | High shear stress during bioprinting; cytotoxic bioink components; long print times. | - Use larger needle gauges and tapered tips to reduce shear. [6]- Systematically test print pressures and needle types with a 24-hour viability assay. [3]- Optimize bioink crosslinking to avoid harsh chemicals. [3] |
| Lack of Structural Integrity Post-Printing [6] | Insufficient or improper bioink crosslinking; low bioink viscosity. | - Characterize and optimize crosslinking method (photocrosslinking wavelength, ionic crosslinker concentration, thermal bed temperature). [6]- Perform rheological tests to ensure bioink has appropriate thixotropic behavior for 3D structure retention. [6] |
| Graft Occlusion (Thrombosis) [2] | Slow endothelialization; thrombogenic bioink surface. | - Incorporate pro-endothelialization factors (e.g., VEGF) into the bioink. [35]- Use a scaffold-free approach with high cell density to promote rapid tissue maturation and self-endothelialization. [2]- Ensure a confluent endothelial cell layer is present or can form quickly in vivo. |
| Poor Host Integration & Fibrosis [2] | Bioink is not permissive to host cell infiltration; strong foreign body response. | - Utilize bioinks that mimic native ECM (e.g., Hyaluronic Acid, Gelatin-based kits) to improve biocompatibility. [2]- Design bioinks with porosity or degradable properties to allow for host cell migration and tissue remodeling. |
| Graft Mechanical Failure (Aneurysm/Rupture) [2] | Mismatched mechanical properties between graft and native vessel; degradation rate exceeds tissue formation. | - Carefully match the mechanical strength of the target native vessel during bioink design. [2]- For scaffold-based approaches, ensure the degradation rate of the scaffold is coupled with the rate of new tissue formation by the cells. [2] |
Quantitative Data from a Recent In Vivo Validation Study
The following table summarizes key quantitative metrics from a landmark study that successfully developed and deployed a functional 3D-bioprinted blood vessel in a rat model, providing a benchmark for successful outcomes [2].
| Parameter | Method of Assessment | Result / Benchmark from Literature |
|---|---|---|
| Bioink Cell Density | Cell encapsulation and counting | 100 million cells/mL [2] |
| Cell Ratio (SMC:FC) | Bioink formulation | 70% Smooth Muscle Cells : 30% Fibroblasts [2] |
| In Vivo Patency | Direct observation & Doppler ultrasound | Well-incorporated into native vasculature; demonstrated physiological behavior [2] |
| Functional Outcome | Long-term survival study | Grafts were well-tolerated and functional over the long term [2] |
| Key Bioink Components | Material composition | Hyaluronic acid, Gelatin, Polyethylene glycol diacrylate (PEGDA) [2] |
Essential Research Reagents and Materials
This table lists critical reagents and their functions for conducting in vivo validation studies of bioprinted vascular tissues.
| Item | Function / Application in Research |
|---|---|
| Hyaluronic Acid-based Bioink Kit (e.g., HyStem-C) | Provides a biocompatible, crosslinkable hydrogel that mimics the native extracellular matrix, supporting cell adhesion, motility, and proliferation. [2] |
| Smooth Muscle Cells (SMCs) & Fibroblasts (FCs) | Primary cells used to fabricate the vessel wall, replicating the tunica media and adventitia of native vessels. [2] |
| Vascular Endothelial Growth Factor (VEGF) | A key growth factor added to bioinks to promote angiogenesis and endothelialization of the graft lumen. [35] |
| CD31 (PECAM-1) Antibody | An immunohistochemical marker used to identify endothelial cells and confirm the formation of a confluent lumen post-explant. [2] |
| Basic Fibroblast Growth Factor (bFGF) | A growth factor used as an additive to promote neovascularization and support vessel formation and maturation. [35] |
| Doppler Ultrasound System | Non-invasive imaging equipment for longitudinal monitoring of blood flow and graft patency in live animals. [2] |
Experimental Protocol: Implanting a Bioprinted Vessel in a Rodent Model
Protocol Title: Deployment and Long-Term Assessment of a 3D-Bioprinted Aortic Graft in a Rat Model.
Summary: This protocol outlines the key steps for the in vivo validation of a scaffold-free, bioprinted vascular conduit, from biofabrication to terminal analysis, based on a successfully demonstrated methodology [2].
Step-by-Step Methodology:
Bioink Preparation:
- Culture rat aortic smooth muscle cells (SMCs) and fibroblasts (FCs) separately, harvesting at passages 10 or less upon reaching 80-90% confluence.
- Prepare a hydrogel bioink using a commercial kit (e.g., HyStem-C containing hyaluronic acid, gelatin, and PEGDA).
- Encapsulate the cells at a high density (e.g., 100 x 10^6 cells/mL) in the crosslinked hydrogel mixture, using a ratio of 70% SMCs to 30% FCs. Keep the bioink on ice until printing to prevent premature crosslinking. [2]
Bioprinting the Vascular Conduit:
- Utilize a bioprinter capable of extrusion-based printing.
- Employ a rotating mandrel as a scaffold-free support structure to create the tubular shape of the blood vessel.
- Print the bioink directly onto the rotating mandrel to form the vascular conduit.
- Apply the appropriate crosslinking method (e.g., photo-crosslinking if using PEGDA) to finalize the structure's mechanical integrity. [2]
Surgical Implantation:
- Anesthetize the rat according to approved institutional animal care protocols.
- Perform a laparotomy or other appropriate surgical procedure to expose the target vessel (e.g., the abdominal aorta).
- Carefully clamp the native vessel and excise a segment.
- Anastomose the bioprinted vascular conduit to the two free ends of the native vessel using standard microsurgical suturing techniques.
- Release the clamps and confirm blood flow through the graft by visual inspection. [2]
Post-Operative Care and Monitoring:
- Administer post-operative analgesics and monitor animals daily for signs of distress or complications.
- Use non-invasive Doppler ultrasound at regular intervals (e.g., weekly for the first month, then bi-weekly) to monitor graft patency and blood flow dynamics. [2]
Terminal Analysis and Endpoint Assessment:
- At predetermined endpoints (e.g., 3 and 6 months), euthanize the animals humanely.
- Explant the graft along with adjacent native vessel tissue.
- Assess the graft for gross morphology, tissue incorporation, and signs of aneurysm or occlusion.
- Fix the explanted tissue for histological processing (e.g., paraffin or cryo-sectioning).
- Perform histological and immunohistochemical staining (H&E, Masson's Trichrome, CD31, SMA) to evaluate cellular organization, ECM deposition, endothelialization, and immune response. [2]
Visualizing the In Vivo Validation Workflow
The diagram below outlines the key stages of a long-term in vivo validation study for a bioprinted vascular graft.
Technical Support Center
Troubleshooting Guides
Guide 1: Addressing Common Extrusion-Based Bioprinting Failures
Problem: Needle clogging during bioprinting.
- Cause & Solution: Clogging often results from bioink inhomogeneity or particle agglomeration. First, ensure bioink homogeneity. If clogging persists, gradually increase extrusion pressure (up to 2 bar for cell-laden bioinks to protect viability). If extrusion does not occur, switch to a larger needle gauge. For bioinks containing nanoparticles, confirm particle size is smaller than the needle diameter to prevent blockages [6].
Problem: Poor structural integrity and layer stacking failure in multi-layer constructs.
- Cause & Solution: This is typically caused by insufficient bioink viscosity or inadequate crosslinking. Perform rheological tests to characterize the bioink's thixotropic nature. Optimize crosslinking parameters: for ionic crosslinking, characterize the ideal crosslinker concentration; for photocrosslinking, ensure correct wavelength and exposure; for thermal crosslinking, optimize build platform temperature. Providing sufficient crosslinking time between layers ensures bottom layers maintain structure to support subsequent layers [6].
Problem: Air bubbles in bioink leading to uneven extrusion and voids in constructs.
- Cause & Solution: Bubbles are introduced during bioink mixing and loading. To eliminate, centrifuge bioink at low RPM for 30 seconds. Avoid high RPM to prevent cell clustering. Alternatively, triturate bioink slowly by dispensing it gently along the walls of the falcon tube during mixing, which minimizes bubble formation compared to mixing within the solution itself [6].
Problem: Hydrogel does not support its shape after deposition.
- Cause & Solution: Low-viscosity hydrogels spread on the build surface. Solutions include: increasing hydrogel concentration if possible; using the Freeform Reversible Embedding of Suspended Hydrogels (FRESH) method with a support bath; employing coaxial bioprinting for rapid crosslinking; using sacrificial materials like Pluronic or Carbohydrate Glass as temporary supports; or creating interpenetrating polymer networks by mixing materials (e.g., alginate with GelMA) for combined rapid crosslinking [44].
Guide 2: Optimizing Printing Fidelity for Vascular Network Fabrication
Problem: Lack of perfusability in bioprinted vascular channels.
- Cause & Solution: This may stem from incomplete sacrificial ink removal or channel collapse. For sacrificial printing, ensure fugitive materials (e.g., Pluronic, carbohydrate glass) fully dissolve at low temperatures without residue. For direct printing, optimize bioink mechanical properties to withstand perfusion pressures. Incorporate mural cells (pericytes, smooth muscle cells) via co-culture to stabilize vessels and prevent regression. Implement immediate, gradual perfusion post-printing to promote endothelial maturation and barrier function [1] [78].
Problem: Low cell viability in bioprinted vascular constructs.
- Cause & Solution: Viability drops due to shear stress during extrusion, contamination, or nutrient diffusion limits. To mitigate: select needle gauges and extrusion pressures that minimize shear stress; use bioinks with protective rheological properties; maintain sterile technique with UV/HEPA filtration and 70% ethanol sterilization; and incorporate perfusable vascular networks from the outset to overcome diffusion limits, ensuring nutrient delivery to all cells within the construct [1] [6].
Problem: Poor integration of bioprinted vasculature with host blood vessels.
- Cause & Solution: Failure to incorporate key biological cues for host recruitment. Design bioinks to include angiogenic growth factors (VEGF, bFGF, PDGF) for controlled release to attract host endothelial cells and support anastomosis. Use natural ECM-derived bioinks (e.g., collagen, decellularized matrix) that present native adhesive ligands and are susceptible to cell-driven remodeling, facilitating integration [35] [78].
Frequently Asked Questions (FAQs)
FAQ 1: What is the fundamental difference between 3D printing and 3D bioprinting? The key difference lies in the material and the objective. Standard 3D printing uses materials like plastics or resins (filament) to create inert objects. Bioprinting uses bioinks, which are hydrogel-based formulations combining living cells, biomaterials, and biological factors, with the goal of creating biologically functional tissues [79].
FAQ 2: Why is vascularization critical for bioprinted tissues, and what is the diffusion limit? Vascular networks deliver oxygen, nutrients, remove waste, and enable immune cell trafficking. Without them, simple diffusion can only sustain cell viability within 100–200 µm of a nutrient source. Constructs thicker than this limit will develop a necrotic core, making vascularization essential for clinically relevant, volumetric tissues [1].
FAQ 3: What are the primary cell sources used in bioprinting vascularized tissues?
- Induced Pluripotent Stem Cells (iPSCs): Readily obtained and pluripotent, but require careful management of tumorigenic tendencies [35].
- Mesenchymal Stem Cells (MSCs): Valued for multipotency and ease of access [35].
- Endothelial Cells (ECs): Essential for forming the vessel lining. Often co-cultured with other cells (e.g., fibroblasts) to improve structural formation [1] [35].
- Pericytes and Smooth Muscle Cells: Crucial for recruiting and stabilizing newly formed endothelial tubes, promoting vessel maturation [78].
FAQ 4: What are the main challenges in achieving clinical translation of bioprinted vascularized tissues? Key challenges include: ensuring long-term perfusion and stability of printed vessels without leakage or thrombosis; achieving capillary-level resolution (<100 µm) with current bioprinting technologies; scaling up to clinically relevant tissue sizes; managing immunogenicity; and establishing clear regulatory pathways for these complex biological products [1] [79] [78].
FAQ 5: How can I select the right bioprinting modality for my vascular tissue application? The choice depends on the required resolution, cell density, and structural complexity.
- Extrusion-based Bioprinting: Ideal for high-cell-density bioinks and creating larger, perfusable channels. Its limitations include shear-induced cell stress [1].
- Digital Light Processing (DLP): Offers high resolution and speed for fabricating intricate channel geometries [1].
- Two-Photon Polymerization (TPP): Provides sub-micron resolution for mimicking fine capillary features, but has limited throughput [1].
- Melt Electrowriting (MEW): Capable of depositing ultrafine fibers to create highly organized, mechanically robust scaffolds that can guide tissue organization [1].
Data Presentation
Table 1: Comparative Analysis of Bioprinting Modalities for Vascular Tissue Engineering
| Bioprinting Modality | Typical Resolution | Key Strengths | Key Limitations | Clinical Relevance for Vascularization |
|---|---|---|---|---|
| Extrusion-Based Bioprinting | ~100 µm [1] | High cell-density printing; ability to create perfusable channels directly (e.g., via coaxial printing) or indirectly (via sacrificial printing) [1] | Shear-induced cell stress; limited resolution for capillaries [1] | Fabrication of vascular grafts, patches, and macro-vascular trees [1] |
| Droplet/Inkjet Bioprinting | Information Missing | High printing speed; good cell viability [1] | Limited bioink viscosity range; potential for nozzle clogging [1] | Precise placement of cells and growth factors to promote angiogenic patterning [1] |
| Digital Light Processing (DLP) | ~10-50 µm [1] | High resolution and printing speed; excellent for complex 3D channel geometries [1] | Limited to photocurable bioinks; potential cytotoxicity from photoinitiators [1] | Creating high-fidelity, complex vascular networks with smooth lumens [1] |
| Two-Photon Polymerization (TPP) | Sub-micron to ~1 µm [1] | Extremely high (sub-micron) resolution; can replicate fine capillary features [1] | Very low throughput; not suitable for large tissues [1] | Engineering microvascular features and niche environments [1] |
| Melt Electrowriting (MEW) | ~1-20 µm [1] | High resolution for synthetic polymer fibers; creates highly organized, mechanically strong scaffolds [1] | Generally requires post-processing to incorporate cells; limited materials [1] | Fabricating structured, anisotropic scaffolds to guide tissue alignment and vessel organization [1] |
Table 2: Research Reagent Solutions for Vascularized Tissue Constructs
| Reagent / Material | Function / Rationale | Example Application |
|---|---|---|
| GelMA (Gelatin Methacrylate) | A photocrosslinkable hydrogel derived from ECM; provides cell-adhesive motifs (RGD) and tunable mechanical properties [1] | Used as a primary bioink for creating 3D endothelialized networks; often combined with other materials like alginate for improved printability [44] |
| PEG (Polyethylene Glycol) | A synthetic, bio-inert polymer that can be functionalized with peptides (e.g., RGD) and made photocrosslinkable; allows precise control over mechanical and biochemical cues [1] | Serves as a synthetic bioink base for studying specific cell-matrix interactions in vasculogenesis [1] |
| Decellularized ECM (dECM) | Bioink derived from native tissues; preserves the complex, tissue-specific biochemical composition of the natural ECM [1] | Provides a tissue-specific microenvironment that enhances the maturation and function of bioprinted vascular cells [1] |
| Alginate | A natural polymer that undergoes rapid, gentle ionic crosslinking (e.g., with CaCl₂); useful for providing immediate structural integrity [1] [44] | Often blended with other hydrogels (e.g., GelMA) to create interpenetrating networks for improved printability and shape fidelity [44] |
| VEGF (Vascular Endothelial Growth Factor) | A key angiogenic growth factor that stimulates endothelial cell proliferation, migration, and survival [35] [78] | Incorporated into bioinks or scaffolds via controlled release systems to promote the formation of new vascular networks in vitro and host vessel ingrowth in vivo [35] |
| PDGF-BB (Platelet-Derived Growth Factor-BB) | A crucial factor secreted by endothelial cells to recruit and stabilize pericytes and vascular smooth muscle cells [78] | Used in co-culture systems to promote the maturation and stabilization of nascent bioprinted microvessels, preventing regression [78] |
Experimental Protocols
Protocol 1: FRESH Bioprinting of Collagen-Based Vascularized Constructs
Objective: To fabricate a collagen-based, cell-laden construct with embedded perfusable channels using the Freeform Reversible Embedding of Suspended Hydrogels (FRESH) technique [1].
Materials:
- Bioink: Neutralized, cell-laden collagen type I solution (e.g., 5-10 mg/mL).
- Support Bath: A yield-stress gel (e.g., gelatin microparticles) that temporarily supports the printed structure until crosslinking is complete.
- Sacrificial Ink: Pluronic F127 or similar fugitive material.
- Crosslinking Agent: For collagen, this is typically a pH and temperature change.
Methodology:
- Preparation: Load the collagen bioink and sacrificial ink into separate printing syringes. Maintain the collagen at a low temperature to prevent premature gelation.
- Printing:
- Print the sacrificial ink pattern within the support bath to define the internal channel network.
- Subsequently, print the cell-laden collagen bioink around the sacrificial structure to form the tissue construct's bulk.
- Crosslinking: After printing, raise the temperature of the entire construct to 37°C to induce collagen fibrillogenesis and gelation.
- Sacrificial Ink Removal: Cool the construct to 4°C to liquefy the sacrificial ink, then gently flush it out, leaving behind patent, perfusable channels.
- Seeding and Perfusion: Seed the lumen of the channels with endothelial cells (e.g., HUVECs) to form an endothelium. Connect the construct to a perfusion system to provide flow, which promotes endothelial maturation and barrier function [1].
Protocol 2: Coaxial Extrusion Bioprinting of Vascular Tubes
Objective: To directly fabricate endothelialized, tubular structures in a single step using a coaxial nozzle assembly [1].
Materials:
- Core Solution: A calcium chloride (CaCl₂) solution or a temporary sacrificial gel.
- Shell Bioink: A cell-laden alginate or alginate-composite bioink.
Methodology:
- Setup: Utilize a coaxial nozzle where the core and shell materials are extruded simultaneously through concentric nozzles.
- Printing:
- The shell bioink, containing endothelial cells and potentially mural cells, is extruded through the outer nozzle.
- The core crosslinker (CaCl₂) is simultaneously extruded through the inner nozzle. As the two streams meet, the alginate in the shell instantly ionically crosslinks at the interface, forming a hollow, tubular structure.
- Post-processing: If a sacrificial core was used, it is removed after printing to open the lumen. The resulting tubular construct can be immediately perfused.
- Maturation: Culture the bioprinted vessels under dynamic flow conditions. The applied shear stress will guide endothelial cell alignment along the flow direction and promote the formation of strong cell-cell junctions, leading to a mature, stable vessel [1].
Experimental Workflow Visualization
Diagram 1: Bioprinted Vasculature Integration Pathway
This diagram illustrates the critical steps and signaling events required for a bioprinted vascular construct to successfully integrate with the host circulatory system, leading to functional perfusion.
Diagram 2: Vascular Maturation Process
This diagram outlines the key cellular and molecular events in the maturation of a nascent endothelial tube into a stable, functional blood vessel.
Diagram 3: Bioprinting Troubleshooting Logic
This troubleshooting logic tree guides users from a common observed problem to a series of actionable solutions based on the underlying cause.
This technical support center provides targeted guidance for researchers working on the mechanical and functional characterization of bioprinted tissues, with a specific focus on assays critical for successful integration with host vasculature. The proper assessment of biomechanical properties, such as tissue stiffness and contractile forces, is not merely a quality control step; it is fundamental to ensuring that an implanted tissue can withstand hemodynamic forces, facilitate nutrient perfusion, and interact appropriately with the host's circulatory system. The following guides and protocols are designed to help you troubleshoot common experimental challenges and generate reliable, reproducible data for your research.
Frequently Asked Questions (FAQs)
1. Why is measuring the contractility of bioprinted vascular tissues important for integration? Contractility is a key functional property of vascular tissues, primarily driven by vascular smooth muscle cells. This function is essential for regulating blood pressure and flow. For a bioprinted vessel to integrate successfully, it must not only possess a passive mechanical strength to prevent rupture but also the active ability to contract and relax in response to physiological stimuli. A construct that lacks appropriate contractile function may fail to maintain hemodynamic stability or could be rejected by the host. Furthermore, contractile forces generated by cells are a primary driver of tissue maturation and remodeling post-printing, which influences long-term integration [80].
2. My bioprinted hydrogel contracts excessively, compromising its designed dimensions. How can I control this? Excessive hydrogel contraction is a common issue where cells, such as fibroblasts or osteoblasts, pull on and reshape their surrounding matrix. This can be controlled by modulating the cross-linking density of your bioink. As demonstrated in contraction assays, hydrogels with higher cross-linking density (referred to as HCALow condition) significantly limit cell-mediated contraction, whereas those with lower cross-linking (HCAHigh) enhance it [81]. You can adjust the concentration of cross-linkers (e.g., PEGDA in HyStem-C kits) or use biomaterials that are more resistant to proteolytic degradation to provide greater mechanical resistance to cellular traction forces [2] [81].
3. What is the significance of nanoindentation measurements in the context of host integration? Nanoindentation allows for the localized measurement of tissue stiffness (elastic modulus) at a micro-scale resolution. This is critical because the mechanical mismatch between an implanted construct and the host's native blood vessels can lead to severe complications, such as intimal hyperplasia, inflammation, or graft failure. By ensuring that your bioprinted tissue's stiffness mimics that of the target native vessel (e.g., the rat aorta has a reported modulus in the kilopascal range), you promote harmonious mechanical integration and reduce the risk of adverse biological responses [82] [2].
4. My nanoindentation data is highly variable across different locations on the same bioprinted sample. What could be the cause? High spatial variability in nanoindentation results often indicates inhomogeneity in the tissue construct. This can arise from several factors:
- Incomplete ECM Remodeling: The tissue may not be fully matured, leading to uneven distribution of newly secreted matrix proteins like collagen and elastin [80].
- Irregular Cell Distribution: Clustering of cells can create stiffer regions compared to acellular areas. Ensuring a homogeneous cell distribution in your bioink before printing is crucial.
- Inconsistent Cross-Linking: Variations in the cross-linking density within the hydrogel can create localized differences in mechanical properties. Verify that your cross-linking process (e.g., exposure to light for photo-crosslinkable inks, or immersion in ionic solution for alginate) is uniform across the entire construct [82].
Troubleshooting Guides
Guide 1: Troubleshooting Hydrogel Contraction Assays
Problem: Low or negligible contraction observed in free-floating hydrogel assays.
| Possible Cause | Diagnostic Steps | Solution |
|---|---|---|
| Excessively stiff bioink | Measure the storage modulus (G') of the bioink. Compare it to values reported permissive for contraction (e.g., in the low kilopascal range). | Reduce the cross-linker concentration or use a bioink with a lower base stiffness (e.g., a softer collagen formulation) [81]. |
| Low cell viability or density | Perform a live/dead assay post-printing. Check if cell density meets or exceeds typical thresholds (e.g., 10-30 million cells/mL) [2]. | Optimize printing parameters to enhance viability. Increase the cell density in the bioink. |
| Bioink resistant to proteolysis | Review the bioink composition. Some synthetic hydrogels lack MMP-sensitive degradation sites. | Incorporate MMP-degradable peptides (e.g., GGGVPMS↓MRGG) into your hydrogel to allow cells to remodel and contract the matrix [81]. |
Problem: High variability in contraction between replicate samples.
| Possible Cause | Diagnostic Steps | Solution |
|---|---|---|
| Inconsistent bioink formulation | Carefully document the batch preparation times, temperatures, and concentrations of all components. | Standardize the bioink preparation protocol, including mixing speed, duration, and order of component addition. |
| Non-uniform cell distribution | Let the bioink sit in a transparent cartridge and check for cell sedimentation under a microscope. | Gently mix the bioink immediately before loading and during printing if pauses occur. Use bioinks with rheological properties that discourage sedimentation [82]. |
Guide 2: Troubleshooting Nanoindentation Measurements
Problem: The force-depth curve during nanoindentation is erratic or "noisy."
| Possible Cause | Diagnostic Steps | Solution |
|---|---|---|
| Surface adhesion or capillarity | Check the environmental control. High humidity can cause a water meniscus to form between the tip and sample. | Perform indentation in a controlled humidity chamber or while the sample is submerged in PBS or culture medium. Use a larger tip radius if appropriate. |
| Sample too soft or hydrated | Visually assess if the sample deforms excessively around the indenter. | Use a larger indenter tip to distribute the load. Ensure the sample is properly supported on a rigid substrate. Increase the bioink's polymer concentration to enhance its mechanical integrity [82]. |
| Tip contamination | Inspect the indenter tip under a microscope for debris. | Clean the tip according to manufacturer guidelines using solvents and ultrasonic cleaning. |
Problem: Measured elastic modulus is significantly lower than literature values for native tissue.
| Possible Cause | Diagnostic Steps | Solution |
|---|---|---|
| Incomplete cross-linking | Test the modulus immediately after printing and again after 24-48 hours of culture. | Extend the cross-linking time or optimize the cross-linking initiator concentration. Allow for sufficient post-printing tissue maturation in a bioreactor [80]. |
| Insufficient ECM deposition | Perform biochemical assays (e.g., hydroxyproline for collagen) or immunohistochemistry to quantify ECM components after culture. | Extend the in vitro maturation time. Supplement the culture medium with ascorbic acid (50 µg/mL) to promote collagen synthesis by the cells [80]. |
| Poroelastic relaxation effects | Analyze the indentation data using a poroelastic model instead of a purely elastic model. | Use a slower indentation rate or include a hold period at peak load in the test protocol to allow for fluid flow within the hydrogel [82]. |
The following tables consolidate key quantitative data from the literature to serve as benchmarks for your experiments.
Table 1: Biomechanical Properties of Hydrogels and Native Tissues
| Material / Tissue | Elastic Modulus | Key Measurement Technique | Context / Notes |
|---|---|---|---|
| Alginate-Gelatin Bioink [82] | 54.6 - 64.1 kPa | Unspecified | Used for embedded printing of fibroblasts. |
| Alginate-Fibrin-HA Bioink [82] | 1.28 - 2.61 kPa | Unspecified | Used for Schwann cells and neurons. |
| Vascular Conduit (Bioprinted) [2] | Mimics native rat aorta | Functional implantation | Shows physiological behavior post-implantation in rats. |
| HCAHigh Condition [81] | Designed for high contraction | Macroscopic contraction assay | Hydrogel formulation tuned to enhance cell contractility. |
| HCALow Condition [81] | Designed to limit contraction | Macroscopic contraction assay | Increased cross-linking to resist cell-mediated contraction. |
Table 2: Contractility Assay Data from 3D Bioprinted Constructs
| Cell Type | Max Contraction Stress | Peak Time | Key Experimental Condition |
|---|---|---|---|
| Fibroblasts [81] | 1.1 x 10⁻¹⁴ Pa | Day 5 | Cultured in HCAHigh collagen hydrogel. |
| Osteoblasts [81] | 3.5 x 10⁻¹⁴ Pa | Day 5 | Cultured in HCAHigh collagen hydrogel. |
| SMCs & Fibroblasts [2] | Functional vessel contractility | Post-implantation | Co-printed with hyaluronic acid/gelatin/PEGDA bioink. |
Detailed Experimental Protocols
Protocol 1: Macroscopic Quantification of Contraction Forces in 3D Bioprinted Hydrogels
This protocol is adapted from a method that uses the work-energy theorem to non-destructively calculate contraction stresses from macroscopic measurements [81].
Materials:
- Bioink (e.g., collagen-based, alginate-gelatin, fibrin)
- Cells (e.g., fibroblasts, osteoblasts, vascular smooth muscle cells)
- 3D Bioprinter (extrusion-based)
- Multi-well culture plates (low-adhesion, U-bottom recommended)
- Calibrated imaging system (e.g., camera on a stereomicroscope)
- Image analysis software (e.g., ImageJ)
Method:
- Bioink Preparation and Printing: Prepare your cell-laden bioink according to your standardized protocol. The cell density should be high, typically in the range of 10-30 million cells/mL [2] [81]. Using a sterile, temperature-controlled bioprinter, print cylindrical hydrogel constructs of a defined initial radius (R₀) and height directly into the wells of a multi-well plate.
- Cross-Linking and Culture: Induce cross-linking appropriate for your bioink (e.g., ionic for alginate, thermal for gelatin, photo for PEGDA). After cross-linking, carefully add culture medium to each well without disturbing the hydrogels. Maintain the constructs in free-floating conditions to allow for unconstrained contraction.
- Longitudinal Imaging: At regular time intervals (e.g., daily for the first week), capture high-contrast images of the hydrogels from above. Include a scale bar in each image for calibration.
- Surface Area Measurement: Use image analysis software to measure the projected surface area (A) of each hydrogel at each time point.
- Force Calculation: The contraction force (F) generated by the cells can be calculated using a biomechanical model based on the work-energy theorem. The model relates the change in surface energy of the hydrogel to the work done by the cells. A simplified relationship for a cylindrical gel is:
- F ≈ k * (1/√A - 1/√A₀) (Where A₀ is the initial surface area, A is the surface area at time t, and k is a constant that incorporates the hydrogel's initial shear modulus and volume, which must be characterized independently) [81].
- Analysis: Plot the contraction force and stress over time to understand the dynamics of tissue maturation and contractility.
Protocol 2: Embedded 3D Bioprinting of a Multi-Layered Arterial Model
This protocol outlines the steps for creating a structured, multi-layered arterial tissue with enhanced contractile function, a key requirement for integration studies [83].
Materials:
- Support bath (e.g., Carbopol, gelatin slurry)
- Bioinks for different layers: Bioink A (for adventitia/outer layer, e.g., with fibroblasts), Bioink B (for media/middle layer, e.g., with SMCs in an aligned pattern), Bioink C (for intima/inner layer, e.g., with endothelial cells)
- Multi-material extrusion bioprinter
- Perfusion bioreactor (optional, for maturation)
Method:
- Material and Path Preparation: Prepare the support bath and load the different bioinks into separate printing cartridges. Using the printer's software, design 3D print paths that correspond to the targeted tissue characteristics. For the middle SMC layer, design a concentric spiral or circumferential path to promote cellular alignment, which is critical for generating strong contractile forces [83].
- Simulation (Recommended): Before printing, simulate the bioink flow rate, considering temperature-dependent viscosity changes, to ensure smooth extrusion and filament formation.
- Embedded Bioprinting: Fill a printing reservoir with the support bath. Perform the bioprinting sequentially from the outermost layer inwards:
- Print the adventitial layer (Bioink A).
- Print the medial layer (Bioink B) using the pre-designed aligned path onto the adventitia.
- Print the intimal layer (Bioink C) as a lumen inside the medial layer.
- Post-Printing Processing: After printing, carefully remove the construct from the support bath and transfer it to a culture system. For functional maturation, culture the vessel under dynamic conditions in a perfusion bioreactor that can apply cyclic radial strain, mimicking blood flow. This mechanical stimulation has been shown to enhance the expression of contractile proteins and improve tissue strength [80].
- Biological Characterization: Characterize the construct by assessing cell viability, layer-specific markers (e.g., α-SMA for SMCs, CD31 for ECs), and its contractile response to vasoactive agents.
Signaling Pathways and Workflows
Contractility and Integration Pathway
Nanoindentation Experimental Workflow
The Scientist's Toolkit: Research Reagent Solutions
| Item | Function in Experiment | Example & Notes |
|---|---|---|
| Hyaluronic Acid-Based Bioink (e.g., HyStem-C Kit) [2] | Provides a biocompatible, PEGDA-crosslinkable hydrogel that supports cell motility, adhesion, and proliferation. | Used in the bioprinting of functional rat aortas. Offers a balance of compression strength and hydration. |
| PEGDA (Polyethylene Glycol Diacrylate) [2] | Acts as a synthetic, tunable cross-linker. The degree of cross-linking directly controls hydrogel stiffness and resistance to cell-mediated contraction. | Concentration can be varied to create HCALow (high cross-link) or HCAHigh (low cross-link) conditions [81]. |
| Vascular Smooth Muscle Cells (SMCs) & Fibroblasts (FCs) [2] | The primary cellular components for building the media and adventitia layers of a blood vessel, responsible for contractile function and ECM secretion. | Typically co-printed at high densities (e.g., 100 million cells/mL total, in a 70% SMC / 30% FC ratio). |
| Collagen Type I Hydrogel [81] | A natural, MMP-sensitive bioink that allows for robust cell-mediated remodeling and contraction. Ideal for free-floating contraction assays. | The most abundant ECM protein; supports strong cell attachment and traction. |
| Ascorbic Acid (Vitamin C) [80] | A media supplement that acts as a essential cofactor for prolyl hydroxylase and lysyl oxidase, enzymes critical for collagen synthesis and cross-linking. | Promotes endogenous ECM deposition and maturation, increasing the tissue's mechanical strength over time. |
| Perfusion Bioreactor [80] | A system that provides dynamic culture conditions, including fluid shear stress and cyclic strain, to mimic the in vivo environment. | Crucial for maturing bioprinted vascular tissues, enhancing cell alignment, contractile function, and ECM organization. |
For researchers developing bioprinted tissues, achieving functional integration with host vasculature represents the critical bottleneck between laboratory success and clinical application. The survival of any implanted tissue construct depends on rapid anastomosis with the host's circulatory system to deliver oxygen and nutrients while removing waste products. This process of vascular integration is not merely a biological challenge but a regulatory one, where demonstrating consistent, safe, and predictable perfusion is paramount for approval by agencies like the FDA and EMA. This technical support guide addresses the specific regulatory and standardization hurdles you face in proving your bioprinted vasculature can reliably connect with a patient's own blood vessels, providing actionable troubleshooting advice and clear protocols to strengthen your path to clinical translation.
Understanding the Regulatory Framework
Global Regulatory Classification
Bioprinted constructs designed for vascular integration are typically classified as Tissue Engineered Medical Products (TEMPs) or Advanced Therapy Medicinal Products (ATMPs) [84] [85]. Your first step is determining how regulatory bodies classify your specific product, as this dictates the entire approval pathway.
- United States (FDA): The FDA regulates bioprinted products through a multi-center approach. The Center for Biologics Evaluation and Research (CBER) often takes the lead for products involving cells and biologics, while the Center for Devices and Radiological Health (CDRH) may be involved if the product has a significant device-like component, such as a structural scaffold [86]. The classification (Class I, II, or III) is based on risk, with most vascularized constructs falling into Class III, requiring the most stringent Premarket Approval (PMA) [86].
- European Union: In the EU, bioprinted constructs are regulated under the Advanced Therapy Medicinal Products (ATMP) regulation. You must submit a marketing authorization application to the European Medicines Agency (EMA) for centralized approval [84] [85].
- Other Regions: Countries like China, Australia, Japan, and South Korea have their own evolving regulatory frameworks, often drawing parallels from existing categories for 3D-printed medical devices, injectable hydrogels, and tissue-engineered products [84] [85].
Table 1: Global Regulatory Agencies and Pathways for Bioprinted Vascular Constructs
| Region | Primary Regulatory Body | Product Classification | Key Approval Pathway |
|---|---|---|---|
| United States | Food and Drug Administration (FDA) | Tissue Engineered Medical Product (TEMP), Biologic/Device Combination | Premarket Approval (PMA) or 510(k) if a predicate device exists [86] |
| European Union | European Medicines Agency (EMA) | Advanced Therapy Medicinal Product (ATMP) | Centralized Marketing Authorization [84] |
| International | Various (e.g., NMPA in China, TGA in Australia) | TEMP, ATMP, or as a new category | Varies; requires early engagement with the specific agency [85] |
Frequently Asked Questions: Regulatory Strategy
Q: My bioprinted vascularized liver model is for drug testing, not implantation. Does it still need regulatory approval? A: Yes, but the pathway is different. While you are not seeking approval for implantation, the model itself, especially if used for regulatory decision-making in drug development, may need to be validated and manufactured under Quality Systems (QS) regulations to ensure its consistency and reliability [86].
Q: What is the single biggest regulatory challenge for vascularized constructs? A: A significant challenge is the absence of time-resolved evaluation standards [9]. Regulators are not just looking for the presence of perfusable channels at a single time point but require evidence of functional maturation, stability, and non-thrombogenic integration over time. You must design your studies to capture this dynamic progression, from initial anastomosis to long-term stability [9] [31].
Q: We are a university lab planning first-in-human trials. What should we prioritize? A: Prioritize documentation and quality control from the very beginning. Even at the research stage, adopt Good Manufacturing Practice (GMP)-like conditions for your critical processes. Meticulous record-keeping of raw materials (e.g., bioink Certificates of Analysis), cell sourcing, and process parameters will be invaluable when you eventually engage with regulators [84] [86].
Standardization and Quality Control
A lack of standardization is a major barrier to clinical translation. The table below outlines key parameters that require standardized measurement and control for vascularized constructs.
Table 2: Key Quality Control Parameters for Bioprinted Vascular Constructs
| Parameter Category | Specific Tests & Metrics | Purpose & Rationale |
|---|---|---|
| Structural Fidelity | - Filament diameter/diameter consistency- Pore size and interconnectivity- Layer adhesion fidelity | Ensures the printed architecture matches the design and allows for fluid perfusion and cell infiltration [87] [86] |
| Mechanical Properties | - Tensile and compressive strength- Elastic modulus (stiffness)- Burst pressure resistance | Confirms the construct can withstand handling and in vivo physiological pressures without failure [2] [86] |
| Biological Performance | - Cell viability & proliferation post-printing- Endothelial barrier function (e.g., permeability assays)- Expression of maturation markers (VE-cadherin, α-SMA) [9] | Verifies biological functionality, including vessel stability and appropriate barrier formation [31] [87] |
| Physicochemical Properties | - Bioink pH (6.5-7.4) and osmolality- Degradation rate matching tissue formation- Sterility and endotoxin testing | Maintains a biocompatible microenvironment and prevents inflammatory responses [86] |
Troubleshooting Guide: Common QC Failures
Problem: Poor Cell Viability in Bioprinted Vascular Channels
- Potential Cause 1: Shear stress during extrusion. The pressure and nozzle geometry can damage cells.
- Solution: Optimize printing pressure and temperature. Use a larger nozzle diameter or a bioink with higher shear-thinning properties to reduce stress [30].
- Potential Cause 2: Inadequate perfusion post-printing. Cells at the core of thick constructs die without nutrients.
- Solution: Integrate a perfusion bioreactor immediately after printing to ensure continuous medium flow through the channels [27].
Problem: Lack of Functional Anastomosis with Host Vasculature In Vivo
- Potential Cause 1: Immature endothelial lining. The printed endothelium may not express the right adhesion molecules for host cells to connect to.
- Solution: Pre-mature your constructs in a bioreactor with flow-induced shear stress to enhance endothelial junction formation (e.g., upregulation of VE-cadherin) [9] [31].
- Protocol: Flow-Mediated Maturation.
- Seed channels: Seed bioprinted channels with human endothelial cells (HUVECs or iPSC-ECs) at a high density.
- Mount in bioreactor: Connect the construct to a flow-perfusion bioreactor system.
- Initiate flow: Begin with a low, steady flow rate (e.g., 0.1 dyne/cm²) for 24 hours.
- Increase stress: Gradually increase the shear stress to physiological levels (5-20 dyne/cm²) over 3-7 days.
- Assess maturity: Confirm maturation via immunostaining for VE-cadherin (junctions) and PECAM-1 (CD31), and measure albumin permeability across the endothelial barrier [9].
Problem: Inconsistent Bioink Properties Leading to Print Failures
- Potential Cause: Batch-to-batch variability in natural polymer bioinks (e.g., collagen, alginate).
- Solution: Implement rigorous pre-print testing of bioink viscosity, gelation kinetics, and pH for every new batch. Adopt synthetic or hybrid bioinks with more reproducible properties where possible [86]. Maintain detailed documentation of all material handling.
The following diagram illustrates the core logical relationship and workflow for the regulatory pathway of a bioprinted vascular construct.
The Scientist's Toolkit: Essential Reagents and Materials
Success in bioprinting vascularized tissues relies on a carefully selected toolkit. The table below details key reagents and their functions based on current research.
Table 3: Research Reagent Solutions for Vascularized Bioprinting
| Reagent/Material | Function & Role in Vascularization | Example & Notes |
|---|---|---|
| Hyaluronic Acid (HA) based Hydrogels | Provides a tunable, cell-adhesive microenvironment; allows for cell motility and capillary formation. | HyStem-C Kit [2]: Used in bioprinting a functional rat aorta, provides compression strength and supports SMC/fibroblast proliferation. |
| Gelatin-Based Bioinks | Offers cell-binding motifs (e.g., RGD sequences); often combined with other polymers to improve printability and mechanical properties. | GelMA (Gelatin Methacryloyl): |
| A photocrosslinkable hydrogel that allows precise control over stiffness and supports endothelial network formation [9]. | ||
| PEGDA (Polyethylene Glycol Diacrylate) | A synthetic polymer used as a crosslinker; provides mechanical integrity and allows control over degradation kinetics. | Used in the HyStem-C Kit [2] to crosslink HA and gelatin, creating a stable 3D network for the vascular conduit. |
| Decellularized ECM (dECM) | Provides a complex, tissue-specific biochemical milieu that enhances cell differentiation and function. | Liver dECM bioink: Can be used to create a more physiologically relevant microenvironment for vascularized liver models, promoting tissue-specific maturation [30]. |
| Recombinant Growth Factors | Directs cellular behavior, including angiogenesis and mural cell recruitment. | VEGF: Guides endothelial sprouting. PDGF-BB: Critical for recruiting pericytes and smooth muscle cells to stabilize nascent vessels [9]. Use controlled release systems to maintain efficacy. |
| Collagen | The most abundant natural protein in the body; forms the structural basis of many native tissues. | FRESH Bioprinting [27]: Enables high-fidelity 3D printing of pure collagen structures, allowing creation of perfusable, fully biologic vascular channels at capillary scale (~100 µm). |
The following workflow summarizes the key stages and biological checkpoints for developing a functional, implantable vascularized construct.
Navigating the path to the clinic for bioprinted tissues with integrated vasculature is a complex but surmountable challenge. The key is to adopt a regulatory and standardization mindset early in your R&D process. By focusing on robust QC metrics, documenting everything, designing studies that demonstrate functional maturation over time, and proactively engaging with regulatory bodies, you can build the compelling evidence needed for clinical translation. The future of bioprinting in medicine depends not just on our ability to create complex structures, but on our commitment to proving their safety and efficacy through rigorous, standardized science.
Conclusion
The integration of bioprinted tissues with the host vasculature is advancing rapidly, propelled by innovations in bioink design, bioprinting technologies, and a deeper understanding of vascular biology. The convergence of scaffold-free techniques, AI-driven design, and nanotechnology is enabling the creation of hierarchical, perfusable vascular networks that support long-term tissue survival and function. Future progress hinges on overcoming persistent challenges in immune compatibility, scalable manufacturing, and functional maturation. As validation methods become more sophisticated and regulatory pathways clearer, the field moves closer to its ultimate goal: the clinical translation of complex, vascularized tissues that can truly regenerate function and address the critical shortage of donor organs.
References
- 1. Three-Dimensional Printing and Bioprinting Strategies for ... [https://pmc.ncbi.nlm.nih.gov/articles/PMC12430996/]
- 2. Development and deployment of a functional 3D-bioprinted ... [https://www.nature.com/articles/s41598-025-93276-y]
- 3. Troubleshooting Guide: 3D Bioprinted Culture Viability - Allevi [https://www.allevi3d.com/troubleshooting-issues-with-3d-viability/]
- 4. A review on cell damage, viability, and functionality during 3D ... [https://mmrjournal.biomedcentral.com/articles/10.1186/s40779-022-00429-5]
- 5. A Review of Bioprinting Techniques, Scaffolds, and Bioinks [https://pmc.ncbi.nlm.nih.gov/articles/PMC11447703/]
- 6. Bioprinting 101: Troubleshooting common challenges and ... [https://nextbiginnovationlabs.com/bioprinting-101-troubleshooting-common-challenges-and-solutions/]
- 7. 3D Bioprinting of Living Tissues - Wyss Institute [https://wyss.harvard.edu/technology/3d-bioprinting/]
- 8. Beginner's Guide to Bioprinting [https://meow.wse.jhu.edu/protocols/beginners-guide-to-bioprinting/]
- 9. Bioprinting Vascularized Constructs for Clinical Relevance [https://pmc.ncbi.nlm.nih.gov/articles/PMC12385750/]
- 10. Engineering branching morphogenesis using cell ... [https://www.sciencedirect.com/science/article/abs/pii/S2405886623000040]
- 11. Decoding tumor angiogenesis: pathways, mechanisms, and ... [https://biomarkerres.biomedcentral.com/articles/10.1186/s40364-025-00779-x]
- 12. Engineering in vitro vascular microsystems [https://www.nature.com/articles/s41378-025-00956-w]
- 13. Scientists Can Now Design Intricate Networks of Blood ... [https://singularityhub.com/2025/06/16/scientists-can-now-design-intricate-networks-of-blood-vessels-for-3d-printed-organs/]
- 14. Vascular endothelial growth factor signaling in health and ... [https://pmc.ncbi.nlm.nih.gov/articles/PMC12086256/]
- 15. JCI - Blood vessel maturation : vascular development comes of age [https://www.jci.org/articles/view/6127]
- 16. IDIBELL researchers generate heart tissue by 3D ... [https://idibell.cat/en/2025/06/idibell-researchers-generate-heart-tissue-by-3d-bioprinting-for-the-first-time/]
- 17. Wall-Resident CD44+ Multipotent Stem Vascular ... | PLOS One Cells [https://journals.plos.org/plosone/article?id=10.1371/journal.pone.0020540]
- 18. Vascular tissue engineering: progress, challenges, and ... [https://pmc.ncbi.nlm.nih.gov/articles/PMC5849079/]
- 19. Extracellular Vesicles Mediate Communication between Endothelial... [https://pubmed.ncbi.nlm.nih.gov/35008757/]
- 20. Protocol for designing and bioprinting multi-layered ... [https://pmc.ncbi.nlm.nih.gov/articles/PMC10436237/]
- 21. Three-Dimensional Printing and Bioprinting Strategies for ... [https://www.mdpi.com/2073-4360/17/17/2337]
- 22. Stability and function of adult vasculature is sustained by ... [https://www.nature.com/articles/ncomms10960]
- 23. Integrating functional vasculature into organoid culture [https://pmc.ncbi.nlm.nih.gov/articles/PMC9262412/]
- 24. Rapid generation of functional vascular organoids via ... [https://www.sciencedirect.com/science/article/abs/pii/S1934590925002218]
- 25. 3D Bioprinting of Vascularized Tissues for in vitro and in ... [https://www.frontiersin.org/journals/bioengineering-and-biotechnology/articles/10.3389/fbioe.2021.664188/full]
- 26. Bio-inspired electronics: Soft, biohybrid, and “living” neural ... [https://pmc.ncbi.nlm.nih.gov/articles/PMC11845577/]
- 27. FRESH bioprinting brings vascularized tissue one step closer [https://engineering.cmu.edu/news-events/news/2025/04/23-bioprinting-tissue.html]
- 28. Organ-Specific Strategies in Bioprinting - PubMed Central - NIH [https://pmc.ncbi.nlm.nih.gov/articles/PMC12565448/]
- 29. New 3D bioprinting technique may improve production of ... [https://news.mit.edu/2025/new-3d-bioprinting-technique-may-improve-production-engineered-tissue-0917]
- 30. 3D Bioprinting in Tissue Engineering: Advancements, ... [https://www.jscimedcentral.com/jounal-article-info/JSM-Regenerative-Medicine-and-Bioengineering/3D-Bioprinting-in-Tissue-Engineering:-Advancements,-Challenges,-and-Pathways-to-Clinical-Translation-12103]
- 31. Bioprinted vascular tissue: Assessing functions from ... [https://www.sciencedirect.com/science/article/pii/S259000642300306X]
- 32. Bioprinting in Vascularization Strategies - PMC [https://pmc.ncbi.nlm.nih.gov/articles/PMC6305822/]
- 33. High-resolution lithographic biofabrication of hydrogels ... [https://www.sciencedirect.com/science/article/pii/S2590006421000703]
- 34. Volumetric additive manufacturing of pristine silk-based ... [https://www.nature.com/articles/s41467-023-35807-7]
- 35. 3D Bioprinting for Vascularization - PMC [https://pmc.ncbi.nlm.nih.gov/articles/PMC10215405/]
- 36. Progress in scaffold - free for cardiovascular medicine bioprinting [https://pubmed.ncbi.nlm.nih.gov/29536627/]
- 37. Scaffold-Free Vascular Tissue Engineering Using Bioprinting [https://pmc.ncbi.nlm.nih.gov/articles/PMC2748110/]
- 38. (Open Access) Principles of the Kenzan for Robotic Cell... Method [https://scispace.com/papers/principles-of-the-kenzan-method-for-robotic-cell-spheroid-2gz3ihykm9]
- 39. Position of the Kenzan in the Space-Time of Method ... Tissue [https://link.springer.com/chapter/10.1007/978-3-030-58688-1_2]
- 40. Cardiac Tissue Creation with the Kenzan | CoLab Method [https://colab.ws/articles/10.1007%2F978-3-030-58688-1_8]
- 41. Freeform 3D printing of vascularized tissues - PubMed Central [https://pmc.ncbi.nlm.nih.gov/articles/PMC8638074/]
- 42. Multiscale bioprinting of vascularized models [https://www.sciencedirect.com/science/article/abs/pii/S014296121830560X]
- 43. GRACE ERA V2.0: The Official User Manual [https://gracekits.com/instructions.php]
- 44. Hydrogel Extrusion Troubleshooting Guide - Allevi [https://www.allevi3d.com/hydrogel-extrusion-troubleshooting/]
- 45. Bioprinted vascular tissue: Assessing functions from cellular ... [https://pmc.ncbi.nlm.nih.gov/articles/PMC10632537/]
- 46. Taking It Personally: 3D Bioprinting a Patient-Specific Cardiac ... [https://pmc.ncbi.nlm.nih.gov/articles/PMC8945185/]
- 47. A critical review on advances and challenges of bioprinted ... [https://www.sciencedirect.com/science/article/abs/pii/S174270612400583X]
- 48. Three-dimensional bioprinting of artificial blood vessel [https://pmc.ncbi.nlm.nih.gov/articles/PMC10261152/]
- 49. The Long-Road to Develop Custom-Built Livers [https://pmc.ncbi.nlm.nih.gov/articles/PMC10724374/]
- 50. Three Dimensional Bioprinting for Hepatic Tissue Engineering [https://pmc.ncbi.nlm.nih.gov/articles/PMC10764711/]
- 51. Bioprinted Patches for Heart Repair [https://www.medicaldesignbriefs.com/component/content/article/48305-bioprinted-patches-for-heart-repair]
- 52. Harnessing the power of bioprinting for the development ... [https://www.sciencedirect.com/science/article/pii/S2452199X24003785]
- 53. 2025 International Conference on Biofabrication (14-17 ... [https://indico3.conference4me.psnc.pl/event/86/contributions/11470/]
- 54. In vitro pre-vascularization strategies for tissue engineered ... [https://pmc.ncbi.nlm.nih.gov/articles/PMC7575626/]
- 55. State-of-the-Art Strategies for the Vascularization of Three- ... [https://www.vsijournal.org/journal/view.html?doi=10.5758/vsi.2019.35.2.77]
- 56. Neural tissue-engineered prevascularization in vivo ... [https://www.sciencedirect.com/science/article/pii/S2590006423001783]
- 57. Strategies Affording Prevascularized Cell-Based ... [https://pmc.ncbi.nlm.nih.gov/articles/PMC3913389/]
- 58. Vascularization strategies for bioprinting [https://www.sciencedirect.com/science/article/pii/S2214785322065208]
- 59. stromal vascular fraction versus adipose tissue-derived ... [https://jbioleng.biomedcentral.com/articles/10.1186/s13036-018-0118-3]
- 60. 3D bioprinting strategy for engineering vascularized tissue ... [https://pmc.ncbi.nlm.nih.gov/articles/PMC10370342/]
- 61. Advanced Strategies for 3D Bioprinting of Tissue and Organ ... [https://pmc.ncbi.nlm.nih.gov/articles/PMC8708555/]
- 62. Bioprinting Scaffolds for Vascular Tissues and Tissue ... [https://pmc.ncbi.nlm.nih.gov/articles/PMC8615027/]
- 63. Vascular Tissue Engineering: Progress, Challenges, and ... [https://www.sciencedirect.com/science/article/pii/S1934590918300717]
- 64. Alginate-based 3D bioprinting strategies for structure–function ... [https://pubs.rsc.org/en/content/articlehtml/2025/tb/d5tb01489a?page=search]
- 65. New Frontiers in 3D Printing Using Biocompatible Polymers [https://pmc.ncbi.nlm.nih.gov/articles/PMC12386597/]
- 66. Current Standing and Future Potential of 3D Bioprinting and ... [https://scifiniti.com/3105-0387/2/2025.0015]
- 67. Light-based 3D bioprinting techniques for illuminating the ... [https://www.sciencedirect.com/science/article/pii/S2590006424003478]
- 68. How to troubleshoot bioreactor contamination [https://infors-ht.com/en/blog/how-to-troubleshoot-bioreactor-contamination]
- 69. Troubleshooting Common Issues in Bioreactor System ... [https://www.ask.com/culture/troubleshooting-common-issues-bioreactor-system-operations]
- 70. Bioreactor Troubleshooting Guide [https://quneup.com/resources/bioreactor-troubleshooting-guide/]
- 71. Advances in Modeling the Inner Blood–Retinal Barrier [https://pmc.ncbi.nlm.nih.gov/articles/PMC12472624/]
- 72. Microfluidic Perfusable Pathological Vasculature for ... [https://pmc.ncbi.nlm.nih.gov/articles/PMC12446761/]
- 73. Confined bioprinting and culture in inflatable bioreactor for ... [https://www.nature.com/articles/s41598-024-60382-2]
- 74. Advancements in tissue and organ 3D bioprinting [https://www.sciencedirect.com/science/article/pii/S0264127524002260]
- 75. Development of 3D bioprinting: From printing methods to ... [https://www.sciencedirect.com/science/article/pii/S1818087619311869]
- 76. 2.9. Perfusion through Bioprinted Vessels. [https://bio-protocol.org/exchange/minidetail?id=18877525&type=30]
- 77. Synergistic coupling between 3D bioprinting and ... [https://pmc.ncbi.nlm.nih.gov/articles/PMC10658349/]
- 78. Bioprinting Vascularized Constructs for Clinical Relevance [https://www.mdpi.com/2310-2861/11/8/636]
- 79. FAQ: bioprinting [https://www.regmednet.com/faq-bioprinting/]
- 80. Mechanical Considerations of Bioprinted Tissue [https://www.frontiersin.org/journals/mechanical-engineering/articles/10.3389/fmech.2020.568726/full]
- 81. Quantification of cell contractile behavior based on non- ... [https://www.sciencedirect.com/science/article/abs/pii/S1751616122002752]
- 82. Biomechanical factors in three-dimensional tissue bioprinting [https://pmc.ncbi.nlm.nih.gov/articles/PMC7780402/]
- 83. Protocol for embedded 3D bioprinting of arterial models ... [https://www.sciencedirect.com/science/article/pii/S2666166725002266]
- 84. Current standards and ethical landscape of engineered ... [https://pmc.ncbi.nlm.nih.gov/articles/PMC8330463/]
- 85. Bioprinted Constructs in the Regulatory Landscape [https://pubmed.ncbi.nlm.nih.gov/41099479/]
- 86. 3D Bioprinting in 2025: What Medical Device Makers Need to ... [https://diasurgemed.com/ng/3d-bioprinting-in-2025-what-medical-device-makers-need-to-know-now/]
- 87. Standardized 3D Bioprinting of Soft Tissue Models with ... [https://www.sciencedirect.com/science/article/pii/S247263032201408X]